Table of Contents
ToggleOne of the most crucial accounting procedures in QuickBooks is reconciliation. Ensuring that all of your financial transactions balance out, enables you to maintain track of your company’s finances. This indicates that the balance of your debits and credits is equal. Understanding how to reconcile Bank and Credit Card Accounts in QuickBooks desktop can be challenging, but you can make it simpler by adhering to a few general rules when you set up your reconciliation process for the first time.
This article outlines a comprehensive guide on reconciling bank and credit card accounts in QuickBooks Desktop. However, it covers everything you need to know to begin.
Reconcile Bank and Credit Card Accounts in QuickBooks Desktop
Step 1: Examine your opening balance
- Before you begin the reconciliation process, make sure to back up your company file.
- Pay attention to the opening balance, if you are reconciling an account for the first time.
Step 2: Prepare for the reconciliation
To ensure a smooth reconciliation process, make sure to include all transactions that occurred during the bank statement period you intend to reconcile. If you encounter transactions that have not yet cleared your bank and are not reflected on your statement, it is advisable to postpone entering them.
Step 3: Start the Reconciliation Process in QuickBooks Desktop
Reconcile each month one by one and if you’re doing this for multiple months make sure to start with the oldest bank statement.
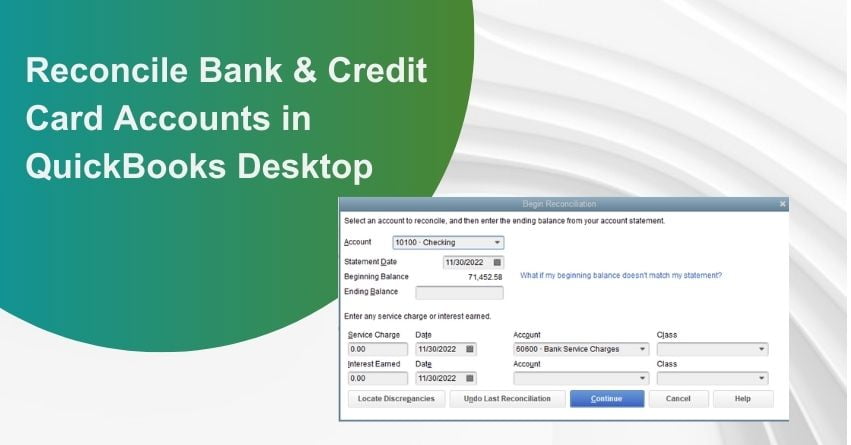
– Begin Reconciliation Window
In this window, you can select the bank or credit card account that requires reconciliation, and review all the associated information. It is crucial to ensure that all the information presented in this window is accurate before proceeding to the next step.
- To access the Begin Reconciliation window, navigate to the Banking menu and select Reconcile.
- From there, choose the bank or credit card account that requires reconciliation in the Account field.
- The Statement Date is automatically generated, typically 30 or 31 days after the previous statement date, but can be adjusted as needed.
- Quickbooks automatically fills the beginning balance.
- Manually enter the Ending Balance from your statement in the designated field.
- Fill in the Service Charge and interest earned.
- Make sure to input those amounts into the appropriate sections, do not duplicate transactions that have already been entered.
- Check the information entered and go ahead with the Continue or OK.
Follow the step if the beginning balance doesn’t match your statement.
- Select Locate Discrepancies to access available reports that can assist in identifying discrepancies and other reconciliation issues
- And choose to Undo and restart Reconciliation if necessary.
Step 4: Compare your bank statement and QuickBooks
To reconcile, simply compare the transactions listed on your bank statement with those in QuickBooks, ensuring that all relevant dates and transactions have been accurately included. After reviewing your statement, you can confirm that all transactions have been correctly entered into QuickBooks.
– Before you begin
- If you want to view only the transactions within the current statement period, select the option to Hide transactions after the statement’s end date.
- When reconciling a credit card account, it’s best to focus on one section at a time, such as Charges and Cash Advances or Payments and Credits.
- For online banking reconciliation, choose the “Matched” option and input the Statement Ending Date from your bank statement to automatically select QuickBooks’ downloaded and matched transactions.
- Additionally, to sort the list, simply click on the header or title of a column.
- If QuickBooks shows more transactions than those on your bank statement, refer to the list for accuracy.
– Match your transactions
- To start reconciling, begin with the first transaction on your bank statement and compare it with the corresponding entry in QuickBooks’ Reconciliation window.
- If they match, put a checkmark in the checkmark column to reconcile the transaction.
- Repeat this process for all transactions on the statement, ensuring that only cleared transactions are marked as reconciled and that the Cleared Balance amount reflects any changes made during the reconciliation process. Do not mark a transaction as reconciled if it does not appear on your statement.
- Additionally, ensure that everything matches up, and compare the total number and amount of transactions in QuickBooks to those provided in the bank statement summary.
- If you need to edit or obtain more information on a transaction, select it and choose Go To or double-click on it.
- If you need to modify the information entered in Step 3, select Modify, and review the service charges, interest, and ending balance details.
- Finally, after completing the reconciliation, the difference between the bank statement and QuickBooks should be zero, which indicates that all transactions have been recorded correctly. Select, Reconcile now.
– Review the reconciliation
After finishing the reconciliation, you can choose to view the Reconciliation report by selecting “Display” or print it by selecting “Print.”
Your task is now complete.
To access the Reconciliation report at a later time, follow these steps:\
- Click on the Reports menu and next go to the Reports Center.
- Search for and open the Previous Reconciliation report.
- Choose the reconciled account.
- Select the version of the report that you want to view – Detail, Summary, or Both.
to resolve your query in no-time.
Why do you Need to Undo your Last Reconciliation?
If you are unable to locate any discrepancies during reconciliation or need to modify the opening balance date, you may need to undo the last reconciliation. By doing so, previously cleared transactions will become uncleared, and the beginning balance will revert to its previous state.
The Reconcile Screen is where you can narrow down the transactions you want to compare with your bank statement and select which ones to clear. If all the transactions on your statement have been selected and there are no discrepancies, you can simply click the Reconcile Button to complete the reconciliation process.
You can choose to check the Hide transactions after the statement end date checkbox to display only the transactions within the statement period you are currently reconciling. This can be helpful if you are catching up on the reconciliation process and want to avoid confusion.
The list of transactions entered in QuickBooks Desktop is divided into two sections: Checks/Payments (Money out) and Deposits and other Credits (Money in). If you are reconciling a credit card account, the sections will be Charges and Cash Advances (purchases) and Payments and Credits (payments to the credit card company). Make sure to compare the transactions listed in QuickBooks against those on your bank or credit card statement. Only select the transactions that appear on your statement and ensure that the amounts match. You will notice that as you select transactions, the Cleared Balance will change accordingly.
To streamline the reconciliation process, the Reconcile Screen offers various options:
1. Hide transactions after the statement end date Checkbox:
It filters out transactions that fall outside the statement period you are reconciling.
2. List of transactions entered in QuickBooks Desktop:
It is categorized as either Checks / Payments or Deposits and other Credits. If reconciling a credit card account, these categories change to Charges and Cash Advances, and Payments and Credits. To reconcile, you should only mark transactions that appear on your bank or credit card statement, and ensure the amounts match. As you select transactions, the Cleared Balance updates, and you can verify the total number and amount of cleared transactions in the Items you have marked cleared section.
3. Items you have marked cleared:
This section will display the total number and the total amount of Deposits and checks you’ve selected. Some banks provide a similar summary of transactions on the statement. This section will save you time if you need to check any possible discrepancies.
4. The Mark All/Unmark All Options buttons:
These can be used to quickly select or deselect transactions. When all reconciled transactions match, the Reconcile Screen should show no difference between the ending and clearing balances.
5. Go To Option:
You can click on this button to access and make any necessary edits to a transaction directly from the reconciliation window. This option is useful if you need to make minor modifications to a transaction.
6. Matched button:
If the account being reconciled is linked to bank feeds, clicking this button will automatically select all of the downloaded and auto-matched transactions.
Also Read:- How to Download Bank Feed Transactions into QuickBooks Desktop?
7. Columns to Display button:
Click on this button to select which fields you want to display in the reconciliation window.
8. Modify button:
Click on this button if you need to make any last-minute changes to the information you entered in the Begin Reconciliation window.
This section displays important reconciliation figures that will help you track the progress of the process:
9. Service Charge:
Interest Earned, and Ending Balance are all based on the figures you entered in the Begin Reconciliation window.
10. Cleared Balance:
The figure decreases as you select or clear checks, and payments, and increases as you select/clear deposits and other credit amounts.
11. Difference:
It represents the variance between the beginning balance you entered and the cleared balance. Ideally, this figure should be zero, indicating that all transactions have been reconciled.
12. Leave option:
If you need to work on another account or edit transactions, click the Leave option to exit the Reconcile window.
14. Reconcile Now Option:
Once you have selected all transactions that appear on your statement, click the Reconcile Now option to complete the reconciliation.
Conclusion
If you need additional guidance on reconciling in QuickBooks Desktop or require any other QuickBooks support, please contact us through our Help Desk Number and speak with our team of Certified QuickBooks ProAdvisors. They will be happy to assist you further.
Frequently Asked Questions
1. Access the Banking menu and choose “Enter Credit Card Charges.”
2. Pick the relevant credit card account from the dropdown labeled “Credit Card.“
3. By default, the transaction type is set to “Purchase/Charge.” If you’re recording a credit or refund you received through the credit card, change it to “Refund/Credit.”
4. From the “Purchased From” dropdown, select the vendor associated with the transaction.
5. Specify the transaction date.
6. If needed, provide a memo to describe the charge or refund (this is optional).
7. Depending on the nature of the transaction, navigate to either the “Expenses” or “Items” tab
8. To save the transaction, click “Save & Close.”
To access the banking center in QuickBooks Online, follow these steps:
1. Hover your cursor over the “Banking” option located in the left menu bar.
2. Click on the dropdown menu that appears when you hover over “Banking.”
3. Within the banking center, locate and choose your credit card account.
4. The credit card transactions that require review can be found in the “For review” tab.
You have the option to accept online credit and debit card payments using both QuickBooks Online and QuickBooks Money. If you need to manually input card information or track in-person payments, you can either download the QuickBooks GoPayment app as a standalone solution or integrate it with QuickBooks Online for accounting purposes.
1. Select “Reconcile.”
2. Input Your Credit Card Statement Information.
3. Reconcile Your Transactions.
4. Verify the $0 Difference.
5. Write a Check for Immediate Payment or Enter a Bill for Future Payment.