Updated
8 min read



Recording credit card bill payments in QuickBooks Online is essential for maintaining accurate financial records, simplifying tax preparation, and managing cash flow effectively. It reduces errors, ensures compliance, and provides reliable financial reporting, helping you make informed business decisions.
A credit card allows you to borrow funds for purchases or bill payments. You can set up your credit card account using QuickBooks Online to help you keep track of your charges and expenses.
In this article, we’ll walk you through the steps to record your credit card bill payments in QuickBooks Online.
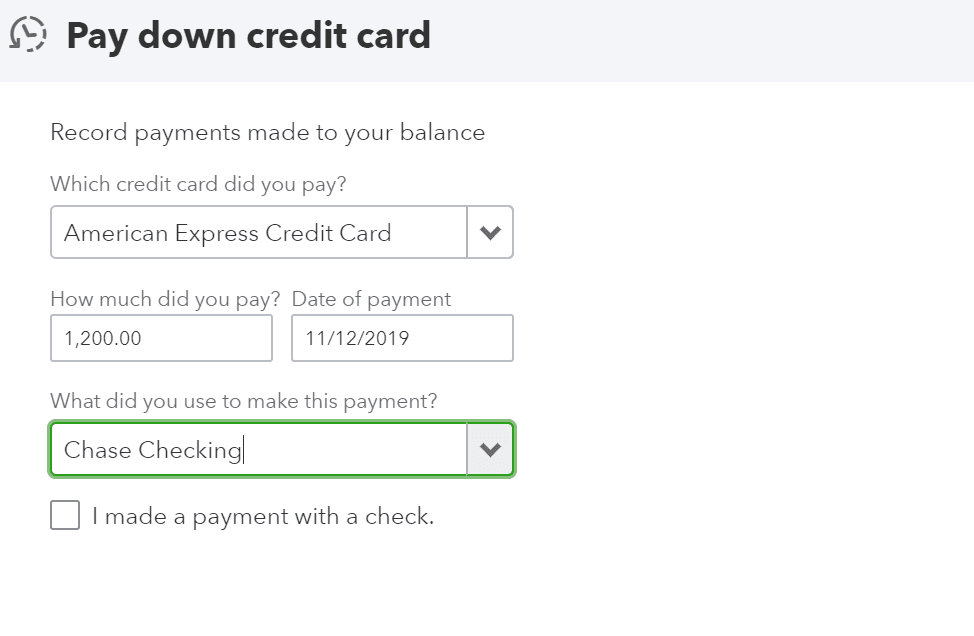
If you paid using a credit card, you can record it in QuickBooks by creating a check.
Note: Before you pay, you are advised to reconcile your transactions.
Need Help Recording Credit Card Bill Payments?
Contact us today for expert assistance in recording your credit card payments accurately in QuickBooks Online. We’ll help ensure your accounts stay in top shape!
Reconciliation involves matching the transactions recorded in QuickBooks with your credit card statements to ensure all transactions are accounted for. It is a final check to identify discrepancies or errors before generating financial statements.
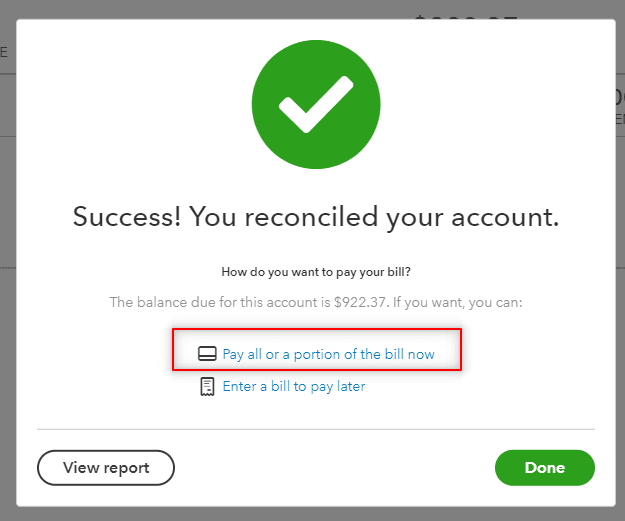
Select your bill payment option:
Note: For businesses operating on a Cash Basis, credit card bills and payments might appear as unapplied cash on the Profit and Loss report.
If your credit card and the bank account used to pay the credit card expense are connected via bank feeds, you have the option to record the payment by transferring the record.
Alternatively, you can use the Record as a transfer option:
After completing the transaction transfer, match it with the new account.
To accurately track your expenses, it’s necessary to enter all credit card charges in QuickBooks Online. Follow these steps:
Add the charges to the credit card account (Other Current Liability).
Recording credit card bill payments in QuickBooks Online is essential for keeping your business finances organized. By following the steps outlined in this article, you can easily keep track of your credit card transactions, making sure they are correctly recorded and categorized. This will help you maintain accurate financial records, simplifying things like tax preparation and financial reporting.
If you face any challenges while recording your credit card bill payments or need additional information, kindly fill in the contact form and we will get back to you.
1. Locate and select your credit card account.
2. In the Review tab, locate the transaction to categorize.
3. Enter details such as the vendor or customer name, the expense category, and any custom labels if needed.
4. Select a Category and Enter the amount.
5. Next, complete the remaining fields.
1. Go to the Banking menu and choose Enter Credit Card Charges.
2. Pick the credit card account from the Credit Card ▼ dropdown.
3. By default, it will be set to Purchase/Charge.
4. If you need to record a refund or credit, hit Refund/Credit instead.
1. Access the +New button.
2. Next, pick the Pay Down credit card under Other.
3. Find the credit card you paid, and confirm the payment date and amount.
4. Opt for the payment method you used.
5. Add notes or attachments if needed.
6. Select Save and Close.
1. Access Reports.
2. Enter Transaction List with Splits in the search bar.
3. Tap Switch to classic view, then select Customize.
4. Click Change columns, scroll down, and tick Customer.
5. Select Filter, then Transaction Type.
6. Tick Check and Expense, then choose Run Report.
Credit cards are classified as liabilities, but in QuickBooks Online (QBO), we record them specifically as credit cards. Despite this classification, they remain liabilities. To record them, select “Credit cards” from the options. In the “Save account under” dropdown list, choose Credit cards.
1.Click on + New.
2. Access Money Out (Business view) or Other (Accountant view) and choose to Pay down a credit card.
3. Pick the credit card you paid.
4. Confirm the payment amount and date.
5. Select the bank account you used for the payment.
6. If you used a check, verify the check number or the EFT number for electronic payments.
7. Add any notes or attachments if needed by choosing Memo and Attachments.
8. Hit Save and Close.
Using the ‘Pay down credit card’ option (Create > + New > Other > Pay down credit card) simplifies recording payments to your credit card balance. This reduces confusion for users. Whether you choose this menu or another, the transaction will be recorded the same way—it will debit the credit card account and credit the bank account.
1. Create credit card accounts.
2. Select the Chart of Accounts option from the Company menu.
3. Click the Plus (+) symbol or Account, and then click New.
4. After choosing Credit Card, click Proceed.
5. Enter the credit card name in the Add New Account window.
6. After choosing Enter Opening Balance, enter the date and balance of the account.
7. Click Save & Close.
1. Hit + New, then choose Sales Receipt.
2. Choose the customer and enter sales details.
3. Pick a Credit Card as the payment method.
4. Confirm credit card info or mark it as received if using an external terminal.
5. Hit Save and Close.
For External Terminals:
1. Go to + New and next, choose Bank Deposit.
2. Select the bank account, and enter the deposit details.
About the author
Have a QuickBooks® question? Our ProAdvisors can help. QAsolved is not affiliated with Intuit.