
Managing customers in one platform and finances in another can feel like running two parallel businesses. Your sales team closes deals in HubSpot, marketing nurtures leads, and support keeps customers happy, but when it’s time to send invoices or reconcile payments in QuickBooks, things suddenly get manual and time-consuming. You end up copying data from one system to another, double-checking every tiny detail just to be safe, and before you know it, small errors start creeping in, causing confusion, back-and-forth emails, and frustrating delays for both your sales and finance teams.
This is where smart automation changes the game.
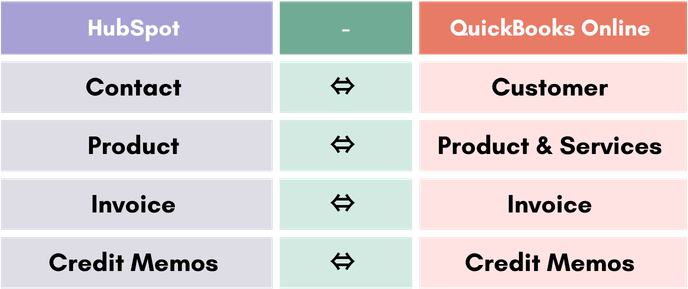
When you integrate HubSpot with QuickBooks Online, you connect your customer relationship management with your accounting system, allowing contacts, deals, invoices, and payments to sync seamlessly. Instead of switching tabs and re-entering information, your sales and finance teams stay aligned in real time. Closed deals can automatically generate invoices, customer data remains consistent across platforms, and payment updates flow back into your CRM without extra effort.
Imagine your sales rep marking a deal as “Closed Won” and your accounting system instantly preparing the invoice. No spreadsheets. No missed entries. No confusion. This is exactly what you can achieve with HubSpot and QuickBooks Online integration.
If you’re looking for exactly that, you’ve landed in the right place. In this blog, we’ll walk you through the step-by-step process to integrate HubSpot with QuickBooks Online for free. But before we dive into the setup, let’s quickly explore how this integration can benefit your business and how you can truly make the most of it.
An Overview of HubSpot and QuickBooks Online
HubSpot is a leading customer relationship management platform designed to help businesses attract, engage, and delight customers. It brings marketing, sales, customer service, content management, and operations together in one unified system. From managing leads and tracking deals to automating email campaigns and generating reports, HubSpot enables teams to build stronger relationships and streamline their growth strategy. Its user-friendly interface and powerful automation tools make it especially popular among startups, growing businesses, and mid-sized companies.
On the other hand, QuickBooks Online is a cloud-based accounting solution that helps businesses manage their finances efficiently. It allows users to create invoices, track expenses, manage cash flow, calculate taxes, and generate financial reports in real time. With secure cloud access and seamless integrations, QuickBooks Online simplifies accounting processes and provides business owners with clear financial visibility.
By deciding to connect HubSpot with QuickBooks Online, you empower your business with a smooth connection between your sales and accounting systems, enabling real-time data synchronization, better operational efficiency, and a clear, unified view of both customer interactions and financial health.
Why You Should Connect HubSpot with QuickBooks Online?
When you integrate HubSpot with QuickBooks Online, you eliminate data silos and create a connected system where your sales and finance teams work in perfect alignment. Instead of manually transferring information between platforms, you enable automated syncing, faster billing, clearer reporting, and greater control over your business data. Here are the key benefits you can expect from this integration:
1. Effortless Two-Way Data Sync
Imagine your contacts, invoices, and products automatically staying updated in both systems without manual effort. Whether you want data to move from HubSpot to QuickBooks Online, the other way around, or both, you’re in control. With flexible sync settings, you decide what gets shared, when it syncs, and how it behaves. Less manual entry, fewer mistakes, and a lot more confidence in your data.
2. Faster and More Efficient Billing
Closed a deal? Why not turn it into an invoice in just a few clicks? Instead of recreating information inside your accounting software, you can generate invoices or subscriptions directly from your CRM. Once published, invoices sync with QuickBooks Online automatically. Payments update in both systems, whether they’re recorded in HubSpot or directly in QuickBooks.
3. Real-Time Sync Health and Quick Fixes
Gain full visibility into how your data is syncing between platforms. Detailed sync health reports allow you to monitor active records, quickly identify issues, and resolve errors before they impact your operations. This transparency helps maintain data accuracy and reduces downtime.
4. Custom Field Mapping for Better Data Alignment
Every business structures its data differently, and that’s perfectly okay. With customizable field mappings, you can align invoice, contact, and product data exactly the way your business needs it. Instead of adjusting your workflow to fit the software, you make the integration work for you.
5. Improved Financial Visibility for Sales Teams
When you integrate HubSpot with QuickBooks Online, your sales team gains better insight into customers’ financial status without switching platforms. They can view invoice details, payment statuses, and outstanding balances directly within HubSpot. This shared visibility helps sales representatives follow up more effectively and make informed decisions during renewals or upsells.
In short, when your CRM and accounting software start working hand in hand, your entire business runs smoother, faster, and with far more clarity. No chaos, no confusion, just streamlined operations. Now that you know the “why,” let’s move on to the “how.” Up next, we’ll walk you through the exact steps that make this powerful collaboration surprisingly simple to set up and manage.
Limitations, Recommendations, and Steps for Integrating HubSpot with QuickBooks Online
Before you connect the two platforms, it’s important to understand not just the setup process, but also the practical considerations that come with it. In this section, we’ll cover the key limitations to be aware of, helpful recommendations to ensure a smooth experience, and the step-by-step process to successfully integrate HubSpot and QuickBooks Online.
Key Limitations to Consider Before You Begin
Before starting the integration, it’s important to understand certain platform limitations and sync constraints so you can avoid unexpected issues and ensure a smooth setup experience.
1. Restricted Invoice Editing
Invoices created in HubSpot cannot be fully edited in QuickBooks Online. Changes like adding or removing line items, updating prices, removing payments, or adding tax details must be made in HubSpot, or the sync may fail. However, certain updates like adding payments, credits, or service dates are still allowed in QuickBooks. Invoices created directly in QuickBooks remain fully editable there.
2. Accounting Property Sync
The integration does not update the accounting deal property group in HubSpot. For accurate reporting and workflows, it’s recommended to use the invoice object instead.
3. Tax and Regional Restrictions
To sync tax data properly, automated sales tax must be enabled. Additionally, most non-U.S. QuickBooks Online accounts require tax-inclusive invoices (e.g., VAT or GST), but HubSpot invoices currently do not support this, limiting functionality for international users.
4. Split Payments Across Multiple Invoices
QuickBooks Online allows a single payment to be applied to multiple invoices. However, HubSpot does not support splitting payments across invoices. As a result, payments associated with multiple invoices in QuickBooks Online will not sync back to HubSpot.
5. Revenue Recognition Limitations
HubSpot does not support adding Service Dates to line items, which may affect businesses using QuickBooks Online’s Revenue Recognition feature.
6. Credit Card Fee Syncing
If credit card fees are enabled in your HubSpot payment settings, those fees will not sync to QuickBooks Online invoices. This can lead to reconciliation differences and require manual adjustments. To prevent discrepancies, it is advisable to disable the credit card fee setting when using the integration.
By reviewing these limitations beforehand, you can plan your workflows more effectively and ensure a smoother integration experience.
Recommendations Before Using the Integration
To ensure a smooth and error-free experience when you integrate HubSpot with QuickBooks Online, consider the following best practices before getting started:
1. Turn Off Custom Transaction Numbers
Check whether the Custom Transaction Number setting is enabled in QuickBooks Online. It’s recommended to turn this off. If left enabled, invoices created in QuickBooks may automatically use the HubSpot invoice prefix, potentially causing duplicate or conflicting invoice numbers.
2. Sync Products from QuickBooks Online to HubSpot
It’s best to sync your product catalog from QuickBooks Online into HubSpot and use those synced products when creating invoices, quotes, or payment links. This ensures that synced transactions are correctly mapped to the appropriate income and expense accounts in QuickBooks.
3. Update Invoice and Payment Workflows
If you’re using two-way invoice sync, adjust your workflows to exclude payments generated from invoices, such as filtering payments where the source equals invoice. Without this update, invoice payments may trigger duplicate invoice creation, leading to confusion even though only one actual payment exists.
4. Lock Closed Accounting Periods
Enable the setting that automatically locks closed accounting periods in QuickBooks Online. This prevents accidental changes to finalized financial records and protects the accuracy of your reports.
5. Sync All Customers Before Invoicing
Import all customers from QuickBooks Online into HubSpot as contacts. When creating invoices for existing customers, always use the synced contact to ensure proper customer mapping. For new customers, make sure the billing contact’s email is accurate, as it will be linked to the customer record in QuickBooks Online.
Note: Product sync matches items using SKUs, and only products with SKUs are synced by default to avoid duplicates. Make sure relevant products in QuickBooks Online have SKUs added.
Note: If a line item doesn’t match any product, a Custom Line Item product is automatically created and linked to the selected income account during sync setup.
Steps to Integrate and Configure HubSpot and QuickBooks
Follow these simple steps to connect and configure HubSpot with QuickBooks, ensuring a smooth and accurate data sync between both platforms.
Note: To connect these two apps, you need Super Admin access or the required App Marketplace permissions within your HubSpot account.
- In your HubSpot account, click on the Marketplace icon located in the top navigation menu and choose HubSpot Marketplace.
- Search for QuickBooks Online in the marketplace search bar and select the app from the results.
- Log in with your QuickBooks Online credentials and click Install to complete the connection.
Note: Please note that QuickBooks sandbox accounts cannot be connected to HubSpot.
3 Steps to Configure the Sync Properly
Once the integration is connected, the next step is to configure your sync settings carefully to ensure accurate data flow, proper field mapping, and smooth communication between HubSpot and QuickBooks Online. Here are the steps:
After installing the QuickBooks Online integration, you will be automatically directed to the Guided Setup page. This streamlined, single-page process walks you through configuring invoice, contact, and product sync settings between HubSpot and QuickBooks. To review the sync settings:
- First, click the right arrow next to each object to access its sync settings. For every object, you can configure the following:
- Sync Direction: Choose between one-way or two-way synchronization.
- Data Conflict Resolution: Decide which platform should take priority if there’s a data mismatch.
- Field Mappings: Customize how fields are matched between HubSpot and QuickBooks.
- Sync Filters: Apply filters to control which records are included in the sync.
- If any configuration issues require attention, they will appear at the bottom of the respective object’s sync section.
- For more detailed customization, click Go to advanced settings. Once everything is configured, click Save and start sync in the top-right corner to activate the data synchronization.
A 13-Step Process to Turn On Data Sync
Follow these steps to enable and activate data synchronization between HubSpot and QuickBooks, ensuring your records stay aligned and automatically updated across both platforms.
- First, navigate to your HubSpot account, click the Settings icon in the top navigation bar.
- From the left-hand menu, go to Integrations > Connected Apps.
- Then, select QuickBooks Online from the list of connected apps.
- Open the CRM Syncs tab.
- Click Set up your sync to begin the configuration process.
- Now, on the “Select the data you want to sync” page, use the QuickBooks Online dropdown to choose the object you want to sync with HubSpot.
- Note: The corresponding HubSpot object will update automatically.
- Finally, click on the sync direction arrows to choose your preferred sync type, whether one-way or two-way.
- When an invoice syncs from QuickBooks Online to HubSpot, it’s linked to the contact’s primary company. If multiple companies are associated, only the primary one is used. If no company is linked, the invoice won’t be associated with any company, though this can be updated manually later.
- For paid invoices synced from HubSpot to QuickBooks Online, processing fees from Stripe or HubSpot Payments are not automatically recorded as expenses. You’ll need to calculate the total processing and platform fees and manually enter them as an expense in QuickBooks Online.
- Customers synced from HubSpot will use the associated company name as the Display Name in QuickBooks Online. If no company is linked, the customer’s first and last name will be used instead.
- In two-way invoice sync, property updates only push to QuickBooks Online if the invoice was originally created in HubSpot.
- If an ACH payment is still processing, the invoice may appear as paid in HubSpot but will only be marked as paid in QuickBooks Online after the payment is fully completed.
- In the top-right corner, click Next to continue.
- Open the Data conflict resolution dropdown and choose whether HubSpot or QuickBooks Online should take priority when data differences occur.
- In the Mapped fields section, switch off any fields you don’t want to include in the sync.
- If you’re using a Data Hub Starter, Professional, or Enterprise plan, you can click Add a mapping to include additional fields beyond the default ones.
- Select the appropriate fields from the dropdown menus and click Create to add the mapping or click the delete icon to remove it.
- To modify or delete an existing custom mapping, click Actions, then choose Edit or Delete.
- To use a QuickBooks Online custom field in HubSpot for invoice field mapping, it must be configured correctly in QuickBooks. The field should be set to the Text and Number type, placed under the Transaction category, marked as Print Enabled, and turned on for all sales forms, such as invoices, estimates, and sales receipts.
- Once the custom field mapping is configured and the sync is turned on, all matching invoices, including past records, will begin syncing automatically.
- Keep in mind that only the first three custom invoice fields created in QuickBooks Online are supported and visible for syncing. For more information, check out the QuickBooks API documentation.
- If you’re using a Data Hub Starter, Professional, or Enterprise plan, you can click Add a mapping to include additional fields beyond the default ones.
- In the top-right corner, click Next to proceed.
- On the Limit screen, recommended sync filters will be applied automatically based on the date you’re setting up the sync. These filters help prevent unnecessary or excessive data syncing, especially when syncing from HubSpot to QuickBooks Online. Review the suggested filters carefully.
- Most sync filters, except for outbound invoice sync, can be modified. To update a filter:
- Under Filters, click Edit next to the relevant sync filter.
- Choose the appropriate properties and define your filter criteria.
- Click Apply criteria, then select Done to save your changes.
Once you turn on the sync, HubSpot and QuickBooks start communicating automatically in the background. After the initial sync is completed, the systems continue updating each other at regular intervals without any manual effort.
- Updates made in HubSpot are typically reflected in QuickBooks within a few minutes, keeping your financial data fresh and accurate.
- On the other hand, changes made in QuickBooks are checked and synced back to HubSpot approximately every 30 minutes.
Note: You can manually trigger a refresh anytime by clicking the Sync now button under the CRM Syncs tab, ensuring both platforms are fully up to date whenever you need them to be.
Bringing HubSpot and QuickBooks Online together is not just about connecting two tools; it’s about creating a streamlined system where your sales and finance teams operate in sync. By understanding the key limitations, applying the right recommendations, and carefully configuring your sync settings, you set the foundation for accurate data flow and fewer operational hiccups.
Once everything is properly set up, the integration works quietly in the background, keeping your customer and financial data aligned so you can focus on growth instead of manual updates.
Understand Recommended Sync Filters and Display Name Setup
Before finalizing your sync, it’s important to understand how recommended sync filters help control the flow of data and prevent unnecessary or duplicate records. At the same time, setting up display names correctly ensures your customer information stays clean, consistent, and easy to manage across both HubSpot and QuickBooks Online.
Here are the recommended filters that are automatically set:
- Contacts: A two-way sync is configured with specific filters to avoid pushing unnecessary contacts from HubSpot to QuickBooks Online.
- QuickBooks Online → HubSpot: All customers are included in the sync.
- HubSpot → QuickBooks Online: Filters are applied so that only relevant records sync. The conditions include Invoice status not equal to Draft, Create date after the current date, and Invoice source set to HubSpot.
- Invoices: If no filters are applied, all invoices would sync between both platforms. To control this, a one-way sync is set from QuickBooks Online to HubSpot, with a filter for invoices created after the current day at 12:00 AM.
- Products: A one-way sync is enabled from QuickBooks Online to HubSpot using the default filter that includes all products and services.
6 Steps to Set the Display Name on Customers
When customers are synced from HubSpot to QuickBooks Online, the associated company name in HubSpot is automatically used as the customer’s Display Name in QuickBooks. If no company is linked to the contact, QuickBooks will instead use the contact’s first and last name as the default display name.
If you’d like to change this setting, follow these steps:
- In your HubSpot account, click the Settings icon in the top navigation bar.
- From the left menu, go to Integrations > Connected Apps.
- Select QuickBooks Online from the list.
- Open the CRM Syncs tab.
- Click on Contact Sync.
- On the Configure screen, go to the Mapped Fields section and turn off the mapping for Display Name ← Associated Company Name.
Once disabled, you can adjust the field mapping according to your preferred display name format.
Note: Display Names in QuickBooks Online must be unique. Only one contact per company should use the company name as the Display Name to avoid sync errors. Assign a single billing contact to ensure smooth syncing.
Edit & Turn Off Data Sync, Review Sync Statuses, and Export Sync Records
Need to pause the integration, check what’s syncing, or download records for review? Here’s how you can edit or disable data sync, monitor sync statuses, and export sync records to stay fully in control of your HubSpot and QuickBooks Online integration.
5 Steps to Edit an Existing Data Sync
If you need to update how records are syncing between HubSpot and QuickBooks Online, you can easily modify the current setup. Here are the steps:
- Start by clicking the Settings icon in your HubSpot account.
- From the left sidebar, go to Integrations > Connected apps.
- Next, click on QuickBooks Online to edit the existing data sync.
- Then, click on the CRM sync tab.
- Hover over the sync you want to change (Contacts, Products, or Invoices) and click Edit.
Note: Apply the necessary updates by going through the same configuration steps you would follow during the initial sync setup.
7 Steps to Turn Off the Data Sync Correctly
Learn how to safely disable the data sync between HubSpot and QuickBooks Online to prevent further automatic data updates while keeping your existing records intact.
- Log in to your HubSpot account and click the Settings icon in the top navigation bar.
- In the left sidebar, go to Integrations > Connected apps.
- Select QuickBooks Online from the list of connected apps.
- Open the CRM syncs tab.
- Hover over the object sync (Contacts, Products, or Invoices) that you want to disable.
- Click More, then choose Turn off sync.
- This will stop data from syncing between HubSpot and QuickBooks Online.
Note: To enable it again, click More > Turn on sync.
7 Steps to Review Sync Statuses
Monitor your sync performance by reviewing record statuses to quickly identify which items are syncing successfully, failing, or being excluded. To view records and check their sync status:
- In your HubSpot account, click the Settings icon in the top navigation bar.
- From the left-hand menu, go to Integrations > Connected apps.
- Select QuickBooks Online, then open the CRM syncs tab.
- Now, click on Object view to see a breakdown of records that are syncing successfully, failing, or excluded.
- To customize the table layout, click More in the top-right corner of the table and choose Edit columns.
- Use the Filter by dropdown and select All objects to narrow results by a specific object.
- Click on the record count in any status column to view detailed information about those syncing, failing, or excluded records.
- Click Record view to access a detailed list of individual records.
- To modify the columns shown in the table, click More in the top-right corner and select Edit columns.
- Use the available filters above the table to narrow down records based on specific criteria.
- Navigate between pages using the pagination controls at the bottom of the table.
- In the Sync activity column, click the dropdown arrow to expand and review detailed activity for a specific record.
8 Steps to Export the Sync Records Smoothly
If you want better visibility into your sync activity, exporting sync records is a smart move. It allows you to download detailed data for reporting, internal reviews, or troubleshooting, so you always have a clear understanding of how information is flowing between your systems. Here are the steps:
- In your HubSpot account, click the Settings icon in the top navigation bar.
- Go to Integrations > Connected apps from the left sidebar.
- Select QuickBooks Online, then open the CRM syncs tab.
- Click on Record view to access the list of synced records.
- To customize the table layout, click More in the top-right corner and choose Edit columns.
- Apply the relevant filters above the table to narrow down the records you want to export.
- Once your filters are set, click More again and select Export.
- Choose your preferred file format and click Export to proceed.
Once everything is processed successfully, you’ll be notified right inside your account, and the export file will also be delivered straight to your inbox, so you can access it anytime without missing a step.
As we move toward wrapping this up, let’s quickly walk through two important actions you should know. First, how to seamlessly push your deals into QuickBooks and turn them into invoices without manual effort. And second, how to safely disconnect your HubSpot account if you ever decide to pause or stop the integration.
These final steps ensure you not only know how to use the integration effectively but also how to manage it with complete control.
How to Get Deals into QuickBooks from HubSpot?
Once your integration is successfully set up, you can start turning HubSpot deals into QuickBooks invoices in just a few clicks. Whenever you create a QuickBooks invoice from a deal in HubSpot, the system automatically sends the deal details to QuickBooks and generates a draft invoice for you to review before finalizing. Here’s how to Review and Finalize Draft Invoices:
- Open the Tasks menu, or navigate to the HubSpot menu and click View tasks.
- Go through the opportunities listed under Outstanding.
- Click the dropdown menu next to a deal and choose Edit details to view additional information.
- Note: Deals marked with an exclamation icon require attention, usually because a HubSpot product or service hasn’t been mapped to a matching item in QuickBooks.
- Make the necessary updates. If needed, click the HubSpot deal link to review the original record.
- Once everything looks correct, click Save.
Once you save the draft, QuickBooks automatically turns it into a standard invoice. From that point on, it works just like any other sales form in your account. You can send it to customers, record payments, or make edits whenever needed, just as you would with any regular QuickBooks invoice.
How to Disconnect your HubSpot Account?
If you no longer want new deals or data to flow in from HubSpot, you can disconnect the integration at any time. This will stop future syncing and prevent additional records from being pulled into QuickBooks. Make sure to review any pending drafts before disconnecting.
Steps to Disconnect HubSpot from QuickBooks:
- Open the HubSpot menu in your QuickBooks account.
- Click Disconnect.
- Follow the on-screen instructions to confirm the disconnection.
Note: Any draft transactions that haven’t been reviewed and saved will be deleted once the account is disconnected.
In Short,
Integrating HubSpot with QuickBooks Online helps bring your sales and finance operations together in a more connected and organized way. Instead of dealing with manual data entry, repeated updates, or scattered information across systems, you get a unified workflow where contacts, invoices, products, and payments move smoothly between both platforms. Once the integration is properly set up and configured, it works in the background to keep your data consistent and up to date.
With the right sync settings, filters, and recommendations in place, you can reduce errors, avoid duplication, and maintain better control over your business information. Beyond just automation, this integration also improves collaboration between teams. Sales get better visibility into payments, finance gets cleaner customer data, and overall operations become more efficient.
In the long run, connecting HubSpot with QuickBooks Online is not just a technical setup; it is a practical step toward building a more scalable, reliable, and well-organized business system that supports growth without adding extra complexity.
Frequently Asked Questions
HubSpot CRM is often considered one of the best CRMs for QuickBooks integration because it offers a user-friendly interface, strong automation features, and reliable syncing for contacts, deals, and invoices. It also supports a smooth connection with QuickBooks Online, making it ideal for businesses that want sales and accounting data in one place.
Other popular options include Zoho CRM and Pipedrive, but HubSpot is widely preferred for its ease of use and all-in-one functionality.
HubSpot’s QuickBooks Online integration connects your CRM and accounting data, giving you a complete view of each customer in one place. It helps streamline billing and payment workflows by syncing invoices, contacts, and products between both platforms. This ensures your financial records stay accurate, up to date, and easier to manage without manual effort.
No, you don’t need any technical expertise to get started. The integration comes with a guided setup process that walks you through each step in a simple and user-friendly way. If you ever need help, support resources are also available to assist you during the setup.
To get started, you must have active accounts on both HubSpot and QuickBooks Online. You will also need to authorize the connection so the two platforms can securely communicate. Make sure the required permissions are enabled to allow proper data syncing between the systems.
Once connected, specific actions in HubSpot, such as creating new contacts or closing deals, can trigger corresponding updates in QuickBooks Online like adding customers or generating invoices. The sync process can also be customized based on your business requirements.
If a sync error occurs, start by reviewing your integration settings and confirming that both HubSpot and QuickBooks Online are properly authenticated. In most cases, this helps resolve the issue. If the problem continues, it’s best to reach out to our certified integration support team for further assistance.
