
The QuickBooks Abort Error message is a crucial issue many users face while working with their QuickBooks software. This error often occurs when there’s a disruption in the connection to the QuickBooks company file, causing the program to abruptly terminate. This disruption can stem from several sources such as network problems, corrupted company files, incorrect configurations, or conflicts with other software. Addressing this error promptly is essential to avoid data loss and to ensure the smooth operation of your accounting tasks.
This article will provide step-by-step methods to help you effectively troubleshoot and resolve the QuickBooks Abort Error, allowing you to get back to managing your financial data.
Possible Causes why QuickBooks Abort Error Message Occurs
- The QBWUSER.INI file may become compromised or is not found, impacting QuickBooks functionality.
- Firewall and antivirus software may inadvertently interfere with QuickBooks operations, leading to aborted tasks.
- Multiple versions of QuickBooks in a shared environment may result in configuration conflicts.
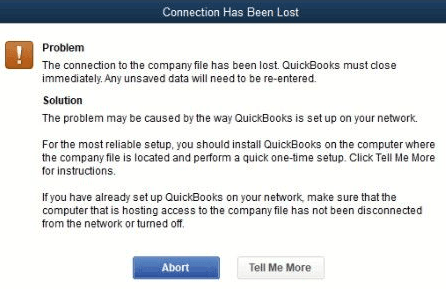
- Occurrences where more than one computer tries to host the QuickBooks company file at the same time.
- The computer’s power settings, such as entering sleep or hibernation mode, disrupt the ongoing saving of company files.
- Challenges in the data transmission between devices, especially when accessing files over a network from different storage locations.
Methods to Fix QuickBooks Abort Error Message
Follow the methods mentioned below to resolve the Abort Error Message in QuickBooks:
Method 1: Update QuickBooks
- Open QuickBooks.
- Go to the Help menu and select Update QuickBooks Desktop.
- Click on the Update Now tab.
- Select Get Updates to start the update process.
- Once the update is complete, restart QuickBooks.
Method 2: Use QuickBooks File Doctor
- Download and install QuickBooks Tool Hub.
- Open the Tool Hub and select Company File Issues.
- Click on Run QuickBooks File Doctor.
- Select your company file from the drop-down list. If you don’t see your file, browse to the location of the file and select it.
- Choose Check your file (middle option) and then Continue.
- Enter your QuickBooks admin password and click Next.
- File Doctor will scan your file and fix the issues.
Method 3: Configure Firewall and Antivirus
- Add QuickBooks ports to your firewall
- Press Windows + R, type “Control Panel” and press Enter.
- Select System and Security, then Windows Defender Firewall.
- Click on Advanced Settings.
- Right-click Inbound Rules and choose New Rule.
- Choose Port and click Next.
- Ensure TCP is selected. Enter the specific ports required for your QuickBooks year version and click Next.
- Allow the connection, click Next, give the rule a name like “QuickBooks Ports,” and click Finish.
- Configure antivirus settings:
- Open your antivirus software.
- Add QuickBooks and its processes (QBW32.exe, QBDBMgr.exe, etc.) to the list of exceptions.
Method 4: Rename QBWUSER.ini File on your System
This method is used if you are unable to open a company file stored on a network location.
- Find the folder where the QBWUSER.ini file is stored. The typical path is \Users[User Name]\AppData\Local\Intuit\QuickBooks.
- Enable hidden files to view it in case you can’t find it.
- Right-click on the QBWUSER.ini file and select Rename.
- Add “.old” to the end of the file name, making it “QBWUSER.ini.old”.
- Additionally, rename the .ecml file (Entitlement Data Store) by changing its name to “Entitlement Data Store.ecml”.
- After renaming these files, open a sample company file.
- If the sample file does not open, try copying and pasting it into another local folder and open it from there.
Method 5: Check for Data Damage
- Open QuickBooks and press F2 to open the Product Information window.
- Check the file size and the list information.
- Run the Verify Data tool by going to File > Utilities > Verify Data.
- If Verify Data finds issues, run the Rebuild Data tool by going to File > Utilities > Rebuild Data.
Method 6: Reinstall QuickBooks Using Clean Install Tool
- Download and install QuickBooks Tool Hub.
- Open the Tool Hub and select Installation Issues.
- Click Clean Install Tool and follow the on-screen instructions.
Method 7: Network Diagnosis and Repair
- Download and install QuickBooks Connection Diagnostic Tool.
- Run the tool and follow the prompts to diagnose and repair your network setup.
Conclusion
QuickBooks Abort Error message can be a disruptive issue, but with the right approach, it can be effectively resolved. To address the root causes of this error, you can take several steps. Firstly, updating QuickBooks and using tools like the QuickBooks File Doctor can help diagnose and fix issues. Performing a clean install, verifying user permissions, and diagnosing any network issues can further help resolve the underlying issues causing the disruption.
If the problem persists despite following these steps, contact us at toll-free number +1-888-245-6075 for advanced assistance.
Frequently Asked Questions
1. Open Internet Explorer.
2. Click on the Tools option from the Command Bar.
3. Choose Internet Options and then go to the Security tab.
4. Select Trusted Sites and then click on Sites.
5. In the “Add this website to the zone” section, enter *.intuit.com and *.quickbooks.com, then click Add.
6. Uncheck the box next to “Require server verification (https:) for all sites in this zone.”
7. Ensure that “Enable Protected Mode” is unchecked, then close the Trusted Sites window.
8. Close the browser.
1. Navigate to File > Utilities > Rebuild Data.
2. When prompted to make a backup before rebuilding your company file, click OK. A backup is required before proceeding.
3. Choose the location where you want to save your backup, then click OK. Ensure you do not overwrite an existing backup file by entering a new name in the File name field, and then click Save.
4. Click OK when you see the message “Rebuild has completed.”
5. To check for any additional damage, go to File > Utilities > Verify Data again.
6. If Verify Data detects more damage, you will need to fix it manually. Search for the specific error(s) in the qbwin.log on the QuickBooks Desktop support site for instructions on how to resolve them.
7. If the error cannot be found, you can restore a recent backup. Go to File > Open or Restore Company.
Note: Do not replace your existing company file. Be aware that you will need to re-enter any information that was added to your company file since the backup was created.
1. Download and Run QuickBooks Diagnostic Tool.
2. Disable your Antivirus Application as well as your Windows Firewall.
3. Rename the QBWUSER.ini file on your System.
4. Restore QuickBooks from Backup.
1. Utilize the QuickBooks Database Server Manager.
2. Verify the host mode settings on each user’s computer.
3. Ensure that QuickBooks services are running.
4. Confirm that QuickBooks can send data.
5. Create a new folder for the company file.
