
Running a business isn’t just about tracking numbers; it’s also about building strong, lasting relationships that drive growth, foster trust, and streamline collaboration. That’s where the QuickBooks Business Network steps in. Designed to connect small businesses, vendors, and clients within the QuickBooks ecosystem, this powerful network streamlines invoicing, payments, and contact management, eliminating the hassle of scattered email threads and manual data entry.
At its core, the Intuit Business Network serves as a directory of businesses that are already using QuickBooks. It allows users to share basic, non-sensitive business information, such as company name, email, and billing address with other verified users. This visibility not only streamlines key tasks, such as sending invoices, confirming vendor details but also sync contact information automatically.
With built-in safeguards for accuracy and security, the network ensures your shared information remains up to date and error-free, while giving you full control over what’s visible. From pre-filled invoices and faster transaction matching to fewer manual errors, QuickBooks Business Network is a smart solution for small and mid-sized businesses that frequently collaborate with partners, suppliers, or contractors who also rely on QuickBooks.
If you’re also looking forward to maximizing your capabilities with Intuit QuickBooks Business Network, then you have indeed landed on the right page. So, without wasting any time, let’s get on with it.
What is QuickBooks Business Network and What are its Key Benefits?
Before understanding how to join QuickBooks Business Network, it is important for a user to know what it means and how it can benefit them. Business Network is a feature of QuickBooks Online that acts as an automated business directory. QuickBooks users can see your customer-facing details, such as your company name, email, and address. It simplifies the process of connecting with customers or vendors, sending and receiving invoices, and reducing manual data entry.
In short, it’s a smart, secure way to simplify business relationships within the trusted QuickBooks ecosystem-at no additional charge.
5 Key Benefits of Using Intuit QuickBooks Business Network
The Intuit QuickBooks Business Network enables smoother workflows, fewer errors, and better connections with other QuickBooks users. The following are the top advantages:
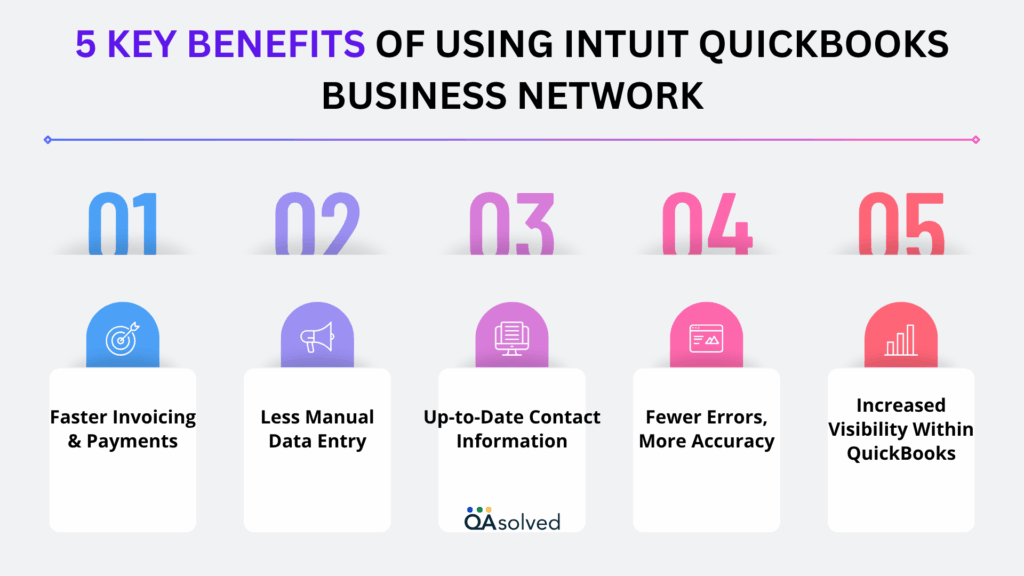
1. Faster Invoicing & Payments
When you have access to verified customer and vendor information, you can create and send invoices more quickly and get paid faster.
2. Less Manual Data Entry
There is no need to copy-paste or double-check contact details anymore. With QuickBooks, you can automatically fill information from the network, saving your time and reducing tedious administration tasks.
3. Up-to-Date Contact Information
Your system will automatically update the contact details of other businesses in the network when they update their contact details. In this way, your records will be kept up-to-date without any extra effort on your part.
4. Fewer Errors, More Accuracy
Invoices, payments, and vendor setups will be easier to handle when you rely on shared, verified business data, so you will spend less time fixing problems and more time on making invoices and payments.
5. Increased Visibility Within QuickBooks
Having your business listed in the network’s search results within QuickBooks makes it easier for others to find you and do business with you by making your business appear in search results.
These QuickBooks Business Network benefits help you save time, boost accuracy, and strengthen relationships, all within the platform you already know and use. Now that you’re equipped with just enough information, let’s head towards the focal point of this blog.
How to Review and Validate Your Contact Details?
Note: If you’re using QuickBooks Online Accountant, you can search the QuickBooks Business Network to locate contacts or adjust network visibility settings within your clients’ QuickBooks Online accounts. However, it’s important to know that your own accounting firm’s contact details (from the “Your Books” file) won’t appear in the Business Network. As a result, the search and visibility features aren’t available for QuickBooks Online Accountant users managing their own firm’s records.
After you send or accept a QuickBooks Business Network invitation, your customer-facing contact information becomes visible to your connected customers and vendors. Ensure your contact information is up to date so others can access the correct details when connecting with your business.
- Log in as a Primary Admin or Company Admin.
- Choose Account and Settings under Settings.
- Click on the Company tab.
- Review and update the following details, if necessary:
- Company name
- Customer-facing email
- Company phone number
- Website
- Customer-facing address
- To apply your changes, click Save, then Done.
So, these are the steps you need to follow to review and validate your contact details, as they play a crucial role in the upcoming process.
Also Read: How to Write Off Customer and Vendor Balances in QuickBooks?
How to Search and Add Contacts in the QuickBooks Business Network?
The QuickBooks Business Network lets you connect with other businesses by selecting New customer or New vendor. The process is as follows:
- Enter the business name in the Company name field. The QuickBooks Business Network will display matching results as you type.
- Select a business from the list. QuickBooks will automatically fill in relevant details, including the company’s website, city, state, and ZIP code, based on the customer-facing address. Email, phone number, and full address fields will be partially masked until a connection request is accepted.
- You also have the option to manually enter contact details for a customer or vendor. However, if you edit any field that displays a link icon, it will disable automatic updates from the QuickBooks Business Network in case that business updates their information later.
- Click Save and send a request at the bottom to add the business to your Customer or Vendor List and send them an invitation to connect. You can also receive connection requests via the QuickBooks Online app on iOS or Android.
- Once your customer or vendor accepts the invitation, their masked contact details will be revealed, allowing you to seamlessly send and receive invoices through the network.
Use Automation Powered by the QuickBooks Business Network
The QuickBooks Business Network also supports the Accounts Payable (AP) automation feature. When you send an invoice to a connected customer, it’s not only emailed but also automatically shows up in their QuickBooks account as a bill ready for review and payment. Similarly, once you’re connected with vendors, their bills can be added to your account automatically.
Moreover, this powerful automation is included at no additional QuickBooks Business Network cost, giving you a cost-effective solution for invoicing and payment automation. Click to understand Accounts Payable Automation.
4 Steps to Manage Your Connections and Invitations
If you prefer not to have your business appear in QuickBooks Business Network searches, you can adjust your visibility settings. Here’s how to do it:
- Log in to QuickBooks Online.
- Pick one of the following based on the contact type:
- For Vendors: Go to Expenses > Vendors.
- For Customers: Go to Sales > Customers.
- Select the Business Network icon or the Invite sent badge next to the contact.
- Click Remove, then confirm by clicking Remove again.
Note: The business will remain saved in your Customer or Vendor List, but any invoices exchanged will no longer be processed through the QuickBooks Business Network.
How to Manage Your QuickBooks Business Network Visibility Settings?
If you don’t want your business to appear in QuickBooks Business Network search results, you can adjust your visibility settings. How it works:
- Go to QuickBooks Online and Sign in.
- Select Account and settings under Settings.
- Go to the Advanced tab.
- Access the Business Network menu, then select Off.
- Click Save, then Done.
Your business will no longer appear in search results within the QuickBooks Business Network when you set your visibility to “Off.”. However, you’ll still be able to search for your customers and vendors, send connection invitations, and continue using Accounts Payable (AP) Automation.
Previously established connections will still have access to your customer-facing contact information, as well as the ability to send or receive invoices through the network. If you update your contact details in account settings, those changes will not be shared with connections made prior to disabling visibility.
Data Safety and Security with QuickBooks Business Network
The QuickBooks Business Network must not be used for spam, marketing, or any activity that violates Intuit’s Terms of Service. You’re only allowed to view and connect with other members within your geographic region. All business information displayed is provided by QuickBooks Online users and is not independently verified or endorsed by Intuit. It reserves the right to restrict your access to the network, including your ability to connect with others or appear in the directory, in accordance with its Terms of Service.
With these steps completed, your QuickBooks Business Network connection will be active, allowing you to collaborate more efficiently with your customers and vendors, automate transactions, and maintain your contact information within QuickBooks Online.
In case you’re having any trouble while executing the above-mentioned steps, then it would be ideal for you to contact our QuickBooks experts at toll-free number +1-888-245-6075.
Wrapping Up
The QuickBooks Business Network is more than just a directory—it’s a powerful tool that helps small and mid-sized businesses build stronger relationships, streamline workflows, and improve financial accuracy. By connecting directly within the trusted QuickBooks ecosystem, you reduce the need for repetitive data entry, eliminate communication delays, and automate essential tasks like invoicing and bill management. From faster invoice processing and updated contact records to Accounts Payable automation and enhanced visibility, the benefits of using this network are both immediate and long-term.
For businesses already using QuickBooks Online, tapping into the Business Network is a seamless upgrade, it doesn’t require any additional costs or third-party tools. It simply enhances the platform you’re already familiar with, making day-to-day operations smoother and more collaborative.
Whether you’re looking to grow your professional network, automate repetitive tasks, or simply ensure data accuracy across systems, the QuickBooks Business Network provides an effective, secure, and user-friendly solution. So, let the QuickBooks Business Network do the heavy lifting, so you can focus more on growing your business and less on manual processes.
Frequently Asked Questions
Yes, the QuickBooks Business Network allows you to search for other companies. After signing into your account, you’ll see a search field labeled “company name.” Simply enter the name of the business you want to find. You can then send a connection request, and once it’s accepted, their contact information will become visible to you.
The QuickBooks Business Network offers robust security measures to keep your business information safe. Nevertheless, it’s important to practice good security habits, such as using strong, unique passwords and staying vigilant against phishing attempts.
Yes, you can easily access the QuickBooks Business Network on your mobile device through the QuickBooks mobile app. This convenient feature allows you to connect with other businesses, manage professional relationships, and handle transactions anytime, anywhere. It’s a great way to stay productive and keep your business moving forward, even while you’re on the go.
Follow these steps to invite vendors to join the QuickBooks Business Network:
1. Enter the vendor’s company name and email address.
2. Click Continue.
3. Select Send Invite to send an email invitation to your vendor.
Note:
If the vendor’s email is already linked to a QuickBooks Business Network account, you won’t need to send an invitation. Instead, you can send a connection request directly through the network.
Yes, you can manage multiple companies using a single QuickBooks Online login, but each company must have its own separate subscription. Once set up, you can easily switch between companies using the same email and password, making it convenient to manage multiple businesses under one Intuit account.
When you begin entering a business name in the Company Name field while adding a new customer or vendor, QuickBooks will display matching results from the network. If the business is already in the network, their basic details will appear, and you can send a connection request instead of an invitation.
Once the recipient accepts your connection request, their previously masked contact details will be fully visible. You’ll then be able to send and receive invoices and automate transactions more efficiently within QuickBooks.
