
Dealing with bounced checks or returned payments is an unavoidable part of running a business, no matter how efficient your operations are. Whether it’s a customer payment that didn’t clear or a check that bounced due to insufficient funds, knowing how to record bounced checks in QuickBooks is essential for maintaining clean, accurate, and reliable financial records. Fortunately, both QuickBooks Desktop and QuickBooks Online offer step-by-step methods to help you manage these situations efficiently, ensuring your books stay balanced and your cash flow remains transparent.
QuickBooks users may occasionally encounter issues with customer payments—ranging from insufficient funds and closed accounts to unexpected bank errors. These situations can create confusion and accounting discrepancies if not handled properly. That’s why it’s critical to record bounced checks in QuickBooks using the correct procedures. By doing so, you not only maintain the integrity of your records but also get a clear view of your company’s true financial position. If you’re currently facing a returned payment or NSF transaction, this comprehensive article is the perfect guide to help you address the issue confidently and correctly.
In this detailed article, we’ll walk you through everything you need to know about recording a returned or NSF payment the right way. We’ll also provide step-by-step instructions on how to handle bounced checks specifically in QuickBooks Online, helping you stay on top of your accounting tasks with ease.
How to Record a Bounced Check in QuickBooks Online?
Keeping your financial records accurate means properly handling bounced or NSF payments. If you’re unsure how to enter a bounced check in QuickBooks Online, the process is simple once you know the steps. Here are the 4 easy steps:
Step 1: Recategorize the Bounced Payment to Re-open the Original Invoice
To reopen the original invoice, start by recategorizing all the bounced payments. Keeping accurate financial records begins with logging an expense that reflects the withdrawn funds.
- Sign in to your QuickBooks Online account.
- Click Bank transactions under Transactions.
- Locate the bounced check or returned payment in the bank feed and expand it to view details.
- Select the customer who returned the payment from the Vendor/Customer dropdown menu.
- Choose Accounts Receivable from the Account dropdown.
- Click Add to complete the action.
This adjustment reopens the invoice. If your bank isn’t connected to QuickBooks or the returned payment hasn’t appeared yet, you can manually create an expense and match it later.
Step 2: Unapply the Bounced Check Payment From the Original Invoice
- Go to Sales, then click on Customers.
- Locate and open the profile of the customer with the returned payment.
- Click Edit next to the corresponding payment.
- Click the link for the payment made.
- Check the invoice the payment was originally applied to and deselect it.
- Choose the expense you recorded in Step 1.
- Enter Save and close.
You’ll see a prompt indicating that this transaction is linked to others. Select Yes to confirm.
Step 3: Create an Invoice for the Bank Fees to Charge Your Customer
- Click on the + New button, then select Invoice under the Customers section.
- Select the customer whose payment bounced from the Customer dropdown.
- Set the Invoice date to the date when the bank charged the NSF fee.
- Choose Bank Fees Charged to Customers under the Product/Service column.
- Click + Add new service if it doesn’t exist.
- Choose Service as the type and name it “Bank Fees Charged to Customer.”
- Go to the Income account and select Other Income. To add this income account, click +Add new.
- Enter the amount you wish to charge the customer for the bounced payment.
- Click Save and close to complete the transaction.
In this way, you will be able to recover the bank fees associated with the returned payment.
Step 4: Send a Statement to Your Customer
- Go to Sales and select Customers.
- In the Customers tab, click on the name of the customer who issued the bounced check to open their Transaction List.
- Select Statement from the New Transaction dropdown menu.
- In the Statement Type dropdown, choose Balance Forward.
- Specify the start date, end date, and statement date.
- To share the statement, click Print or Preview to print a copy or Save and Send to email it to the customer.
Your customer will receive an accurate statement for the bounced check if you follow this step. Upon receiving the statement, your customer will be informed of the outstanding balance and the reason for it. It will indicate that there is still an open invoice, along with a second invoice covering bank fees and bounced checks. Invoice payment and bank fees settled, you can record their payment by following the usual steps.
Now, let’s take a look at how to record a bounced check in QuickBooks Desktop.
How to Record a Bounced or NSF Check in QuickBooks Desktop?
You’re not alone if you’re wondering how to record and enter a returned check in QuickBooks Desktop without messing up your books? Recording bounced or NSF checks from your customers in QBD for Windows and Mac is indeed a sign of a good accountant. There are two options that help you navigate the situation easily. Let’s discuss them!
QuickBooks For Windows
There are two options to easily record bounced or NSF checks in QB Windows.
Option 1: Use the “Record Bounced Check” Feature
The Record Bounced Check feature is only available in single-user mode and applies to payments recorded via the Customer Payment window. Before proceeding, change the payment type to Check for returned ACH items. Follow Option 2 if the payment method is locked or the steps don’t apply.
Here are steps to record bounced NSF checks in QuickBooks Desktop for Windows:
- Click on Customers and then Customer Center.
- Go to the Transactions tab and select Received Payments.
- Select the payment you want to mark as NSF (non-sufficient funds).
- In the Receive Payments window, click Record Bounced Check on the Main ribbon.
Note: Checks that have already cleared the bank and are not still in Undeposited Funds are eligible for this option. - Enter the optional details in the Manage Bounced Check window:
- Bank Fee and Date
- Expense Account to track the bank fee
- Class (if applicable)
- Customer Fee (if you’re charging the customer)
- QuickBooks will take the following actions as a result of a bounced check:
- Marking invoices as unpaid
- Deducting bank fees
- Creating a new invoice for the customer fee
- To finish, click Finish.
Option 2: Manually Record a Bounced Check in QuickBooks Desktop
Bounced checks can be manually tracked if the “Record Bounced Check” option doesn’t work. Here’s how:
Step 1: Create an Item and Income Account to Track Bounced Checks
a. Create an Income Account:
- Create a new account in your Chart of Accounts.
- Type: Income
- Name it: Bounced Checks Income
b. Create Bad Check Charge item:
- Type: Other Charge
- Name it: Bad Check Charge
- Amount: Leave it blank (you’ll enter it later if needed)
- Tax Code: Set to Non-taxable
- Account: Choose the Bounced Checks Income account you just created.
Step 2: Reverse the Payment by Creating a Journal Entry
- Go to Company > Make General Journal Entries.
- Pay the bounced check by debiting your Accounts Receivable.
- In the memo, add a note like: “Bounced check #123 – NSF.”
- To link this payment to a customer, click the Name column.
- Refund the original check recipient’s account.
- Hit Save & Close.
Step 3: Switch the Payment for the Invoice to the Reversing Journal Entry
- Select Reports > Customers & Receivables > Customer Balance Detail.
- Locate the original payment and double-click it.
- Uncheck the invoice in the Receive Payments window and apply the payment to the journal entry instead.
- Then click Save & Close.
This will reduce your bank balance and mark the original invoice as unpaid again-allowing you to collect the payment properly.
Step 4: Resend the Open Invoice (Optional)
- Check the original invoice related to the bounced check.
- Add the “Bad Check Charge” item if you are charging your customer a fee.
Note: If there are no bank fees or you don’t want to charge your customer, you can skip this step. - Click the Email icon at the top and select Send to notify the customer.
Your customer will be informed about the outstanding balance and any additional charges through this step.
QuickBooks Desktop for Mac
Important: Bounced Checks only work if the payment was entered as a check and has not been deposited into Undeposited Funds.
- Choose Receive Payment from the Customers menu.
- Open the customer’s check payment.
- Click on Bounced Check.
- Enter the required details.
- QuickBooks creates a bank service charge expense account if you don’t already have one.
- View the invoice, check, and any fees that will be changed by clicking Next.
- Hit on Record.
- It will mark the invoice as unpaid and charge the customer for a bounced check.
- QuickBooks will automatically create a “Returned Check Charges” income account if necessary.
- Reversing the payment also generates a journal entry in QuickBooks. Double-click the entry to view its details.
We hope these steps make recording a returned payment or bounced check in QuickBooks Desktop and Online easier for you.
Best Practices to Avoid Check Bounce
Bounced checks can lead to bank fees, damaged relationships, and disrupted cash flow. To help you avoid these issues, here are some practical tips to prevent returned payments and maintain reliable financial practices.

1. Maintain a Cushion in Your Account
Keep extra funds in your bank account as a buffer. A deposit delay or unexpected withdrawal can be covered by this method.
2. Track Your Spending
Use accounting software such as QuickBooks or mobile banking to monitor your transactions regularly. Keeping an eye on your balance helps you stay on top of things.
3. Set Up Low Balance Alerts
Whenever your account balance drops below a certain threshold, your bank will notify you, allowing you to add funds.
4. Reconcile Bank Accounts Regularly
Make sure all transactions are accounted for by matching your bank statements with your personal or business records.
5. Avoid Post-Dated Checks
Write checks only for immediate use. Post-dated checks can bounce if deposited early.
6. Communicate With Recipients
Tell the payee if you are not sure whether the funds will clear, and don’t write the check until you are certain of their ability to do so.
7. Use Overdraft Protection (If Available)
If you have a savings account or credit line linked to your checking account, overdrafts will be automatically covered.
8. Deposit Funds Promptly
Before writing any checks based on an incoming deposit, make sure the funds have cleared before writing any checks on the basis of that deposit.
Possible Causes Behind a Returned Payment or a Bounced Check
Business operations and customer relationships can be disrupted by returned payments or bounced checks. Understanding the underlying causes of insufficient funds or account errors is essential in preventing them from happening again. When payments fail, businesses need to identify these reasons so they can maintain accurate financial records and communicate clearly with customers.
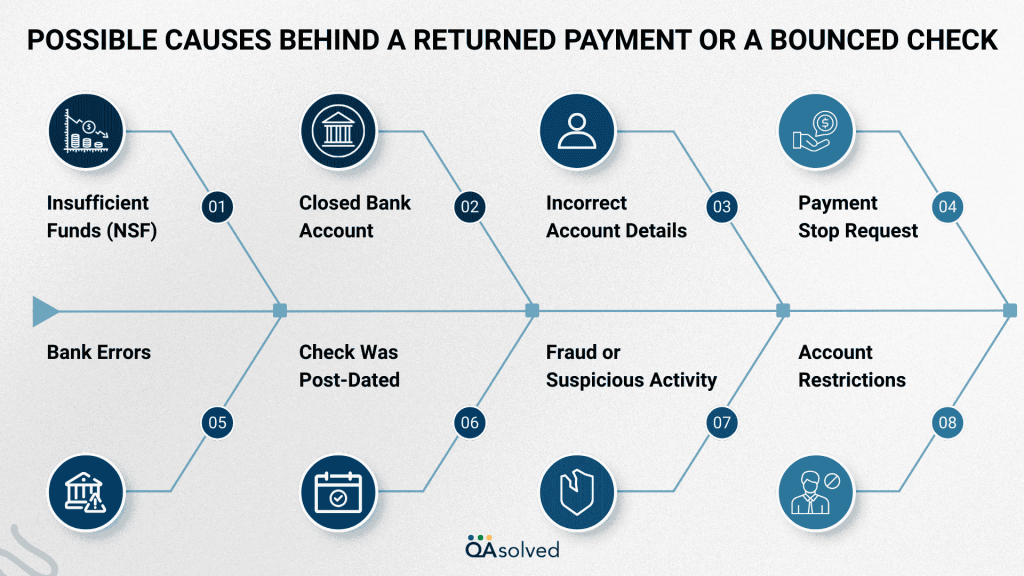
1. Insufficient Funds (NSF)
Bounced checks are most commonly caused by this reason. A non-sufficient funds (NSF) return is caused by insufficient funds in the payer’s bank account.
2. Closed Bank Account
When the payer writes a check from an account that is closed or no longer active, the bank cannot process the transaction, resulting in a returned check.
3. Incorrect Account Details
A bank will not be able to match an incorrect routing number or account number with a valid account if you enter an incorrect routing number or account number.
4. Payment Stop Request
Due to a dispute or error, the payer may have intentionally canceled the transaction by requesting a stop-payment from their bank.
5. Bank Errors
Despite having sufficient funds and providing correct details, banks may return payments when they misread data or experience technical difficulties.
6. Check Was Post-Dated
The bank may reject a check that is deposited before the date written on it, especially if the payer’s bank does not honor post-dated checks.
7. Fraud or Suspicious Activity
The bank may block or return payments that seem fraudulent or suspicious to protect the account holder.
8. Account Restrictions
A legal hold, overdraft limit, or other restrictions on the payer’s account can prevent the bank from processing the payment, causing it to bounce.
If you understand what causes a bounced check or returned payment, you can take proactive steps – such as verifying payment details or setting clear payment policies – to reduce future occurrences. Keep your books in order and maintain customer trust by addressing the issue promptly and accurately in your accounting system.
6 Reasons to Record Customer Refunds in QuickBooks
Bounced or returned payments in QuickBooks can make processes such as entering a returned check in QuickBooks and recording an NSF check in QuickBooks Online easier and more efficient. The following are the key benefits of recording a customer refund in QuickBooks:
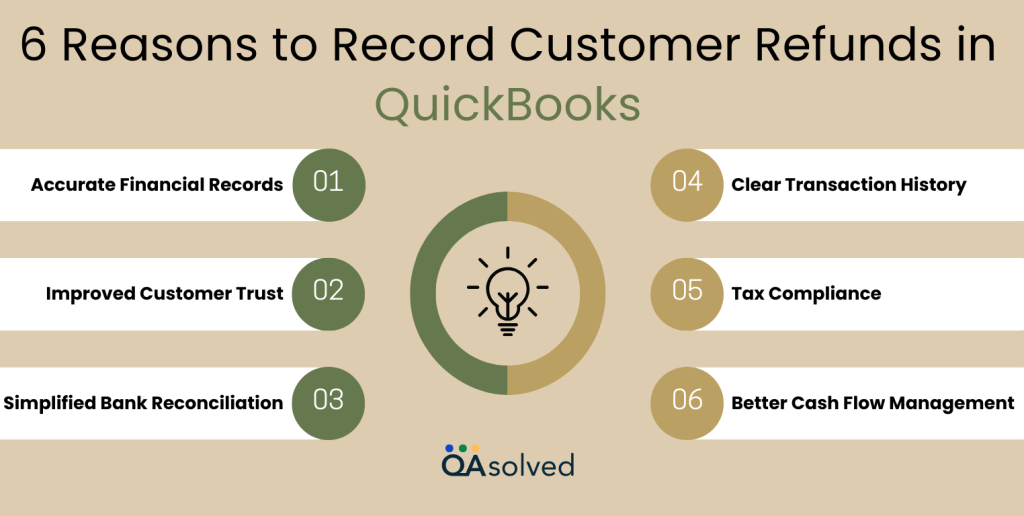
1. Accurate Financial Records
Refunds are recorded to ensure that your books reflect the correct income, preventing overstated revenue and keeping your financial statements audit-ready.
2. Improved Customer Trust
A proper refund log shows professionalism and builds customer confidence by demonstrating transparency and promptness.
3. Simplified Bank Reconciliation
Refunds that are recorded correctly align with actual bank transactions, making reconciliation faster and easier.
4. Clear Transaction History
Recorded refunds provide a traceable record, enabling tracking customer activity and responding to future inquiries.
5. Tax Compliance
Tax laws require accurate refund logs, especially when it comes to reporting income and sales tax adjustments.
6. Better Cash Flow Management
Planning and forecasting cash flow are made more precise when you know exactly when and how much was refunded.
Accurate recordkeeping will not only help you master how to enter returned checks in QuickBooks, but also help you avoid reconciliation errors and maintain better financial control-especially when dealing with NSF checks.
Summary
To cut a long story short, maintaining accurate financial records requires recording returned payments or bounced checks in QuickBooks, whether you use the Desktop version or the Online version. You can ensure that your accounts receivable are updated correctly, and any associated fees, like bank charges, are taken into account. Following the outlined steps will help you manage bounced checks, avoid discrepancies in your financial data, and keep your accounting system up to date.
By regularly monitoring and recording bounced payments, you not only improve your business’s financial health but also prevent issues later on when reconciling accounts or preparing for tax season. In case you’re having trouble in performing the steps, don’t hesitate to connect with our seasoned QuickBooks ProAdvisors.
Frequently Asked Questions
QuickBooks Online users can record NSF checks as follows:
1. Reopen the original invoice by reclassifying the bounced payment.
2. Remove the bounced check payment from the original invoice.
3. Create an invoice for any bank fees your customer needs to pay.
4. Your customer should receive a statement with the outstanding balance.
QuickBooks Desktop users can record rejected payments as follows:
1. Select Company > Make General Journal Entries.
– Debit the bank account and credit Accounts Receivable.
2. Go to Customers > Receive Payments to apply the journal entry.
3. Create an invoice to charge any bounce fees if needed.
To record a reversed or bounced payment in QuickBooks Desktop:
1. Go to Customers > Create Credit Memos/Refunds.
2. Enter the amount to be reversed for the selected customer.
3. Select Save & Close, then choose how to handle the credit (retain as credit or issue refund).
4. Adjust the accounts and reopen the original invoice if necessary.
Keeping accurate records and reflecting reversed payments in bank and customer balances ensures accuracy.
To record a disputed payment in QuickBooks Desktop, follow these steps:
1. Go to Customers > Create Credit Memos/Refunds.
2. Enter the disputed items or amount for the selected customer.
3. Save the credit memo.
4. Choose Apply to an invoice and link it to the related invoice when prompted.
Until the dispute is resolved, don’t apply for credit.
