
Managing a product or service-based organization is never easy for an entrepreneur While the focus is always on providing the best products or services, many companies fail to create a robust and transparent refund system. Refunds play a crucial role in maintaining accurate financial records and providing quality customer service. With QuickBooks, recording a refund is convenient and accurate at the same time. When you record customer refund in QuickBooks Online, your accounts receivable, inventory, and cash flow are updated in real time. QB Online helps you document transactions correctly, whether you’re issuing a refund for a returned product, overpayment, or service cancellation.
QuickBooks Online also simplifies the refund process by aligning it with the original payment method, ensuring your records remain precise and consistent. It doesn’t matter how a customer paid (by check, credit card, or a store credit), issuing a refund in QuickBooks is truly easy. This level of precision not only helps in maintaining clear books but also builds credibility with your customers.
This brings us to the main point: Do you know how to record a customer refund in QuickBooks Online? If yes, then congratulations for mastering the one aspect of providing impeccable customer service. If not, then don’t worry. In this blog, we are going to help you with everything that can help you issue and record refunds in QuickBooks Online effortlessly. So, let’s get started!
Steps to Record a Customer Refund in QuickBooks Online
If you’re wondering how to record a refund in QuickBooks Online, the process is straightforward once you know what to do. If a customer returns an item, overpays, or cancels a service, recording customer refunds correctly ensures accurate and reliable financial reporting. The following steps will guide you through entering the refund correctly.
Customer Refund If Invoice Has Been Paid
Follow the two steps to initiate or issue a refund in QuickBooks if the invoice has been paid:
Step 1: Enter a Credit Memo
- Start with ‘Select + New’ and then click on Credit Memo.
- Select the correct customer in the Customer field.
- Add details such as the Credit Memo Date, the Amount, Tax, and the applicable Product/Service (the item or category you’re issuing a credit for).
Note: If you select an inventory item, QuickBooks will automatically return it to inventory. If the item is damaged or should not be restocked, consider making an inventory adjustment instead. - Click Save and close.
Tip: If the customer overpaid, you may already see an unapplied credit available, eliminating the need for a separate credit memo.
Step 2: Create a Refund
- Again start with ‘Select+ New’ and then select Expense.
- In the Payee field, select or enter the customer’s name.
- Select a bank account from which to issue the refund under the Payment account.
- Select Accounts Receivable (Debtors).
- Enter the refund amount in the Amount field.
- Make sure the tax setting corresponds to your tax treatment.
- Hit Save.
- Click + New again, and select Receive Payment.
- Select the same Customer and specify the payment method and deposit method.
- Due to the refund and credit, the balance should show 0.
- Then click Save and close.
Refunds For Goods or Services that didn’t Satisfy the Customer
You can issue a refund receipt when a customer requests a return for a product or service. Make sure you follow the correct steps to process a credit card refund if the original payment was made by credit card.
Important: To avoid duplicate refunds, confirm that a credit memo has not already been created before issuing the refund. Here are the steps to issue a customer refund for goods or services for unsatisfactory experience:
- Click on + New, then select Refund Receipt or Give Refund.
- Select the customer receiving the refund from the Customer dropdown.
- Choose the bank account where the original invoice payment was deposited under Refund From.
- List the returned products or services in the Product/Service column.
- Ensure all relevant details, such as date, quantity, rate, amount, and sales tax, are filled in correctly.
- Once all the information is correct, click Save and close.
Note: For partial refunds, enter only the specific items or amounts being refunded.
Refund a Customer’s Overpayment or Credit Card
You can use a Check or Expense to record a customer refund in cases such as:
- A customer is applying available credit to their account.
- A customer prepaid for an order, but cancelled before receiving it.
- They need reimbursement for an accidental overpayment.
Refunds recorded this way reduce your bank account balance while clearing the customer’s credit, prepayment, or overpayment.
Step 1: Record the Refund for Your Customer
- Select + New
- Select Expense, Add Expense, or Check. (If you’re using Business view, switch to Accountant view first, then return to these steps.)
- Click the Payee dropdown to select the customer receiving the refund.
- Under the Payment account, choose the bank account where the original overpayment was deposited.
- In the Category column on the first line, select Accounts Receivable.
- Fill out the Amount field with the refund amount.
- Once you have completed all necessary fields, click Save and close.
Step 2: Link the Refund to Customer’s Credit or Overpayment
- Select + New from the menu.
- Select Receive payment to begin recording the transaction.
- Select the customer associated with the refund-related check or expense.
- Select and complete the necessary fields based on your refund details.
- Select the checkbox next to the matching Expense or Check under the Outstanding Transactions section.
- Finally, ensure the payment matches the open balance and select Save and close.
Follow these steps to accurately process a refund in QuickBooks Online, ensuring that your financial records remain balanced and your customer accounts are updated.
How to Categorize a Refund in QuickBooks?
There are several steps involved in categorizing refunds in QuickBooks. Let’s take a look at them!
For Vendor Refunds
- Go to Expenses > Vendors
- Open the profile of the vendor
- Locate and select the bill or expense that was refunded
- Click Add credit or Issue refund
- Enter the refund amount and select the appropriate expense account
- Save the transaction
For Customer Refunds
- Click + New > Refund Receipt
- Choose the customer who is receiving the refund
- Select the bank account used to issue the refund
- Add the items or services being returned
- Fill in details like date, quantity, rate, and total amount
- Save and close the transaction
For Credit Card Refunds
- Navigate to + New > Expense
- Select the payee and credit card account used
- Choose the relevant Category or Item details
- Enter the amount refunded
- Add any necessary memo or reference info
- Click Save and Close
What are the Different Types of Refunds in QuickBooks?
You can issue a refund in QuickBooks via three ways: partial refunds, customer refunds, and payment refunds. Each type requires adjusting the related transactions, keeping your financial records accurate, and maintaining transparency to ensure both compliance and customer satisfaction.
1. Partial Refunds
QuickBooks Online lets you issue partial refunds, allowing you to return a portion of the original payment. This is useful when only part of a product or service needs to be refunded. You can enter adjustment entries to reflect the refund accurately and maintain transparent financial records.
2. Refunding to a Customer
To process a customer refund in QuickBooks Online, start by reviewing and approving the refund request. Once approved, issue the refund and reconcile it with the original payment. QuickBooks also sends a confirmation email to the customer, helping you maintain trust and accurate records.
3. Refunding a Payment
When refunding a payment in QuickBooks, locate the original transaction and select the proper refund method. QuickBooks automatically updates your books, ensuring your financial data stays consistent. Learning how to enter a customer refund in QuickBooks ensures clean books and satisfied customers.
3 Options to Manage and Record Customer Refund in QuickBooks Online
There is no doubt that refund management is a key to enhance customer service and build a sense of trust. Knowing how to process a refund in QuickBooks Online is important but at the same time, you should have a proper understanding of when to use these different refund options. Here are the three options to manage refunds in QB Online:
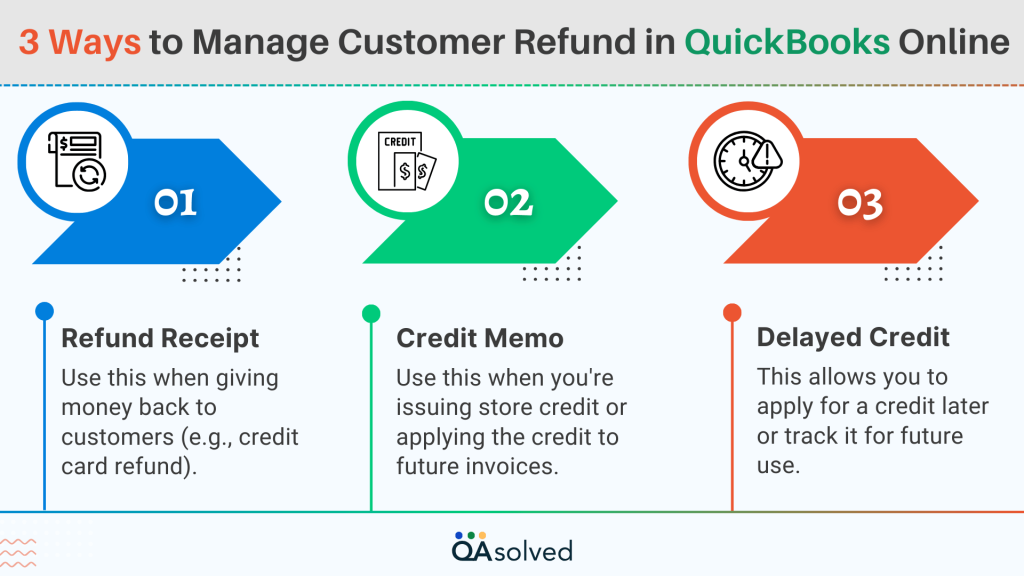
- Refund Receipt – Use this when giving money back to customers (e.g., credit card refund).
- Credit Memo – Use this when you’re issuing store credit or applying the credit to future invoices.
- Delayed Credit – This allows you to apply for a credit later or track it for future use.
By understanding when and how to use these options, you can confidently record customer refund in QuickBooks Online and ensure a smooth, professional experience for your clients.
Benefits of Recording Customer Refunds in QuickBooks Online
We know that recording customer refunds in QuickBooks Online allows businesses to efficiently document and track refund transactions, whether for product returns, overpayments, or service cancellations. Here are the seven advantages of recording customer refunds in QuickBooks Online:
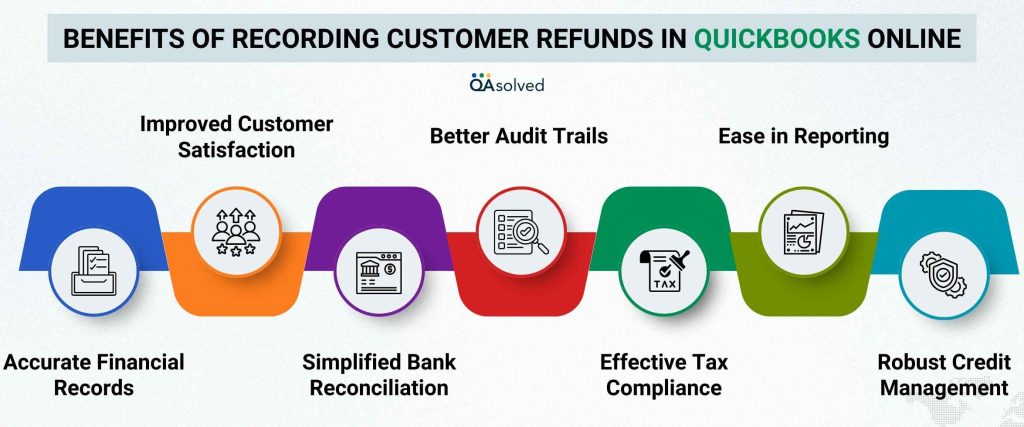
1. Accurate Financial Records
By recording refunds, you ensure your income and expense reports accurately reflect your business activities. Your revenue will not be overstated and your profit margins will be accurate.
2. Improved Customer Satisfaction
Professionalism and trust are built by issuing refunds in a timely and transparent manner. Refunds can be issued more efficiently in QuickBooks, enhancing customer satisfaction.
3. Simplified Bank Reconciliation
The bank account in QuickBooks matches your real bank statement when refunds are entered correctly. Errors are reduced and reconciliations are simplified.
4. Better Audit Trails
Refunds are linked to the original transaction and the customer. During internal reviews or tax season, this provides a clear, searchable audit trail.
5. Effective Tax Compliance
Keeping accurate records of refunds ensures that sales tax amounts are adjusted correctly. In this way, you are able to stay in compliance with tax regulations and avoid overpaying.
6. Ease in Reporting
Refunds can be tracked by customer, item, or account, making it easier to analyze return trends and improve products.
7. Robust Credit Management
QuickBooks helps customers manage outstanding balances and reduce confusion if they opt for store credit instead of a refund.
When you use QuickBooks Online to record customer refunds, you ensure that your financial reports are accurate, your customers remain satisfied, and your business runs smoothly. The small step makes a big difference in long-term financial clarity and customer trust.
In A Nutshell
Recording a customer refund in QuickBooks Online is a vital part of maintaining accurate and transparent financial records. Overpayments, returns, or canceled services all require proper refund handling to keep your books balanced and your customer relationships strong. Understanding how to enter a customer refund in QuickBooks involves selecting the right method based on the situation.
Whenever you issue a refund in QuickBooks, you’re not just returning money; you’re also making sure your accounting workflow reflects the transaction correctly. Every step from linking a refund to the customer’s account to verifying the changes in your accounts receivable and bank register simplifies month-end reconciliation.
If you’re unsure about which refund method to use or facing any problems, consult our QuickBooks Online experts.
Frequently Asked Questions
In QuickBooks, tax refunds should be recorded under an income account that is specifically created for handling refunds. The name of the category typically varies based on the type of tax being refunded—for example, use “Income Tax Refunds” for income tax returns or “Sales Tax Refunds” for sales tax reimbursements.
To record a vendor refund in QuickBooks Online, start by creating a bank deposit to show the refunded amount received. Next, link this deposit to the corresponding bill or expense. This process helps maintain accurate records of your accounts payable and ensures your bank balance is up to date.
Click the link to enter vendor credits and refunds in QuickBooks Online.
In QuickBooks, a refund for customer overpayment refers to the process of returning money to a customer who has paid more than the amount due on an invoice. This typically happens when a customer accidentally overpays or sends duplicate payments. You can either issue a refund or apply the overpaid amount as a credit toward future invoices, depending on the customer’s preference.
Yes, QuickBooks Online allows users to issue partial refunds. You can do this by creating a refund receipt or credit memo for the specific amount you want to refund, rather than the full payment. This flexibility helps businesses handle situations where only a portion of the original payment needs to be returned to the customer.
To enter a customer refund in QuickBooks Online, follow these steps:
Create a Credit Memo:
1. Select + New > Credit Memo.
2. Fill in the refund details (date, amount, tax) and save the credit memo.
Issue the Refund:
1. Click on + New > Refund Receipt.
2. Select the customer, select the bank account for the refund, and enter the refund details (products/services, amount).
3. Save and close the window.
