
If your business frequently relies on a credit card for everyday expenses such as office supplies, business travel, or recurring software subscriptions, it’s essential to set up that credit card in QuickBooks to ensure seamless financial tracking. Properly syncing and managing your credit card within QuickBooks allows you to monitor spending in real-time, reduce manual data entry, and maintain up-to-date financial records. This is especially important for businesses that depend on credit cards for daily operations or regular vendor payments.
To keep your books accurate and your accounting workflow running efficiently, it’s important to understand how to add and edit credit card information in QuickBooks. Whether you’re using QuickBooks Online or QuickBooks Desktop, having the ability to correctly enter, update, or even disable credit card accounts ensures accurate expense tracking, smoother bank reconciliations, and more reliable financial reporting.
In short, by taking the time to manage your credit card data properly, you’re setting your business up for better financial organization and long-term success. In this blog, we’ll explain how to accomplish these tasks in both QuickBooks Online and Desktop versions, allowing you to maintain an organized and reliable accounting system. Whether you’re setting up a new card, updating existing details, or removing outdated information, these steps will help you manage your credit card information.
So, let’s dive in!
Steps to Add, Edit, or Disable a Credit Card In QB Desktop and Online
Payment details don’t have to be entered manually every time you receive a payment. Using QuickBooks, you can securely add, save, or update your customer’s credit card information. It’s a simple and convenient way to make payments.
Note: If a payment method such as Visa, MasterCard, Discover, or AMEX is missing, you can manually add it. This also works for marking transactions as credit card payments, even if you’re not using a merchant account.
Set Up A Credit Card Payment Method in QuickBooks
Add a credit card in QuickBooks so that transactions are automatically imported and financial records are kept up to date.
A. In QuickBooks Desktop for Windows
Here are the steps to set up a credit card payment method in QuickBooks for Windows:
- From the Lists menu, choose Customer & Vendor Profile Lists, and then select Payment Method List.
- Choose New Payment Method from the dropdown box.
- You must enter both the name and the type of payment for the Payment Method.
Tip: Make sure the Payment Method matches the Payment Type exactly. - To save or add more payment methods, click OK.
B. In QuickBooks Online
Follow the given below steps to set up a credit card in QuickBooks Online
- Select All Lists under LISTS under the Settings icon.
- Choose a payment method.
- Hit New to add a new payment method.
- If the payment method is a credit card, check the box This is a credit card.
Note: Make sure to check this box if you’re recording a credit card payment, Merchant Services won’t recognize it otherwise. - To finish, click Save.
C. In QuickBooks Desktop for Mac
- Navigate to the Lists menu and choose Customer & Vendor Profile, then click on Payment Methods.
- Next, select the + icon to add a new payment method.
- Enter the name for the new payment method, then click OK to save it. If you want to add more methods, simply select Next to continue.
So, these are the steps that can help you add a credit card in QuickBooks Desktop, Online, and Mac.
Edit or Disable a Credit Card Payment Method
Easily edit credit card details in QuickBooks to update account numbers, expiration dates, and billing information. Follow the steps for the same:
A. In QuickBooks Desktop for Windows
Payment methods linked to merchant services cannot be modified. If you want to save a payment method without actually charging the credit card, you can change the Payment Type to Cash. To edit or disable a payment method:
- Go to the Lists menu, then select Customer & Vendor Profile Lists, and choose Payment Method List from the options.
Note: Make sure that the payment method matches the actual payment type. If they don’t align, you may encounter an error when processing payments. - Right-click on the payment method you want to edit or disable, then proceed with the following steps:
- To Edit: Choose Edit Payment Method, update the payment details as needed, and then click OK to save your changes.
- To Disable: Select Edit Payment Method, check the box labeled “Method is inactive,” and then click OK. Once a method is marked as inactive, it will still appear in reports but will no longer be available as an option when processing payments.
B. In QuickBooks Online
- Choose All lists under LISTS in Settings.
- Choose a payment method. Select the payment method you want to edit or disable.
- Select Run report from the ACTION column.
- Edit – Click Edit, make the necessary changes, and then click Save.
- Disable – Click Make Inactive, then click Yes
C. In QuickBooks Desktop for Mac
- In the Lists menu, select Customer and Vendor Profile, then select Payment Methods.
- Click Edit.
- Select the Inactive checkbox to disable the payment method or change its name.
- To save your changes, click OK.
If you follow the steps outlined here, you will be able to manage your credit card payments with ease in QuickBooks. You can make updates to card details, add new cards, or disable those that are no longer in use to streamline your accounting workflow, prevent errors, and keep your payment system organized.
Benefits of Setting Up and Managing Credit Card Account in QuickBooks
It’s not just about recording purchases with your business credit card in QuickBooks; it’s about simplifying your financial life. With your card properly integrated, you’ll receive a wide range of time-saving, accuracy-boosting benefits that will make your business run smoothly and help you stay on top of your books.
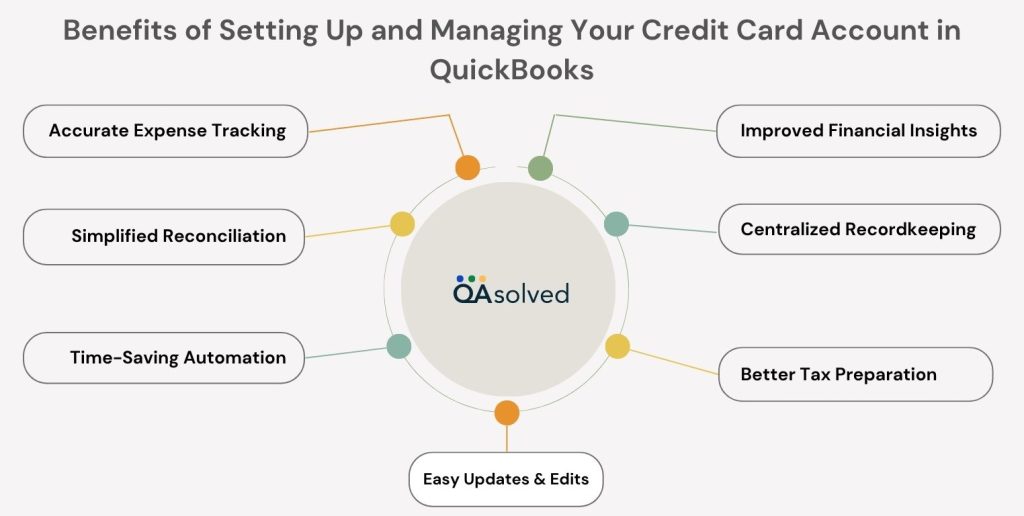
1. Accurate Expense Tracking
Record credit card purchases and payments automatically, ensuring each transaction is captured and categorized correctly. As a result, you maintain cleaner books and reduce the risk of missing any deductible business expenses.
2. Improved Financial Insights
Get a clear picture of where your money is going. You can manage cash flow and make informed business decisions more easily when you link your credit card.
3. Simplified Reconciliation
A properly configured credit card makes monthly reconciliations easier and faster. Using QuickBooks, you can quickly match transactions with credit card statements and detect discrepancies.
4. Centralized Recordkeeping
Manage all your credit card charges, payments, fees, and interest in one place. QuickBooks records and organizes everything, eliminating the need to toggle between statements and spreadsheets.
5. Time-Saving Automation
QuickBooks can automatically download and categorize credit card transactions when you connect to online banking.
6. Better Tax Preparation
If you track all expenses properly, you’ll be better prepared for tax season. Reports that detail deductible expenses and provide an audit trail can be generated easily.
7. Easy Updates & Edits
If you want to rename your account or switch connections, QuickBooks makes it easy to do so without affecting your historical information.
In a nutshell, QuickBooks allows you to manage your credit cards directly, which reduces manual work, improves accuracy, and gives you better insight into your business spending. No matter what your financial needs are, these features ensure that you stay on top of things and in control of your money.
Conclusion
QuickBooks Online and Desktop can help you manage your credit card information effectively, reduce manual error, and improve your overall bookkeeping accuracy. No matter if you need to add a new credit card for recurring expenses, update existing details to reflect a new expiration date, or disable a card no longer in use, QuickBooks helps you stay organized and compliant. Updating your credit card information ensures smoother payment processing, easier reconciliation, and fewer payment delays. In addition, it allows you to see more clearly what your business spends, helping you make more informed financial decisions.
In case you have any questions or need personalized assistance, then we would advise you to get in touch with our certified ProAdvisors for immediate assistance via +1-855-975-1223.
Frequently Asked Questions
A credit card payment should not be recorded as an expense in your accounting records. Instead, it is classified as either a liability payment or a funds transfer. This is because the true expenses occur at the time of purchase when the credit card is used to buy goods or services.
These purchases represent the actual business expenses. When you later make a payment toward your credit card balance, that transaction simply reduces the outstanding liability, the amount you owe to the credit card company, not your overall expenses.
Yes, QuickBooks allows you to accept credit card payments by using its integrated QuickBooks Payments service. This feature enables you to process customer payments in multiple ways—online, over the phone, or in person using a card reader. In addition to credit and debit cards, QuickBooks Payments also supports ACH bank transfers, PayPal, Apple Pay, and other digital wallet options, giving your customers greater flexibility and making it easier for you to get paid faster.
1. Log in to your account.
2. Click on the Payment Methods Widget on the left navigation bar.
3. Choose the Add Payment Method button.
4. Select CA from the Country dropdown menu.
5. Submit your payment information after filling out the necessary fields.
1. Click the Gear icon in the upper right.
2. Select Account and Settings.
3. Go to the Billing & Subscriptions tab.
4. Under the Payment method, click Edit.
5. Add the information for the new credit card (number, expiration date, etc.).
6. Then click Save.
1. Click on Customers.
2. Choose Customer Center.
3. Select the customer for whose payment you want to correct.
4. Identify the Payment you want to edit in the list of transactions.
5. Change the following – for example:
– Change the date
– Adjust the payment amount
– Reapply to the correct invoice(s)
6. Then click Save and Close.
