
Maintaining and organizing receipts is essential for keeping your business finances in order and audit-ready. One of the most efficient ways to streamline this process is by uploading receipts digitally With modern accounting tools and mobile apps, you can simply snap a photo of your paper receipt and upload it directly into your accounting software. This not only eliminates the need for physical storage but also ensures your documents are easily searchable and categorized correctly. Many platforms allow you to tag receipts with expense categories, add notes, and even link them to specific transactions or vendors. One such platform is QuickBooks!
Uploading receipts to QuickBooks Online not only help businesses to track expenses but also ensure compliance during the tax season. QuickBooks can extract key details such as vendor name, date, amount, and category, saving you time and reducing errors. If you’re also looking forward to optimizing your financial processes then you have landed on the right article.
In this blog, we’ll explain how to upload receipts to QuickBooks Online using a variety of methods, including the QuickBooks mobile app, your computer, and email forwarding. So, let’s get started
Steps to Upload Receipts to QuickBooks Online
Don’t worry if you are tired of tracking and entering receipts all the time, because we are now going to help you with the steps to upload receipts to QBO effortlessly.
QuickBooks pulls out the important details from the receipt and creates a transaction for you. Within the Receipts tab, you can review, edit, assign, and match it with existing trans; actions.
Note: Consider upgrading to QuickBooks Online Advanced if your employees must submit receipts for expenses. This feature is not available in all plans, but it lets your team upload receipts for you to review and approve.
Step 1: Upload Receipts to QuickBooks
Choose the method that works best for you when uploading receipts.
A Quick Heads-Up:
Upload receipts that contain sensitive personal information, such as credit card numbers or government identification. You can upload receipts in PDF, JPEG, JPG, PNG, and GIF formats to QuickBooks. Your photos might be in HEIC format if you have a newer iPhone or iPad. You’ll need to convert them to one of the supported file types before uploading.
Upload Receipts from Your Google Drive or Computer
Adding receipts to QuickBooks can be done by uploading them from your computer or importing them directly from Google Drive.
- Log in to QuickBooks Online.
- Click on Receipts under Transactions.
- Add your receipts by uploading them from your computer or Google Drive.
- Make sure you only include one receipt per image or file.
Tip: To begin using QuickBooks Online, download the iOS or Android app.
Steps to Snap a Photo of Your Receipt on Your Mobile Device
- Open the QuickBooks Online app.
- Click the Menu (≡) icon.
- Select the Receipt snap.
- Take a clear photo of your receipt with the Receipt camera.
- Select Upload, then tap Use this photo.
Note: You can disable the sound when you snap receipts on your Android phone.
Add Email Receipts to QuickBooks Online
You can also forward your receipt to QuickBooks Online by email. You can review and approve the transaction after the system pulls out the key details.
You can use the QuickBooks app to upload receipts on the go, which makes it easy to track expenses wherever you are.
Step 2: Review, Add, or Match Receipts
The receipts you uploaded to QuickBooks have not yet been entered into your books. Review, edit, and either add or match existing transactions to complete the process. Here’s how you can do it.
On A Web Browser
- Click Receipts under Transactions.
- In the For review tab, you’ll see your uploaded receipts.
- Similar transactions will be suggested by QuickBooks.
- Review, add, or match them if necessary using the Action column.
If No Matching Record is Found
QuickBooks can create a matching transaction if a receipt doesn’t appear:
- If any details are missing or need to be edited, click Review.
- Select Save and Next.
- Select either Create Expense or Create Bill, depending on the type of transaction.
If A Single Matching Record is Found
QuickBooks finds a match if there is already a record in your books that corresponds to the receipt you uploaded.
You can either:
- Click Match to instantly link the receipt to the existing transaction.
- You can review the match by clicking the ▼ dropdown next to Match, then selecting Review. Before confirming, you can check the details.
Make sure the vendor, date, and amount are correct when reviewing. Changes can be made if any information is missing or needs to be corrected. Click Save and Next to save your updates, and then select Match to connect the receipt and transaction once you’re satisfied.
If QuickBooks Finds Two or More Matching Records:
- Select Review from the dropdown next to Match.
- Identify the correct expense or bill by comparing potential matches.
- Click Match to link it to the receipt.
- Make any necessary corrections or add information if needed by selecting Review.
- Once the changes have been made, click Save and Next.
- Choose the correct bill or expense from the list, then click Match to connect it to the receipt or bill.
On an iOS or Android Device
- Click the Menu.
- Choose the Receipt Snap option.
- In the For Review tab, you’ll find receipts that haven’t been added to your books yet.
- Check the receipt amount label on your uploaded receipts to determine what action needs to be taken.
If One or More Matching Records Are Found
Here are the steps to take if QuickBooks identifies one or more transactions matching your receipt:
- Click on the receipt to view matching transactions.
- Link the receipt to the transaction you want.
If No Matching Record Is Found (No Label Under the Receipt Amount
If there is no label under the receipt amount, QuickBooks cannot find a matching transaction. Based on the receipt, you can create a new transaction.
- Select the receipt.
- Select Create an Expense.
Tip: Make sure to swipe the receipt to add the expense quickly.
If the Receipt has Missing Info
QuickBooks isn’t able to extract all the information and needs more details before creating an expense.
- To add details, select the receipt.
- Choose Save receipts.
- Create an expense.
Note: Your receipts can be viewed under the Reviewed tab. Swipe right on a receipt to undo it and move it back to For Review.
We hope these steps will help you organize your financial records and easily upload receipts into QuickBooks Online. Receipt forwarding in QuickBooks Online lets you send receipts directly to your account via email if you’d like to streamline receipt management.
Benefits of Uploading Receipts to QuickBooks Online
Uploading QuickBooks Online receipts improves your bookkeeping efficiency, accuracy, and organization in several ways:
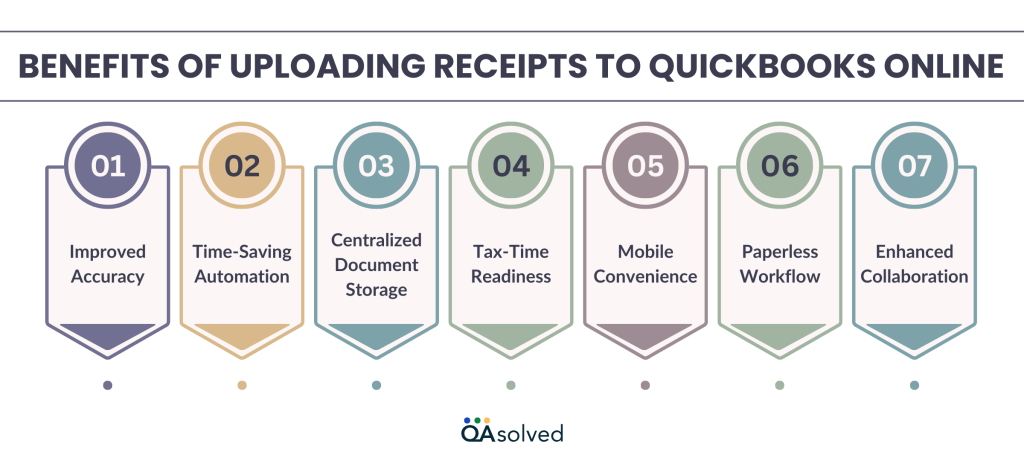
1. Improved Accuracy
QuickBooks Online receipt tracking automatically reads key details like vendor name and amount, improving data accuracy and reducing manual errors.
2. Time-Saving Automation
Uploading receipts to QuickBooks can match existing transactions, so you can reconcile expenses faster and spend less time on manual entry.
3. Centralized Document Storage
Receipts from QuickBooks Online are stored securely in one place, attached to the correct transactions for easy access during audits or reviews.
4. Tax-Time Readiness
QuickBooks Online receipt tracking ensures your business is always prepared for tax season with clear documentation for every expense.
5. Mobile Convenience
The QuickBooks mobile app allows you to upload receipts directly from your phone, so you can track expenses in real time from wherever you are.
6. Paperless Workflow
Get rid of lost paper receipts. You can create a clutter-free, eco-friendly bookkeeping process using QuickBooks Online receipts, which are stored digitally.
7. Enhanced Collaboration
Keeping your financial records current and collaborating smoothly with your accountant or bookkeeper is easier with the ability to upload receipts using your device.
In addition to keeping you organized, uploading receipts ensures that your tax records are accurate and compliant. You can save time and reduce errors by using QuickBooks’s extraction of vendor names, dates, amounts, and categories.
Summary
In conclusion, uploading your receipts to QuickBooks Online is a straightforward and efficient way to track your expenses. By capturing receipts on your computer or mobile device and uploading them directly to QuickBooks, you can ensure that your financial records are accurate and organized. Whether you upload sales receipts manually or use automatic forwarding, QuickBooks Online simplifies the process of storing, categorizing, and matching receipts with existing transactions.
All receipt details can also be reviewed and edited before being added to your books, ensuring that your expense data is always up-to-date and error-free. Integrating these two systems seamlessly saves you time and reduces the possibility of accounting errors, making your financial management much more reliable.
In case you’re having trouble in completing the above-mentioned steps then please do not hesitate to contact QuickBooks Online Support.
Frequently Asked Questions
Follow these steps to upload sales receipts to QuickBooks Online:
1. Log in to QuickBooks Online.
2. Click on “Transactions” then “Receipts”.
3. Click Upload from computer or Upload from Google Drive to choose your receipt files.
4. Upload receipt files from your computer or cloud storage.
5. Once uploaded, QuickBooks will automatically extract details from the receipt.
6. Edit the extracted data.
7. Save the receipt, and it will be added to your transaction history.
In QuickBooks Online, you can import bills using supported file formats such as Excel or CSV. This simplifies data entry, especially if you have multiple bills to upload. Using the “Import Data” tool under the settings menu, you can map and upload your bills directly into QuickBooks.
Follow these steps to match receipts in QuickBooks Online:
1. Click on the Transactions menu, then select Receipts.
2. Match the uploaded receipt in the For Review tab.
3. To automatically link a matching transaction, click Match in QuickBooks.
4. Click the dropdown next to Match, choose Review, then select the correct transaction and click Match.
5. To add the receipt to your books, select the receipt and choose Create Expense or Create Bill.
Follow these steps to bulk upload invoices in QuickBooks Online:
1. Sign in to QuickBooks Online.
2. Choose Import Data from the Settings icon.
3. Choose Invoices from the list of import options.
4. Click Browse to upload your invoice file (in CSV, XLS, or XLSX format).
5. Map the fields from your file to QuickBooks fields (like invoice number, customer, amount, etc.).
6. Review your data, then select Import.
