

Are you also facing the “QuickBooks Subscription Has Lapsed” error when trying to open QuickBooks Desktop? Whether you’re recording transactions, reviewing financial reports, or preparing payroll, this unexpected message can interrupt your workflow and delay important accounting tasks. Naturally, the first thing you want to know is why the error occurred and what you can do to get QuickBooks working again.

The first step is to identify what caused the problem. There could be several reasons behind the subscription lapsed error. However, the good news is that you can fix most of these issues manually. With the right troubleshooting steps, you can identify the underlying cause, restore access to QuickBooks Desktop, and get back to your accounting tasks without unnecessary delays.
In this blog, we’ll walk you through five practical ways to fix the “QuickBooks Desktop Subscription Has Expired” error and get your accounting work back on track. Along the way, you’ll learn how to renew or reactivate your QuickBooks Desktop subscription, what to do when the error refuses to go away, and how to reactivate your QuickBooks Desktop Payroll subscription to get your payroll services running again. Let’s walk through the solutions one by one.
How Do You Fix the “Subscription Has Lapsed” Error in QuickBooks Desktop
An expired QuickBooks subscription can trigger the “QuickBooks Subscription Has Lapsed” error and restrict access to certain Desktop features. The issue may be related to subscription status, billing information, or account-related problems. Here are five solutions to help you troubleshoot the error and restore access.
Solution 1: Update Your Billing Information
An invalid or outdated payment method may lead to this subscription error. Updating your billing information through the Customer Account Management Portal (CAMPs) can help restore your subscription status. Follow these steps to update your payment details:
- Sign in to the Customer Account Management Portal (CAMPs) using your Intuit account.
- From the list of available products and services, select QuickBooks Desktop.
- Locate your QuickBooks product and click Details.
- Find the Payment Method section and select Edit.
- Enter your updated payment or billing information, then click Save and Close.
- Once the payment details are updated, open QuickBooks Desktop on your computer.
- From the Help menu, hover over Manage My License.
- Select Sync License Data Online to refresh your QuickBooks subscription information.
Important: Only the primary contact associated with the account can make changes to the payment information.
After syncing the license data, reopen QuickBooks Desktop and check whether the subscription message has been resolved. If the QuickBooks Subscription Has Lapsed error still appears, proceed to the next troubleshooting solution.
Solution 2: Update QuickBooks Desktop to the Latest Release
Working on an outdated version of QuickBooks Desktop can sometimes lead to subscription-related issues, including the “QuickBooks Subscription Has Lapsed” error. Installing the latest available update helps ensure that QuickBooks has the latest bug fixes, improvements, and security updates.
Download and install the latest update available for your QuickBooks Desktop version. Once the update is installed, restart QuickBooks and check whether the subscription error has been resolved
Solution 3: Run the QuickBooks Install Diagnostic Tool Using Tool Hub
A problem with certain Windows components can sometimes interfere with QuickBooks Desktop’s connection to Intuit’s online services and contribute to subscription-related errors. The QuickBooks Tool Hub includes the Install Diagnostic Tool, which can identify and repair common installation and Windows-related issues.
Before starting, close QuickBooks Desktop. For better compatibility, Intuit recommends using Tool Hub on Windows 11, 64-bit.
Step 1: Download and Install QuickBooks Tool Hub
Follow these steps to get the latest version of the Tool Hub:
- Close QuickBooks Desktop if it is currently open.
- Download the latest available version of QuickBooks Tool Hub and save the setup file somewhere easy to access, such as your Downloads folder or desktop.
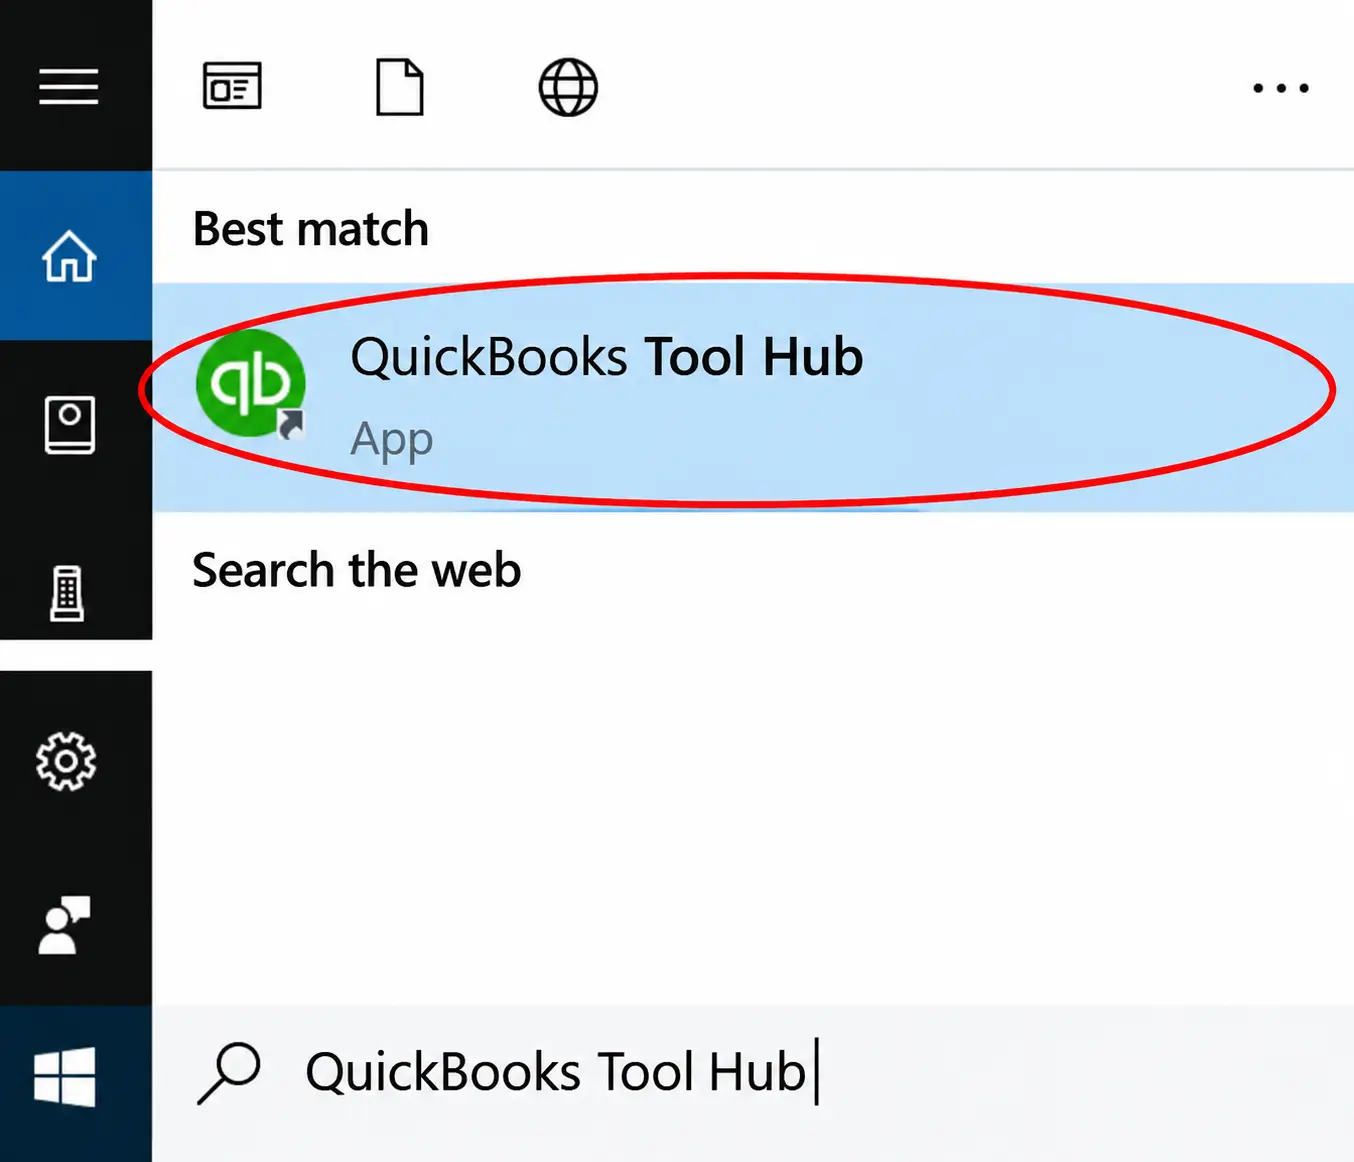
- Locate and open the downloaded QuickBooksToolHub.exe file.
- Follow the instructions displayed on the screen and accept the license terms to complete the installation.
- Once installed, open QuickBooks Tool Hub from the desktop shortcut.
If you can’t find the Tool Hub icon, then search for QuickBooks Tool Hub using Windows Search and open the application from the results.
Tip: If Tool Hub is already installed on your computer, open it and select the Home tab to check the version currently installed.
Step 2: Run the QuickBooks Install Diagnostic Tool
After opening Tool Hub, use the QuickBooks Install Diagnostic Tool to repair Windows components that QuickBooks may need to operate correctly.
- From the Tool Hub home screen, select Installation Issues.
- Click QuickBooks Install Diagnostic Tool and allow it to scan and repair the required Windows files.
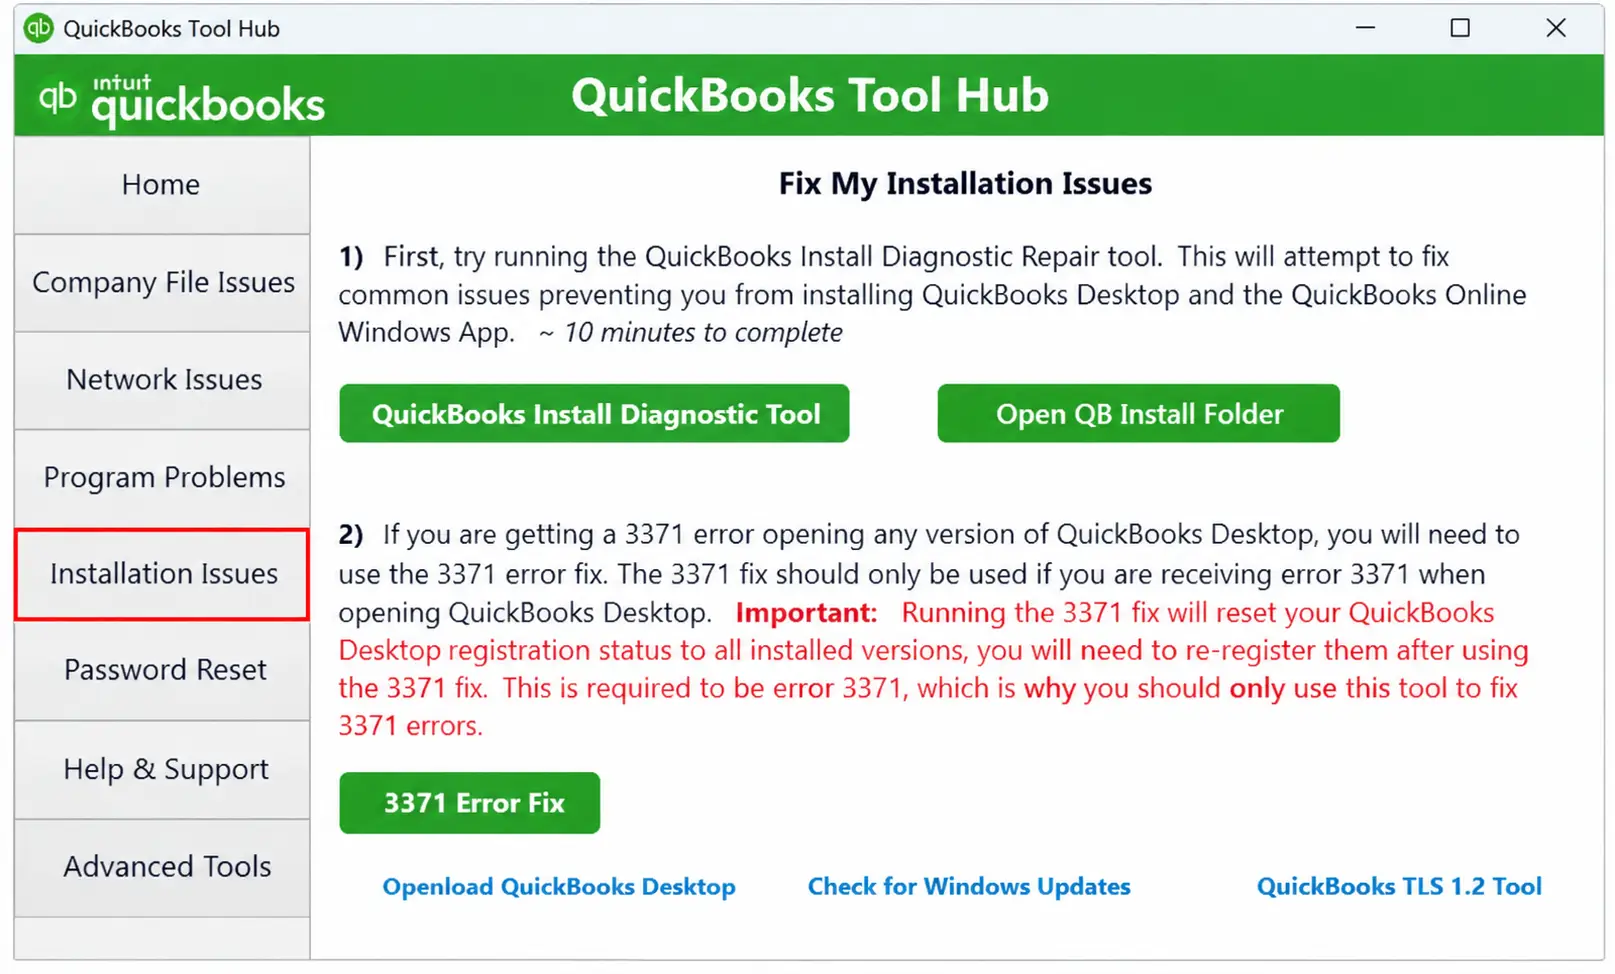
- Wait for the diagnostic process to finish. This may take some time depending on your system.
- Once the process is complete, select OK and restart QuickBooks Desktop.
- Open your company file and check whether the QuickBooks Subscription Has Lapsed error has been resolved.
Solution 4: Restore QuickBooks Product and License Files
QuickBooks Desktop stores your product and license details in an entitlement file. If the file is damaged, QuickBooks may have trouble verifying your subscription. Deleting the file allows QuickBooks to recreate it when you register the software again. Follow these steps to restore the product and license information:
- Keep your QuickBooks product and license details ready. You’ll need them to register QuickBooks again. If you don’t have this information, use instructions to find your QuickBooks product and license number.
- Close QuickBooks Desktop completely before proceeding.
- Open the Windows Start menu and search for Run. Select the Run application.
- In the Run window, enter the following path and press Enter:
C:ProgramDataIntuitEntitlement Clientv8 - If the location doesn’t open, try the alternative path:
C:ProgramDataIntuitEntitlement Clientv6 - Locate the file named EntitlementDataStore.ecml in the folder.
- Right-click the file and select Delete. Confirm the deletion when prompted.
- Launch QuickBooks Desktop again and open your company file.
- QuickBooks will prompt you to register the product. Follow the on-screen instructions and enter your product and license information to complete the registration.
Once the registration is complete, QuickBooks will recreate the required entitlement information.
Solution 5: Check Your Internet Connection Settings
QuickBooks Desktop needs a stable internet connection to communicate with Intuit’s online services and verify your subscription details. If you continue to encounter the subscription error, incorrect internet or connection settings could be preventing QuickBooks from connecting properly. So, check and update your Internet connection settings in QuickBooks Desktop to ensure the software can establish a connection with Intuit’s services.
Try the solutions mentioned above one by one to identify and fix the underlying issue. If the problem continues, contacting QuickBooks Desktop support can help determine whether the issue is related to your subscription or account.
How to Reactivate or Renew Your QuickBooks Desktop Subscription
If your QuickBooks auto renewal is not working, you may need to manually renew or reactivate your QuickBooks Desktop subscription to continue using subscription-based features without interruption.
Method 1: Renew QuickBooks Desktop Subscription Through Your Intuit Account
The quickest way to renew your subscription is through your Intuit account. Follow these steps:
- Sign in to your Customer Account Management Portal or Intuit Account.
- Open the Products & Services section.
- Locate your QuickBooks Desktop subscription.
- Check the subscription status.
- If renewal is available, click Renew or Reactivate Subscription.
- Review your billing information and update it if required.
- Complete the payment process.
- Wait for the renewal confirmation email.
Once the renewal is processed, allow some time for the updated subscription status to reflect in your QuickBooks account.
Method 2: Renew from QuickBooks Desktop
Depending on your QuickBooks Desktop version, you may also be able to manage your subscription directly from the application.
- Open QuickBooks Desktop.
- Select Help from the top menu.
- Choose Manage My Subscription or Manage My License, depending on your version.
- Sign in using your Intuit Account credentials.
- Follow the on-screen instructions to renew or reactivate your subscription.
- Complete the payment process if prompted.
- Close and reopen QuickBooks Desktop once the renewal is complete.
Sync Your License After Renewing
Sometimes, QuickBooks Desktop may continue displaying an expired or lapsed subscription message even after you’ve completed the renewal. This can happen when the updated subscription information hasn’t synced with Intuit’s servers yet.
You can try refreshing your license information by following these steps:
- Open QuickBooks Desktop and go to Help.
- Select Manage My License.
- Choose Sync License Data Online.
- Allow QuickBooks to refresh your subscription information.
- Close and reopen QuickBooks Desktop.
- Check your account or subscription status to confirm that the renewal has been updated.
If the subscription still appears inactive after completing these steps, verify your Intuit account and payment details. Since subscription renewals are easy to overlook, users may only realize there’s an issue after encountering an error or losing access. Let’s look at what happens when you miss your QuickBooks Desktop subscription renewal.
What Happens When Your QuickBooks Desktop Subscription Expires?
You can still access your company file through View-only mode even after your QuickBooks Desktop subscription has expired. This mode allows you to review existing financial data and reports, but you won’t be able to create new transactions or use QuickBooks as an active accounting application.
Note: View-only mode is available with QuickBooks Desktop for Windows 2023 R3 and later and QuickBooks for Mac Plus 2024 and later.
However, users running QuickBooks Desktop 2023 R1 or QuickBooks for Mac 2023 should update to a supported version before canceling their subscription. This helps ensure that their company files remain accessible through the available View-only functionality.
What Can You Do in QuickBooks View-Only Mode?
View-only mode is designed primarily for reviewing historical accounting information. You can:
- Open and review your existing company files.
- Access and view financial reports.
- Review previously recorded transactions and accounting information.
- Keep access to your existing data without creating new transactions.
Before you cancel your subscription or renew QuickBooks Desktop subscription, it is recommended that you export important financial data. Having an additional copy of your records can be useful if you later need to migrate your data or access it through another accounting solution.
Limitations of View-Only Mode
While View-only mode provides continued access to your data, it comes with several restrictions:
- No Transaction Entry: You cannot create or record new transactions.
- Administrator Access Only: Only the company file administrator can access View-only mode.
- No Third-Party Apps: Connections to third-party applications are unavailable.
- Advanced Inventory is Unavailable: You must disable Advanced Inventory, which means features such as Sites, Bins, Serial/Lot Numbers, Barcodes, and related reports cannot be accessed.
- Advanced Pricing is Unavailable: You cannot access Price Rules or other Advanced Pricing features.
- Attachments Cannot be Viewed: Attachments associated with transactions are not accessible.
- Single-User Mode may be Required: View-only mode may not function correctly in multi-user mode, so switch to Single-user mode before canceling your subscription.
- Cloud Hosting Limitations: View-only mode does not work with Intuit Cloud Access/Hosting through Rightworks.
- Reinstallation is Not Supported: The feature applies only to QuickBooks Desktop installations already present on your computer. It will not work if you reinstall QuickBooks later.
- Older Versions are Excluded: QuickBooks Point of Sale and QuickBooks Desktop Mac Plus 2023 and earlier do not support View-only mode.
View-only mode can be useful when you only need to review historical QuickBooks data after a subscription expires.
Why Is QuickBooks Showing a Subscription Expired Pop-Up on Your Screen
A QuickBooks Desktop subscription can fail for several reasons, from payment-related problems to account or connectivity issues. Understanding the possible causes can make it easier to identify what went wrong and take the right steps to restore your subscription.
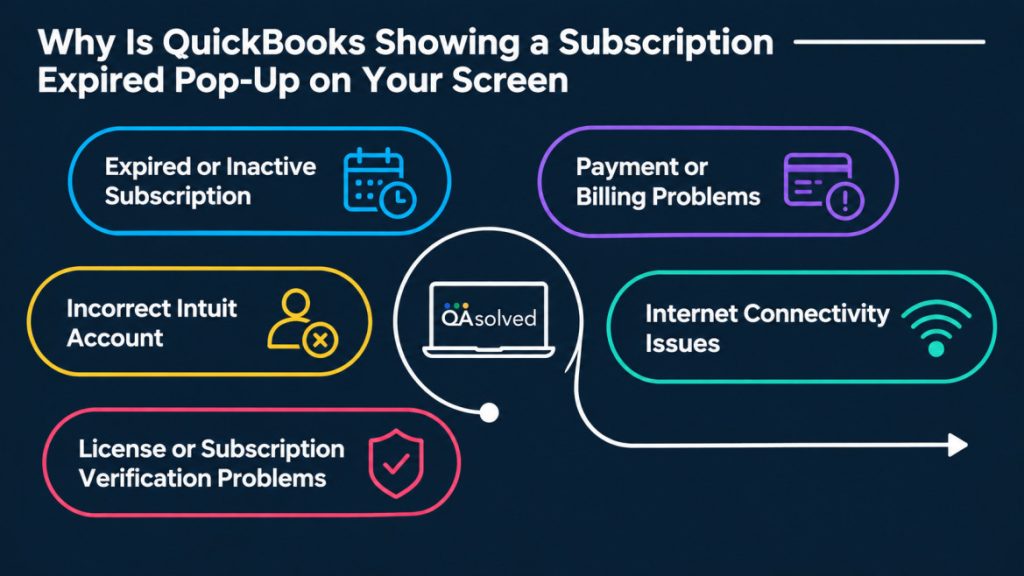
- Expired or Inactive Subscription: Your QuickBooks Desktop subscription may have expired or become inactive because the renewal was missed or the subscription was canceled.
- Payment or Billing Problems: A declined payment, expired card, or outdated billing information can prevent the subscription from renewing successfully.
- Incorrect Intuit Account: Signing in with a different Intuit account than the one linked to your QuickBooks subscription can cause verification or activation issues.
- Internet Connectivity Issues: An unstable or interrupted internet connection may prevent QuickBooks Desktop from communicating with Intuit’s servers and verifying your subscription.
- License or Subscription Verification Problems: QuickBooks may sometimes have difficulty syncing updated license or subscription information, particularly after a renewal or account change.
Understanding these causes can help you identify and address the issue before it causes further disruption. However, knowing the warning signs is equally important, as they can help you recognize a subscription problem early. Let’s look at the key signs to watch for.
What Are the Common Signs of a QuickBooks Desktop Subscription Failure
A failed or inactive QuickBooks Desktop subscription can show up in different ways. Recognizing these signs early can help you check your subscription status and address the issue before it affects your regular accounting activities.
- Subscription Expiration Message Appears: QuickBooks may display a notification stating that your subscription has expired, lapsed, or needs to be renewed.
- Repeated Renewal Prompts: You may repeatedly see requests to renew or reactivate your QuickBooks Desktop subscription, even after signing in.
- Subscription-Based Features Stop Working: Features that require an active subscription, such as payroll, online services, or connected services, may become unavailable.
- QuickBooks Asks You to Verify Your Subscription: The software may repeatedly request your Intuit account credentials or ask you to verify your subscription details.
- Updates or Payroll Services Are Interrupted: A subscription issue may prevent QuickBooks from downloading certain product or payroll updates, which can indicate that your subscription needs attention.
If payroll is affected, here’s how you can reactivate your QuickBooks Desktop Payroll subscription and get your payroll services back on track.
How to Reactivate Your QuickBooks Desktop Payroll Subscription
It’s common to miss a deadline, but it’s also important to renew the QuickBooks Payroll Subscription as soon as possible to avoid service interruptions. Whether you’re reactivating an existing plan or updating your QuickBooks Desktop Payroll subscription, checking your details can help ensure everything is active and up to date.
Note: In some cases, you may also encounter the QuickBooks Cannot Verify Payroll Subscription message, which can require additional troubleshooting before payroll services are restored.
Step 1: Reactivate Your QuickBooks Payroll Subscription
The reactivation process depends on the QuickBooks Payroll service you currently use. Before getting started, identify your payroll service and follow the relevant steps below.
Note: If you’re unsure about which payroll service you have, check out your QuickBooks account to identify your current payroll subscription.
A. Intuit QuickBooks Workforce
For users with an Intuit QuickBooks Payroll subscription, you can reactivate the service directly from your account:
- Select Settings and go to Subscriptions and billing.
- Find your payroll subscription and select Resubscribe.
- Review the subscription details and enter your payment information.
- Choose your preferred payment method and select Resubscribe to complete the process.
B. QuickBooks Desktop Payroll Assisted
To renew this particular version, the process can be a bit more complex. This is why we suggest you need to contact QuickBooks Payroll support and reactivate your QuickBooks Desktop Payroll Assisted subscription. The support team can guide you through the reactivation process and help restore your payroll service.
C. QuickBooks Desktop Payroll Enhanced or Basic
QuickBooks Desktop Payroll Enhanced and Basic users have multiple options for reactivating their payroll subscription. Before proceeding, make sure you’re using a supported version of QuickBooks Desktop.
a. Reactivate Through Your QuickBooks Company File
This is a convenient way to restore your payroll service directly from QuickBooks Desktop:
- Open your QuickBooks Desktop company file.
- Go to Employees and select My Payroll Service.
- Choose Account/Billing Info.
- Sign in with your Intuit Account credentials when prompted.
- Your QuickBooks Account page will open. Under Status, select Resubscribe.
- Follow the on-screen instructions to complete the reactivation.
b. Reactivate Through Your Intuit Account
You can also reactivate your payroll subscription through your Intuit Account:
- Sign in to your Intuit Account using your usual login credentials.
- Locate your payroll subscription and check its current Status.
- Select Resubscribe.
- Follow the instructions displayed on the screen to complete the process.
Note: After completing the reactivation, it may take up to 24 hours for your payroll subscription to become fully active. Once the process is complete, the subscription status should change to Active.
Step 2: Review Your Payroll Data
Once your payroll subscription is active again, it’s a good idea to review your payroll information before processing. Reactivating the service may require you to revisit certain payroll settings, employee details, and tax information to make sure everything is accurate.
A. Intuit QuickBooks Workforce
If you use Intuit QuickBooks Workforce, review your employee and payroll settings by following these steps:
- Go to Payroll and select Employees.
- Review each employee’s information and make sure details such as deductions, W-4 information, and sick or vacation balances are correct.
- Go to Settings and select Payroll Settings.
- Review your tax rates and confirm that the information is up to date.
B. QuickBooks Desktop Payroll
For QuickBooks Desktop Payroll users, you can review employee and payroll information directly from your company file:
- Open QuickBooks Desktop and go to Employees > Employee Center.
- Select the Employees tab and review each employee’s details.
- Check important information such as deductions, W-4 details, and sick or vacation information.
- Go to Lists > Payroll Item List and review your payroll tax items.
Taking a few minutes to review these details can help you catch outdated or missing information before you run your next payroll.
Once you’ve completed the reactivation steps, review your payroll information carefully before processing your next payroll. Keeping your QuickBooks Desktop Payroll active and your employee and tax details up to date can help prevent unnecessary interruptions.
Want to know how much it costs to renew your QuickBooks Payroll subscription? Take a look at the next section for a breakdown of the available plans and their pricing.
How Much Does QuickBooks Payroll Subscription Renewal Cost
Before renewing your QuickBooks Payroll subscription, it’s worth reviewing the available plans and pricing. The renewal cost depends on your subscription tier, the number of employees on your payroll, and any applicable promotional pricing or changes to Intuit’s current rates.
QuickBooks Payroll offers three main plans: Core, Premium, and Elite. Each plan includes payroll processing and tax-related features, but higher tiers provide additional benefits such as same-day direct deposit, workers’ compensation support, and dedicated HR assistance.
QuickBooks Payroll Plans and Pricing
The following table outline the plan prices and key features shown in the pricing information referenced above. These figures should be verified against Intuit’s current pricing before renewing, as rates and promotional offers can change.
| Feature | QuickBooks Core | QuickBooks Premium | QuickBooks Elite |
| Monthly Base Price | $50 Per Month | $88 Per Month | $134 Per Month |
| Monthly Price Per Employee | $7/Employee Per Month | $10/Employee Per Month | $12/Employee Per Month |
| Key Features | Full-service payroll, tax automation, next-day direct deposit | Same-day direct deposit, HR support center, workers’ compensation | Tax penalty protection, personal HR advisor |
| 1099 E-File | No | No | No |
| Time Tracking | Yes | Yes | No |
| Dedicated HR Advisor | Yes | Yes | Yes |
What Affects Your QuickBooks Payroll Renewal Cost
When calculating your QuickBooks Payroll subscription renewal cost, consider these factors:
- Subscription Tier: Core, Premium, and Elite have different base prices and feature sets.
- Employee Count: Per-employee charges increase your total monthly subscription cost as your payroll grows.
- Promotional Pricing: If you initially subscribed using a discount, check whether that offer still applies at renewal.
- Plan Changes: Upgrading or downgrading your subscription may change your recurring charges.
- Additional Services: Review any separately billed services or add-ons included in your account.
How to Check Your Renewal Charges
To confirm what you’ll pay, sign in to your Intuit account and review your QuickBooks Payroll subscription details, billing information, and upcoming charges. Check the renewal amount against your current plan and employee count before making changes.
If your QuickBooks Payroll subscription has expired or your renewal payment failed, verify your billing method and subscription status first. This helps you distinguish a payment issue from a pricing change or a subscription that needs to be renewed.
Tips to Avoid the QuickBooks Subscription Has Expired or Lapsed Issue
Taking a few preventive measures can help you avoid subscription-related interruptions and reduce the chances of encountering this error. Consider the following practices:
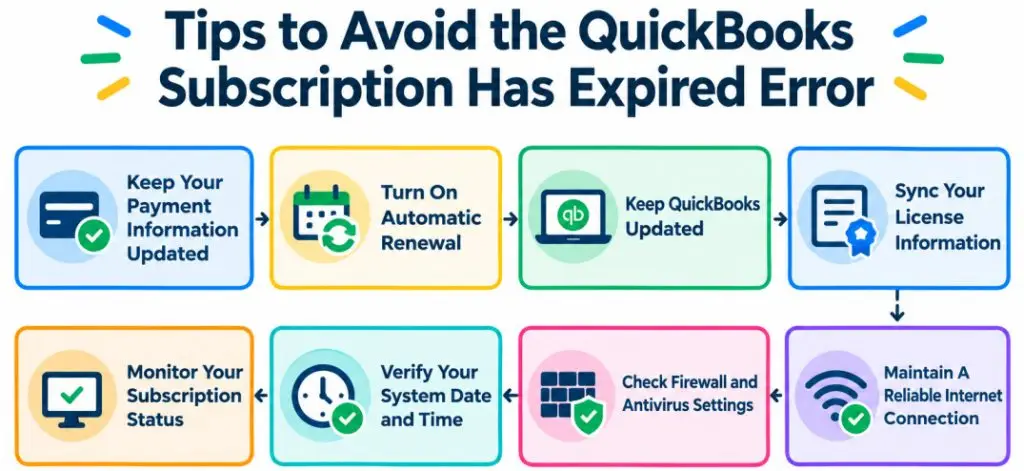
- Keep Your Payment Information Updated: Make sure your billing and payment details in your Intuit account are current.
- Turn On Automatic Renewal: Enabling auto-renewal can help prevent your subscription from expiring unexpectedly.
- Keep QuickBooks Updated: Regularly install the latest QuickBooks Desktop updates to maintain compatibility and improve subscription verification.
- Sync Your License Information: After renewing your subscription or experiencing verification issues, sync your license data to ensure QuickBooks has the latest subscription details.
- Maintain A Reliable Internet Connection: QuickBooks needs internet access to communicate with Intuit’s servers and verify your subscription.
- Check Firewall and Antivirus Settings: Make sure your security software isn’t blocking QuickBooks from connecting to Intuit services.
- Verify Your System Date and Time: Incorrect Windows date or time settings can sometimes interfere with subscription verification.
- Monitor Your Subscription Status: Check your QuickBooks account periodically so you can address upcoming renewals or payment issues before they affect access.
Being proactive is only one part of managing QuickBooks efficiently. Understanding what can trigger the error makes it easier to spot early warning signs and address potential issues before they disrupt your workflow.
Conclusion
Dealing with a subscription issue can be frustrating, especially when you need immediate access to your accounting data or payroll services. However, checking your billing information, updating QuickBooks Desktop, refreshing your license data, and reviewing your internet settings can help identify and resolve common subscription problems. If the subscription has already expired, you can follow the appropriate renewal or reactivation steps to restore access to the required features.
Keeping your account information updated and monitoring your subscription status regularly can help prevent unexpected interruptions and make it easier to address renewal-related issues when they arise.
Frequently Asked Questions
You can update your billing information through the CAMPs (Customer Account Management Portal). Log in with your admin credentials, select your QuickBooks product, click on “Edit” next to your payment method, update the info, and then sync the license data from within QuickBooks under Help > Manage My License > Sync License Data Online.
Reinstalling may help if the issue is due to corrupted files, but it’s recommended to try less invasive solutions first, like updating your subscription info, checking your internet connection, or using the QuickBooks Tool Hub to repair installation files.
The term “Membership lapsed” refers to the expiration of a subscription or service due to nonpayment, non-renewal, or missed renewal deadlines. Until the membership is renewed or reactivated, access to the associated benefits or features is suspended. Membership is no longer active.
Yes, but your access will be limited. After the subscription ends, View-only mode is available for up to 12 months for eligible versions. During this period, you can view your existing data and reports, but you cannot create new transactions or edit your company file.
Your QuickBooks subscription may still appear inactive after payment due to several reasons. Here are some common causes and ways to address them:
1. Payment Processing Delays: Subscription activation may take up to 24 hours.
2. Outdated License Data: In QuickBooks Desktop, go to Help > Manage My License > Sync License Data Online to refresh your subscription information.
3. Incorrect Billing Details: Verify your payment method, billing address, ZIP code, and CVV in your Intuit account.
4. Browser Cache Issues: For QuickBooks Online, try signing in through an incognito window or clearing your browser cache.
5. Activation or Token Issues: If your subscription remains inactive despite successful payment and license syncing, contact QuickBooks Support for further assistance.
To cancel your QuickBooks Online subscription and stop automatic billing, sign in through the QuickBooks Online Sign-In Page using a computer browser. You must be the primary or company administrator. Here are the steps to cancel your QuickBooks Online subscription:
1. Click the Gear icon and select Subscriptions and billing or Billing & Subscriptions.
2. Find your QuickBooks subscription and click Cancel subscription or Cancel online.
3. Follow the prompts and confirm your cancellation.
4. Check for the cancellation confirmation and save it for your records.
QuickBooks subscription auto-renewal may fail because of payment problems, outdated software, or license synchronization errors. Here are the common reasons for auto-renewal failure:
1. Payment Issues: Your card may have expired, been declined, or exceeded its limit.
2. Billing Details Mismatch: Your billing address or ZIP code may not match your bank records.
3. Outdated Software: An older QuickBooks version or outdated payroll tax table may cause renewal issues.
4. License Sync Errors: QuickBooks may not update your subscription status correctly due to communication issues with Intuit’s servers.
5. Activation Token Issues: QuickBooks Desktop may encounter activation problems that restrict access to certain features.
To switch your QuickBooks Online or Payroll subscription from monthly to annual billing, sign in as the primary administrator and follow these steps:
1. Click the Gear icon and select Subscriptions and billing.
2. Find your current plan and choose Switch to Annual Billing, if available.
3. Review the updated price, any applicable discount, and billing details.
4. Confirm the change to complete the switch.
Note: Annual billing options may vary depending on your subscription plan.
You can upgrade or downgrade your subscription in just a few steps. Simply sign in to your QuickBooks Online account as the Primary Admin or Company Admin and follow these steps:
1. Click the Gear icon and select Subscriptions and billing.
2. Make sure your payment information is up to date.
3. Choose Upgrade your plan or Downgrade your plan.
4. Review the available options and click Choose plan for your preferred subscription.
5. Follow the on-screen instructions to confirm the change, then check your email for confirmation.