

When it comes to managing finances, numbers alone rarely tell the full story. For accountants, bookkeepers, and business owners, presenting data in a professional, polished format can make all the difference. That’s where QuickBooks Statement Writer (QSW) steps in. Built as an add-on tool for QuickBooks Desktop, it allows you to create customized, presentation-ready financial statements directly in Microsoft Excel and Word without the hassle of manual formatting.
Think of QSW as your bridge between raw financial data and boardroom-ready reports. Instead of spending hours wrestling with spreadsheets, you can pull live data from QuickBooks and shape it into meaningful statements tailored to your audience, whether that’s investors, clients, or your own management team. From balance sheets to profit and loss reports, the flexibility to design statements that actually reflect your business is right at your fingertips.
But here’s the catch: While QSW is powerful, many users find it a little intimidating at first glance. The interface is different from the usual QuickBooks environment, and navigating its features can feel like stepping into unfamiliar territory. The good news is that once you understand how to use and move around within the tool, it becomes one of the most valuable assets in your accounting toolkit.
In this blog, we’ll show you how to access QSW, use its key features, and navigate the interface efficiently so that you can create accurate, customized statements with confidence. So, let’s begin with it.
What is QuickBooks Statement Writer and How Does it Works?
The QuickBooks Statement Writer (QSW) is your secret weapon for crafting polished, professional financial statements that meet GAAP standards. Instead of struggling with formatting or starting from scratch, QSW lets you pull data straight from your QuickBooks company file and turn it into custom reports that look ready for boardroom discussions. The best part? Your statements stay in sync with QuickBooks, so if the numbers change, your reports update too. Once you launch a new statement, everything flows seamlessly in Excel, giving you the flexibility to tweak, style, and present financials exactly the way you want.
Here are the three QSW parts:
- Your QuickBooks company file serves as the foundation, holding all the financial data that feeds into your reports.
- The Report Designer window is where the magic happens, giving you the tools to shape and customize your statements just the way you need.
- Microsoft Excel becomes the final stage, displaying your polished report and allowing you to make any finishing touches or adjustments.
The QSW feature is available in QuickBooks Premier Accountant, Enterprise Accountant, and Enterprise Solutions. Earlier versions of QuickBooks referred to it as Intuit Statement Writer (ISW).
Top 8 Benefits of Using QuickBooks Statement Writer (QSW)
QSW offers powerful features that go beyond basic reporting to cater to accounting professionals and advanced users. The following are some key benefits that make QSW an ideal choice for anyone who is serious about accurate and professional financial reporting.
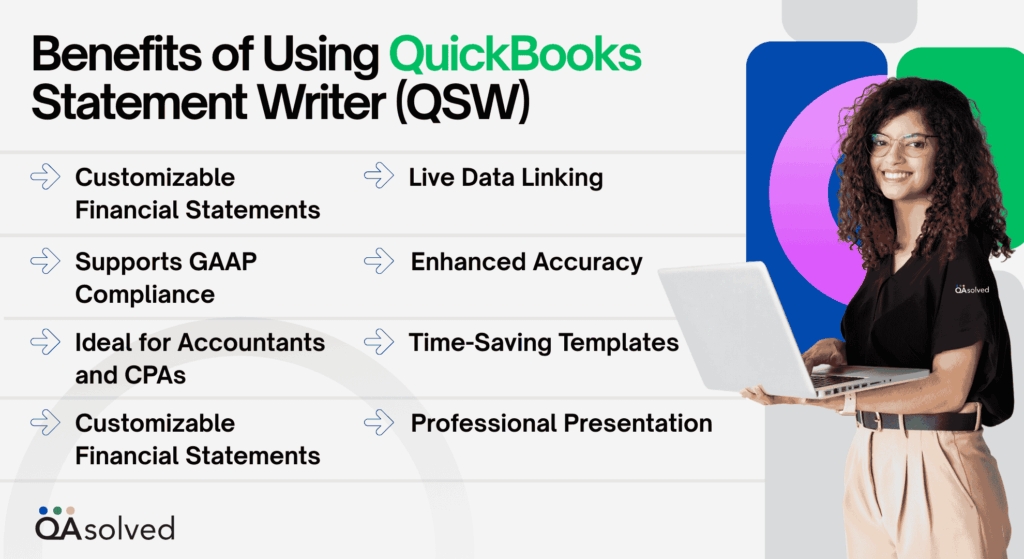
1. Customizable Financial Statements
QuickBooks SW allows you to customize financial statements beyond the standard QuickBooks templates. Create balance sheets, income statements, and cash flow reports based on the needs of the client or business.
2. Seamless Integration with Excel
This QuickBooks Statement Writer feature works hand-in-hand with Microsoft Excel, giving you the flexibility of Excel formatting as well as real-time QuickBooks data accuracy.
3. Live Data Linking
QSW’s live data connection automatically updates your financial statements when changes are made in your QuickBooks file. It eliminates the need for repeated data exports and manual updates.
4. Professional Presentation
In QSW, you can apply consistent formatting, branding, headers and footers, and footnotes to make your reports look polished and presentable-ideal for clients, stakeholders, and auditors.
5. Time-Saving Templates
You can create and save templates for recurring reports so that you can reuse layouts and formatting. A monthly, quarterly, or annual report can now be prepared in a fraction of the time.
6. Supports GAAP Compliance
Financial advisors and accountants will appreciate QSW’s ability to format your statements in accordance with generally accepted accounting principles (GAAP).
7. Enhanced Accuracy
With QSW, data is directly linked from QuickBooks, so there is no chance for human error that occurs with manual copying and spreadsheets.
8. Ideal for Accountants and CPAs
Accountants will benefit from QSW’s advanced features that streamline report creation and enable quick adjustments during client reviews.
QuickBooks Financial Statement Writer can enhance your financial report’s accuracy, efficiency, and presentation. It offers seamless integration and customization options, making it the ideal solution for professionals who want more control over their reporting.
Also Read: Create and Send Customer Statements in QuickBooks Online and Desktop
Steps to Use and Navigate QuickBooks Statement Writer (QSW)
In this section, we are going to cover the step-by-step process of using and navigating QuickBooks Statement Writer (QSW). So, let’s begin with it.
1. Essential Procedures at a Glance
QuickBooks Statement Writer offers a range of options for customizing financial reports. Below is a brief overview of the basic steps for creating a report.
- In QuickBooks, click the QuickBooks Statement Writer icon at the top of the window, and then choose Design New Report from the dialog box that appears.
- In Report Designer Screen 1 (Report Content), browse through the navigation tools to pick the statements and documents that you want to include in a report, and organize them in the sequence you prefer.
- In Report Designer Screens 2 to 5, use the available tools on each screen to customize the statements and documents for your report. On Screen 5, you have the option to save a single statement or the complete report as a reusable template. Once all changes are complete, click Create Report to finalize.
- Open the report in Excel and review it. Adjust account rows by merging or separating them as needed.
- If the QSW Task Pane is not visible in Excel, bring it back by clicking the Show Task Pane icon on the Statement Writer toolbar.
- To make additional customizations to a statement, use the options available in the Row Properties or Column Properties within the Statement Writer pane.
- Use Report Properties to adjust the appearance of your report, including fonts, layouts, sizes, headers, and footers.
- Add additional statements or supporting documents to the report only when necessary.
- Save your completed report.
- To print the financial report, first save it as a PDF by choosing Save As > PDF from the Statement Writer menu, and then print the PDF version.
2. Set Preferences in QuickBooks Statement Writer
If you’d like to personalize how QuickBooks Statement Writer works, it’s super easy. Just click on the Statement Writer drop-down arrow and choose Preferences. From there, pick the section that matches the kind of preference you want to set, whether it’s formatting, layout, or other report options, and adjust it to fit your needs.
A. Save Default Locations
You can choose the folders where your financial reports and templates will be stored. All you need to do is follow the below mentioned steps:
- Open the Preferences window in QSW.
- Go to the section for Default Save Locations.
- Click Browse and select the folder where you want your financial reports and templates to be saved.
- Click OK to confirm.
- For the best results, choose a folder on your computer’s local hard drive instead of a network folder.
Here are Some Reminders
- If you set a network folder as your default save location, MS Office requires administrative rights to enable it for add-in programs like QSW. We recommend working with your network administrator on this.
- When you change the default save location to a network path, QSW automatically runs a network fix to set the right permissions. If you prefer to handle this yourself, select the checkbox Do not automatically configure network permissions. I will run the fix myself.
- QSW also runs diagnostic tests the first time you use it. If you later upgrade your system or Microsoft Office, it’s best to run these tests again.
B. Your Details
This option allows you to save your personal or firm details, so you can quickly add them to future statements without retyping. You can update the information anytime, and any changes will automatically apply to both new and previously created statements that use those details.
C. Formatting
These are universal settings applied to all future reports; however, you can adjust similar settings for an individual report by opening the Report menu and selecting Report Data Properties. Here are some formatting options:
- Automatic Underlines: Clear this option if you prefer to manage all underlines manually and don’t want QSW to automatically apply them to totals or subtotals.
- Show: Choose whether to display decimal places, repeat column headers on each page, and include inactive accounts.
- Show Zero Balances As: Set the default display for zero balances—either as a dash, a blank space, or a zero.
- Show Negative Numbers As: Pick one of five formats for negative numbers by default: (100), (100), -100, -100, or 100.
- Divide All Data By: Decide if you want to scale all data by 1,000, 100, 10, or leave it undivided.
D. Styles
Use Styles to customize global formatting for your reports. These style settings apply to all future reports. To make changes, select a style from the Styles list and apply formatting options from the toolbar, such as font, bold, or italics. As you adjust, the Preview pane on the right lets you see the changes instantly.
Now, let’s see how you can create, open, and back up financial reports while using QuickBooks Statement Writer.
How to Create, Open, and Back Up Financial Reports using QSW?
Creating, opening, and backing up financial reports in QuickBooks Statement Writer (QSW) ensures your data is accurate, accessible, and secure. When starting a new financial report in QSW, you build at least one statement from the open QuickBooks file, with the option to add more statements and supporting documents. If you open an existing report, you can edit current content or include additional statements and documents.
Note: The sequence of statements and documents displayed in Excel does not dictate the order or content of the final PDF report. The final arrangement and included content are determined when you print the report.
1. Steps to Create a Financial Report Using QSW
- In QuickBooks, go to the Accountant menu, select QuickBooks Statement Writer, and then click Design New Report in the QSW opening window. If you are already in QSW, you can start a new report from the Statement Writer menu or the QSW icons.
- Now, enter the report date and basis.
Note: QSW provides several predefined date ranges for convenience. If none of these meet your requirements, you can also set a custom date range to suit your business needs. - Add relevant statements and documents
Note: You can arrange statements and documents in any order that suits you. This arrangement does not affect the sequence in the final report.
- Templates Overview: Templates display terms like Selected Year and Selected Period, where “Selected” refers to the report date you previously entered.
- Filter Templates: You can narrow the list in the left-hand table by choosing a category from the Show dropdown. By default, all statements and documents are displayed.
- Add Items: To include an item in your report, select it from the left table labeled Statement and Document Templates and click the right arrow to move it to the Financial Report Contents table on the right.
- Remove Items: To delete an item from the report, select it in the right table and click the left arrow.
- Remove All Items: To clear all items and start fresh, click the double left arrow button.
- Finally, enter the report name.
Note: The report name can differ from the name used for the final PDF, and it will be saved in the default location.
2. Ways to Open the Financial Report
Financial reports in QSW use the .qsm extension. Opening a report while another is already open launches a new Excel instance, allowing both reports to remain active and fully functional. There are multiple methods available to open an existing financial report.
A. Open via QuickBooks
- In QuickBooks, navigate to the Accountant menu and choose QuickBooks Statement Writer.
- In the QSW Welcome window, click Open Existing Report.
B. Open via QSW
Here, all you need to do is open your QSW, navigate to the Statement Writer menu, or select the QSW icon. You can open a financial report via different techniques, including:
- File Location: If the statement is saved outside the default location, navigate to its folder and double-click the file to open it.
- Netword Drive: If financial reports are stored on a network drive, the system administrator must configure access rights and address local security settings before you can open them; until these changes are made, copy the report to a local drive to access it.
3. Steps to Backup Financial Reports
Note: QuickBooks Statement Writer files are not part of the company backup and must be backed up separately. Here are the steps to create a exact copy of the QSW statements:
- Identify where your .QSM files are stored by going to the Statement Writer drop-down and selecting Preferences.
- Note the path listed under Default Save Locations, typically: C:\Users[User name]\Documents\Intuit\Statement Writer[Client Company name]
- Right-click the Windows Start button and select Explore.
- Navigate to the path noted in step 2.
- Right-click the Statement Writer folder and choose Copy.
- Paste the folder contents into your desired backup location.
So, these are the steps to successfully open a financial report by using QuickBooks and QuickBooks Statement Writer.
How to Use the Report Designer?
With the Report Designer, you can easily set up and customize a report with the statements and documents you need. Once done, you can save a single statement or the entire report as a template, making it quick and simple to create similar reports for other clients with a comparable chart of accounts.
Also, templates let you save your design choices and formatting, helping you work faster by avoiding the need to redo tasks you’ve already completed. Here are some tips to navigate the Report Designer correctly:
- Navigate with Step-By-Step Tabs: Use the numbered tabs at the top of the screen to move smoothly through each step while customizing your report.
- View Statements and Documents: On Screens 2 through 5, the right-hand pane contains tabs that let you switch between the various statements and documents included in your report.
- Drag, Drop, or Use Right-Click Menus: Screens 2 through 4 support both drag-and-drop and right-click functionality. Drag items from the left-hand toolbox into statements on the right, or right-click within a statement to access a context menu with customization options.
- Advanced Button: Screens 1 through 4 feature an Advanced button in the top-right corner, offering a screen-specific menu with additional options for further customizing your report.
1. Design Reports with Easy-to-Use Features
Here are some key features on each screen that you, as a user, can use to tailor the reports.
A. Report Content
On this screen, you create a “bundle,” which is a collection of statements and documents that will be included in your financial report.
- On the Report Content screen, use the basic tools to select all items you want in your report, such as the title page and balance sheet, and arrange them in your preferred order.
- On the next screens, customize each statement and document, and optionally save a statement or the entire report as a template for future use.
B. Columns
You can make the best use of advanced features to successfully customize different columns for each and every statement in the report.
- Add a Column: From the Drag/Drop Columns list, select a column and drag it into the statement. Alternatively, right-click a column in the statement to access a menu and make your selection.
- Edit Column Header or Dates: Right-click a column in the statement and choose Format Column Heading or Edit Column Dates or use the corresponding toolbar buttons.
- Move a Column: Select a column in the statement and drag it left or right to reposition it.
- Delete a Column: Right-click the column in the statement and select Delete Column.
C. Rows and Accounts
You can also use the below mentioned features to successfully customize rows and accounts for every statement in the report. Here’s how:
a. Customize Rows:
- Add a Row: From the Drag/Drop Rows list, select a row and drag it into the statement between the desired rows. You can also right-click a row in the statement to access a menu and make your selection.
- Assign a Row for a Missing Account: In the Accounts toolbox, select the missing account and drag it to the appropriate position in the statement.
- Move a Row: Select a row in the statement and drag it up or down to reposition it.
- Delete a Row: Right-click the row in the statement and choose Delete Row.
b. Customize Row Types:
QSW offers four new total row types, all of which can be customized in Excel. To modify the formula for a total row, open the Row Properties area in the Statement Writer pane. Note that only the SUM formula can be changed on the Rows/Accounts screen in the Report Designer, double-click the row to make adjustments.
c. Roll Up or Separate Accounts:
- Roll Up Accounts: In the statement, hold CTRL and select the rows you want to combine. Right-click to open the menu and choose Roll up Selected Accounts. A small red Roll up indicator will appear for the combined account.
- Roll Up Missing Accounts: From the Accounts toolbox, select the missing account you want to add and drag it directly onto the desired row in the statement. A red Roll up indicator will also appear for this combined account.
- Separate Accounts: Hover over a row with a Roll up indicator to view the accounts it contains. To separate them, right-click the row and select Separate Accounts.
D. Headers and Formatting
- Insert Headers and Footers: Use the tools below to customize headers and footers for each document in your report. You can make further edits in Excel by clicking the Statement Writer button and selecting Edit Header/Footer.
- Use Copy/Paste: Perform standard copy and paste actions using the right-click menu.
- Type Custom Text: Click in the desired header or footer area of the statement and type your own text directly.
E. Review and Finish
Use the tools below to review your report, save a single statement or the entire report as a template, and then create the report. Keep in mind that you cannot print directly from this screen. First, create the report, save it as a PDF in Excel, and then it is ready to print.
- Review Statement Information: This tab shows the report details before importing data into QuickBooks, allowing you to identify any issues and make necessary adjustments before creating the report.
- Memorize Statements as Templates: Use this option to save statements as templates for future use, even across different clients.
- Memorize the Current Statement: Click the single-page icon on the toolbar to save the current statement.
- Memorize all Statements and Documents as a Report Group: Click the multi-page icon to save the entire report. You can then use these custom templates to quickly generate reports for new clients with a similar chart of accounts.
- Launch report in QSW/Excel: To view the data, adjust formulas, and print the report, click the Create Report button to open it in QSW/Excel.
- Easily update a report: Once a report has been created for a client, you can update it by opening the report and changing the dates to refresh the information.
Conclusion
In short, QSW empowers accounting professionals and business users to generate accurate, customized financial statements directly from QuickBooks data. Understanding how to set up and manage report components-such as selecting report types, customizing rows and columns, mapping accounts, and integrating with Microsoft Excel-can streamline financial reporting and reduce manual entry errors. Using QSW’s familiar Excel-based interface, reports can be formatted in a variety of ways while staying up-to-date with real-time financial data.
Using QSW to prepare balance sheets, income statements, or other financial reports helps you save time, improve consistency, and deliver professional-grade documents tailored to your business or client needs. QuickBooks Statement Writer enhances both the efficiency and accuracy of your financial reporting process with clear workflows and thoughtful customization.
Frequently Asked Questions
1. QuickBooks Desktop Accountant (Premier or Enterprise Edition) – QSW works with these versions of QuickBooks.
2. Microsoft Excel – QSW uses Excel to create and format its financial statements. To use this program, you will need Excel installed on your computer (usually the 32-bit version is the best).
3. Microsoft Word (Optional) – Add cover pages or additional documents using Word, but it’s not necessary.
QuickBooks Desktop provides access to financial statements in the following ways:
1. Log in to your company file in QuickBooks Desktop.
2. Go to the Reports menu at the top of the page.
3. Hover over Company & Financial.
4. Select the statement you want, such as Balance Sheet, Profit & Loss, or Statement of Cash Flows.
5. Click on the report to open it. Date ranges and other options can be customized if necessary.
6. You can save or print the report using the buttons at the top.
You can follow the same steps using QuickBooks Online by clicking the Reports tab on the left sidebar.
Yes, the primary admin in QuickBooks can undo reconciliations. Their access to the company file allows them to review and undo previous bank reconciliations if necessary. Correcting errors or discrepancies ensures accurate financial records. Ensure that data consistency is maintained at all times.
1. Log into your company file in QuickBooks Desktop.
2. Click Reports in the top menu.
3. Pick Company & Financial from the dropdown menu.
4. Choose the type of statement you want to create: Balance Sheet, Profit & Loss Statement, or Cash Flow Statement.
5. Make sure your date range and other filters are set correctly.
6. View the report and make changes to the columns or layout if necessary.
7. Use the Save, Export, or Print buttons at the top of the report window to save or print the report.
If your QuickBooks Statement Writer stops working, first ensure that both QuickBooks and QSW are updated on your system. Next, try re-enabling the add-in in Excel or repairing your QuickBooks installation. If the issue persists, close all background applications and restart your system. Should the problem continue, we recommend contacting our certified ProAdvisors for immediate assistance.
