
Managing projects in QuickBooks Online isn’t just about crunching numbers or ticking boxes. It’s about building a clear financial story that helps you see where your project stands at every stage. Every payment received, every invoice waiting to be cleared, and every tiny financial detail plays a role in shaping that story. When all of these elements are properly tracked and connected, you get a complete picture of your project’s true performance. One of the most effective ways to stay organized is by adding both paid and unpaid invoices directly to your projects in QuickBooks Online.
Doing this doesn’t just tidy up your records; it also makes client billing easier to follow and provides real-time visibility into your cash flow. If you’re also looking forward to organizing your numbers and records properly, then you’re in the right spot. In this blog, we’ll guide you through the steps to add invoices to projects in QuickBooks Online and will also explain the importance of the same. So, let’s begin with it.
Steps to Add Paid and Unpaid Invoices to Projects in QuickBooks Online
Whether the invoice has already been paid or is still awaiting approval, connecting it with the right project will provide you with accurate reports, smoother workflows, and financial insights you can rely on to make smarter business decisions.
4 Steps to Add Unpaid Invoices to a Project in QuickBooks Online
The best time to link an invoice to a project is before it has been marked as paid. By doing this, you can keep your project’s finances organized from the start and get a clearer picture of your pending revenue. Here’s a simple way to add existing unpaid invoices to projects in QuickBooks Online:
- Go to your Invoices list in QuickBooks Online and find the invoice you want to link to a project. Make sure it is still unpaid.
- Click on the invoice to open it, then select Edit Invoice to make changes.
- In the invoice details, find the Customer ▼ dropdown menu. From the list, select the project you want to associate with this invoice.
- After selecting the project, click Save to link the invoice to the project successfully.
Optional Step:
To make it easier for your customers to pay, consider using QuickBooks Payments. This feature allows your clients to pay invoices online quickly and securely, helping you manage cash flow more efficiently.
3 Steps to Add Paid Invoices to a Project in QuickBooks Online
Adding a paid invoice to a project requires a bit more care than adding an unpaid one. When you link a paid invoice to a project, QuickBooks temporarily disconnects it from the payment, which changes the invoice status to unpaid. After editing, you’ll need to reconnect the payment to ensure your customer isn’t charged twice.
Before you start, make sure the Automatically apply credits setting is turned off. If this setting is on, QuickBooks may automatically apply the payment to the next open invoice for the same customer, which can cause confusion.
We also recommend avoiding paid invoices that are linked to multiple transactions, billable expenses, or timesheets, as each line item will need to be fixed manually. Here’s a simple step-by-step instruction to safely add a paid invoice to a project in QuickBooks Online:
Step 1: Turn Off the Automatically Apply Credits Setting
Before you edit a paid invoice, make sure the Automatically Apply Credits setting is turned off. This prevents QuickBooks from automatically applying payments or credits to the next open invoice, helping you avoid accidental payment mismatches while linking the invoice to a project. Follow the steps given below carefully.
- Open QuickBooks Online.
Note: Make sure that you’re on the correct company file where you want to add the paid invoice to a project in QuickBooks Online. - Click on the Settings icon in the top-right corner, then select Account and Settings.
- Navigate to the Advanced tab.
- Scroll down to the Automation section and click the pencil icon to edit.
- Toggle off the Automatically apply credits option.
- Click Save, then select Done to confirm your changes.
Once you’ve successfully added the paid invoices to your project, you can repeat the same steps to again turn on the Automatically Apply Credits setting.
Step 2: Add the Paid Invoice to the Project in QuickBooks
Once you’ve turned off the Automatically Apply Credits setting, you can proceed to link your paid invoice to the relevant project. This step helps ensure that the invoice is correctly associated with the project, keeping your records organized and making it easier to track project revenue and profitability. Here are the steps to successfully add paid invoices to projects in QuickBooks Online:
- Log in to your QuickBooks Online account.
- From the dashboard, go to Sales and click on Invoices to view your list of invoices.
- Locate the paid invoice you want to add to a project and click to open it.
- Click on Edit Invoice to make changes to the invoice details.
- In the invoice details, click the Customer dropdown and choose the project you want to associate with this invoice.
- Click Save to finalize the update and link the invoice to the project.
Step 3: Reconnect the Payment to the Invoice
After linking your invoice to a project, the final step is to reconnect the payment to the invoice. This ensures the invoice goes back to being marked as paid and stays correctly linked, so your records remain accurate, and you avoid any accidental double charges. Follow the steps given below:
- Launch QuickBooks Online.
- Click on Settings and select Chart of Accounts.
- Locate the account where the payment was deposited and click View Register.
- Find the payment that corresponds to the invoice and click Edit.
- In the Outstanding Transactions section, check the box next to the invoice the payment should apply to.
- Click Save and Close to finalize the update and ensure the payment is properly connected to the invoice.
So, these are the key steps to help you add paid and unpaid invoices to your projects in QuickBooks Online. Following these steps ensures your project finances stay organized, accurate, and easy to track.
Have you ever considered why businesses and entrepreneurs often include paid and unpaid invoices in QuickBooks Online projects? Well, let’s take a look at the importance of doing so in the context of business growth.
Also Read: How to Identify and Fix Undelivered Invoices in QuickBooks Online?
Importance of Adding Paid and Unpaid Voices to Projects in QBO
Linking both paid and unpaid invoices to your projects in QuickBooks Online is a smart way to stay on top of your finances. It gives you a complete picture of your project’s revenue, keeps your records organized, and helps prevent mistakes like duplicate charges or missed payments. Here’s why it is important.
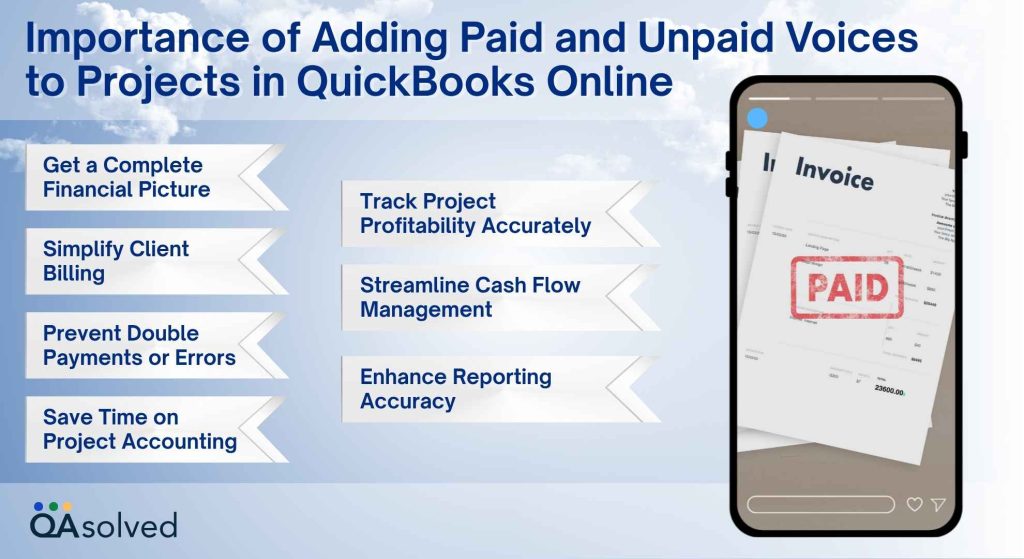
1. Get a Complete Financial Picture
Linking all invoices, whether paid or unpaid, to your projects gives you a comprehensive overview of your project’s finances. This way, you can see exactly how much revenue has been received and what is still pending, helping you stay on top of your cash flow.
2. Track Project Profitability Accurately
Including paid and unpaid invoices allows you to measure your project’s true profitability. By having every transaction recorded under the right project, you can make smarter decisions about budgeting, resource allocation, and overall project strategy.
3. Streamline Cash Flow Management
Knowing which invoices are still outstanding versus which have been paid helps you manage cash flow more efficiently. This clarity allows you to plan for upcoming expenses, anticipate shortfalls, and ensure your business maintains financial stability.
4. Simplify Client Billing
When all invoices are correctly linked to a project, managing client billing becomes much easier. You can quickly generate reports, answer client queries about outstanding payments, and maintain a professional and organized billing system.
5. Prevent Double Payments or Errors
Properly adding invoices ensures that all payments are accurately recorded and avoids the risk of double charging customers or misapplying payments. This reduces accounting errors and keeps your financial records clean and reliable.
6. Enhance Reporting Accuracy
Project reports that include every invoice provide a more accurate and detailed snapshot of your project’s financial performance. Stakeholders and team members can rely on these reports for planning, decision-making, and assessing overall project success.
7. Save Time on Project Accounting
Keeping both paid and unpaid invoices connected to their respective projects minimizes manual tracking and repetitive work. This saves time, reduces stress, and allows you to focus more on growing your business rather than chasing numbers.
In essence, adding invoices to projects in QuickBooks Online is a proactive approach to project management that combines accuracy, efficiency, and clarity. By following the steps outlined in this blog, you can ensure that your projects remain financially organized, giving you the confidence to focus on growth, client satisfaction, and overall business success.
Conclusion
In a nutshell, adding both paid and unpaid invoices to projects in QuickBooks Online is more than just an accounting task; it is a way to gain complete control over your project finances. By linking every invoice to the right project, you create a transparent and organized system that allows you to track revenue, monitor profitability, and stay on top of cash flow. Whether an invoice has already been paid or is still outstanding, including it in your project records ensures that your reports reflect the true financial health of your projects.
This practice not only simplifies client billing and reduces the risk of errors, such as double payments or misapplied credits, but it also saves valuable time that would otherwise be spent manually reconciling accounts. With all invoices connected, you can generate accurate project reports, make informed business decisions, and provide stakeholders with clear insights into how each project is performing.
Frequently Asked Questions
Adding existing bills or expenses to a project in QuickBooks Online is straightforward. Follow these steps:
1. From your dashboard, navigate to Expenses → Expenses to view all your transactions.
2. Find the bill or expense you want to link to a project and click to open it.
3. For each expense line item, use the Customer / Project dropdown to select the project you want to associate the expense with.
4. Click Save and Close to update the transaction and link it to your project.
By connecting bills and expenses to the appropriate projects, you can get a complete view of project costs, streamline reporting, and make more informed financial decisions.
Yes, you can add various transactions, such as invoices, bills, or expenses, to any active project in QuickBooks Online. Linking transactions directly to a project helps you track costs and revenue accurately, giving you a clear picture of the project’s financial performance at any time.
Adding expenses to a project in QuickBooks Online is simple and helps you keep track of project costs effectively. Follow these steps:
1. Open QuickBooks Online.
2. Navigate to the project you want to add expenses to.
3. Click Add to Project, then choose Expense.
4. Fill in the necessary information for each expense item.
5. Check the Billable box next to any items you want to bill to the customer.
6. Click Save and Close to link the expense to your project successfully.
By adding expenses to your projects, you can monitor costs accurately, improve project profitability, and make more informed financial decisions.
Yes, you can mark a paid invoice as unpaid in QuickBooks Online. To do this, follow these steps:
1. Launch QuickBooks Online.
2. From the Sales menu, select the Customers tab.
3. Find the customer and double-click their name to open the paid invoice.
4. Click the payment hyperlink above the PAID status and select the payment date.
5. Scroll to the bottom, click the More button, and choose Delete.
After completing these steps, the invoice status will change back to unpaid, allowing you to make any necessary edits or reconnect the payment later.
Keeping track of paid and unpaid invoices is essential for smooth cash flow management. You can use invoice-tracking tools or software to see which invoices have been paid and how long any outstanding invoices have been overdue. Monitoring these details helps you prioritize unpaid invoices, follow up on payments promptly, and maintain healthy relationships with both clients and suppliers.
