
Running a growing business often means relying on more than one powerful system to keep things moving. Maybe you use NetSuite to manage operations, inventory, and customer data, while QuickBooks handles your accounting and financial reporting. On paper, it sounds like a solid setup. But in reality, it can start to feel like juggling two worlds that don’t always speak the same language. You create an invoice in one system, then re-enter it in another. You update customer records twice. And every month, you cross your fingers during reconciliation.
At first, the extra steps may seem manageable. A few manual entries here and there do not feel like a big deal. But as transactions increase and your team expands, the cracks begin to show. Small errors turn into bigger discrepancies. Reports do not match. Time that could be spent analyzing growth is instead spent fixing sync issues and tracking down missing data. That is when the question becomes unavoidable: is there a better way to make these systems work together?
Connecting NetSuite with QuickBooks is more than a technical upgrade. It is a strategic move toward efficiency. By integrating the two platforms, you create a seamless flow of financial and operational data, reduce manual work, and improve accuracy across the board. In this blog, we will explore how to connect NetSuite with QuickBooks and what you need to know before setting up a smooth, reliable integration.
About Oracle NetSuite and QuickBooks
Oracle NetSuite is a cloud-based Enterprise Resource Planning (ERP) solution designed to help businesses manage core operations within a unified platform. It supports organizations of all sizes by centralizing financial management, inventory control, order processing, CRM, and eCommerce operations.
As a comprehensive ERP system, NetSuite provides real-time visibility into business performance and enables better decision-making through consolidated reporting and automation.
A. Advanced Capabilities & Features of Oracle NetSuite
Beyond its core ERP functionality, Oracle NetSuite offers a wide range of advanced modules designed to support growing, global, and operationally complex businesses. From multinational financial consolidation to warehouse optimization and subscription billing, NetSuite provides an integrated cloud platform that connects departments and delivers real-time visibility across the organization.
1. NetSuite OneWorld
NetSuite OneWorld enables global business management within a single unified system. It supports multiple subsidiaries, currencies, languages, and tax regulations, allowing organizations to manage international operations seamlessly. Businesses can consolidate financial reports across entities while maintaining compliance with local accounting standards and tax requirements.
2. Procurement
NetSuite streamlines purchasing workflows by managing approved vendor lists, automating purchase order creation, and tracking vendor performance. This ensures better cost control, compliance, and procurement efficiency.
3. Inventory and Warehouse Management
This module provides real-time visibility into inventory levels across multiple warehouses and locations. It supports inventory tracking, cycle counts, bin management, and automated reorder points to prevent stockouts and overstocking. By optimizing stock levels and improving fulfillment accuracy, businesses can enhance operational efficiency and reduce carrying costs.
4. Customer Relationship Management (CRM)
NetSuite includes built-in CRM capabilities such as sales force automation, lead and opportunity tracking, marketing campaign management, and customer data management. This ensures better visibility into the sales pipeline and improves customer engagement.
5. Payment Automation Dashboard
This dashboard provides a comprehensive overview of bank transactions and virtual card activity. It automates reconciliation processes, enhances financial transparency, and improves operational efficiency by reducing manual intervention.
6. Customization and Reporting
The platform offers customizable dashboards known as portlets, which display key performance indicators and real-time analytics. Users can personalize system terminology, create saved searches, and generate detailed financial and operational reports. These capabilities enable data-driven decision-making across departments.
7. Cloud-Native Architecture
Built on Oracle Cloud Infrastructure, NetSuite provides enterprise-grade security, automatic updates, and continuous system enhancements. Its cloud-native design ensures 24/7 accessibility, scalability for growing businesses, and reduced IT infrastructure maintenance.
8. Multi-Entity & Global Capabilities
It supports multi-currency transactions, multi-subsidiary management, and consolidated financial reporting. This makes it suitable for businesses operating across different regions while ensuring regulatory compliance and centralized control.
9. Custom Workflows & Automation
NetSuite allows users to create customizable dashboards, saved searches, and automated workflows. These tools help streamline business processes, reduce manual work, and improve overall productivity.
On the other hand, QuickBooks is a widely used accounting software developed by Intuit, primarily designed for small and medium-sized businesses. It focuses on simplifying bookkeeping, invoicing, payroll, tax calculations, and expense tracking.
B. QuickBooks Product Suite and Accounting Solutions
The QuickBooks product suite offers a range of accounting solutions designed to meet the needs of businesses of different sizes and industries. From cloud-based bookkeeping to advanced enterprise-level financial management, QuickBooks provides tools for invoicing, expense tracking, payroll, reporting, and tax management.
1. QuickBooks Online
QuickBooks Online is a cloud-based accounting solution that allows businesses to manage their finances from anywhere with internet access. It offers features such as invoicing, expense tracking, bank reconciliation, financial reporting, tax calculation, and seamless integration with third-party applications. It is ideal for small to medium-sized businesses looking for flexibility and real-time financial visibility.
2. QuickBooks Desktop
On the other hand, QuickBooks Desktop is a locally installed accounting software that provides robust financial management capabilities, including advanced reporting, job costing, inventory tracking, and payroll management. It also offers industry-specific editions tailored for sectors such as manufacturing, retail, and contracting, making it suitable for businesses with complex accounting needs.
3. QuickBooks Enterprise
QuickBooks Enterprise is a more powerful and scalable version of QuickBooks designed for growing and mid-sized businesses. It includes enhanced reporting tools, advanced inventory management with barcode scanning, customizable user permissions, and higher data capacity to handle large transaction volumes efficiently.
4. QuickBooks Self-Employed
Specifically built for freelancers, consultants, and independent contractors, this version helps users track income and expenses, categorize transactions, calculate estimated taxes, and separate personal and business finances. It simplifies bookkeeping for individuals who need straightforward financial management.
You can explore all the other QuickBooks Products or reach out to us directly to connect NetSuite with QuickBooks. While NetSuite functions as a full-scale ERP system and QuickBooks focuses primarily on accounting, many organizations use both platforms together.
To streamline synchronization between them, Oracle provides a predefined integration recipe that helps users create a bridge between these two powerful platforms. The following sections of this blog explain that integration framework in detail, including configuration, setup, and execution steps.
About the NetSuite and QuickBooks Integration Recipe
This integration recipe is designed to synchronize item records from Oracle NetSuite with product records in QuickBooks. It is available in the Integration Store under the name “Oracle NetSuite – QuickBooks | Sync Items and Products.”
Oracle provides this recipe as a sample implementation intended for guidance purposes. It is not guaranteed to be error-free, and official support is not included. Organizations are expected to review, test, and adapt the configuration based on their specific business requirements.
Overview of the Integration Flow
The recipe automates the synchronization of both inventory items and sales service items from NetSuite to QuickBooks. The integration runs based on a schedule defined within Oracle Integration, although it can also be executed manually when required.
To begin using the recipe, you must:
- Install the integration package from the Integration Store.
- Configure the required system connections and lookup resources.
- Activate the integration project.
- Run or schedule the integration flow.
Schedules Integration Flows
The recipe includes two predefined scheduled flows:
- Oracle NS ServiceItem QB Product Sync: This flow retrieves sales service items from NetSuite and creates corresponding product records in QuickBooks.
- Oracle NSInventoryItem QBProduct Sync: This flow retrieves inventory items from NetSuite and creates matching products in QuickBooks.
After successfully creating the product in QuickBooks, the integration updates the related NetSuite item record by populating the QuickBooks ProductItem Id field with the newly generated QuickBooks product ID.
If the system is unable to update this ID back into NetSuite, the corresponding QuickBooks product is automatically marked as inactive to maintain data integrity. In addition to product creation, this integration also synchronizes essential data elements such as account mappings and unit pricing between the two platforms.
Note: The integration creates products in QuickBooks only for those NetSuite item records where the QuickBooks ProductItem Id field is empty. This ensures that duplicate products are not created during subsequent runs.
Procedure and Steps to Integrate Oracle NetSuite with QuickBooks
Integrating Oracle NetSuite with QuickBooks involves configuring system prerequisites, establishing secure connections, and activating predefined integration flows. The process ensures seamless synchronization of item and product data between both platforms through a structured setup within Oracle Integration.
System and Access Requirements
Before initiating the integration, ensure that all required systems and access permissions are in place.
- Oracle Integration version 23.2.0.0.0 or later must be available.
- An active Oracle NetSuite instance is required.
- Administrator-level access to the Oracle NetSuite account is necessary.
- An active QuickBooks account must be in place.
- Administrator privileges are required for the QuickBooks account to configure and authorize the integration.
Note: To successfully connect Oracle NetSuite and QuickBooks through Oracle Integration and enable item and product synchronization, you must complete the required configuration steps in both systems beforehand.
If you want to eliminate the hassle of integrating NetSuite with QuickBooks and save valuable time, we recommend reaching out to Certified ProAdvisors for prompt and reliable QuickBooks integration services.
Configure Oracle NetSuite for Integration
Before connecting Oracle NetSuite with QuickBooks through Oracle Integration, specific configurations must be completed within your NetSuite environment. These include enabling required web service features, setting up Token-Based Authentication (TBA) for secure access, and creating saved searches to define which records will be synchronized.
All configurations must be performed by logging in with an Administrator role. To allow Oracle Integration to communicate with NetSuite:
- Complete the standard setup required to establish connectivity with Oracle NetSuite, including enabling the necessary features and generating the appropriate NetSuite WSDL URL.
- Configure the settings required for Token-Based Authentication (TBA) in accordance with the security policy prerequisites.
- Note: Ensure that the role created for this integration is assigned to all the required permissions to allow proper system access and data synchronization.
| Tab Name | Permission | Level |
| List | Currency | Full |
| List | Currency | Full |
| List | Subsidiaries | Full |
| List | Contacts | Full |
| Setup | User Access Tokens | Full |
| Setup | Log in Using Access Tokens | Full |
| Setup | Soap Web Services | Full |
- Create a Saved Search to retrieve inventory items that meet the defined criteria, as the records returned by this search will be generated as products in QuickBooks.
- Open the New Saved Search page by navigating through any of the available menu paths within NetSuite.
- From the NetSuite home page, click Reports, select Saved Searches, open All Saved Searches, and then click New.
- Alternatively, from the home page, click Transactions, choose Management, select Saved Searches, and then click New to create a new saved search.
- In the New Saved Search window, choose the appropriate record type for the search. For instance, select Item as the object type.
- Enter a suitable name and unique identifier for the saved search in the Search Title and ID fields to help you easily identify and reuse it later.
- Note: The saved search title and ID make it easier to identify, manage, and reuse the search later when you need to retrieve updated records that meet the defined criteria.
- Define the required search conditions by opening the Criteria tab and setting appropriate filters. For example, filter items where the custom field QuickBooks ProductItem Id is empty and set the item type as Inventory. If needed, enable the Use Expressions option to apply logical operators such as AND, OR, or NOT.
- Next, go to the Results tab and choose the specific fields you want to display in the search output by selecting them under the Columns section.
- Open the New Saved Search page by navigating through any of the available menu paths within NetSuite.
Note: Similarly, create an additional saved search for Sales Service Items. Ensure that the search criteria include filtering records where the QuickBooks ProductItem Id custom field is empty, the item type is set to Service Item, and the subtype is specified as Sales.
Moving ahead, to enable Oracle Integration to connect with QuickBooks and synchronize items and products, you must create a dedicated user account for Oracle Integration within QuickBooks and complete the necessary connection prerequisites and configurations.
Steps to Install and Configure the Recipe to Integrate Oracle and QuickBooks
This is where the real setup begins. In this section, we’ll walk through the practical steps to install and configure the integration recipe that connects Oracle NetSuite with QuickBooks.
8 Steps to Install and Configure the Recipe
Follow these five essential steps to successfully install, configure, and prepare the integration recipe for seamless synchronization between NetSuite and QuickBooks.
- Log in to Oracle Integration and navigate to the Home page.
- In the Use a Recipe/Accelerator section, click View All to browse the available integration recipes.
- Next, locate the recipe from the list of available options.
- Select the recipe and click Install to deploy it into your Oracle Integration environment.
- Once installed, a confirmation message will appear, and the recipe status will be updated to Installed.
- After installation, select the recipe again and click Configure to begin setting up its associated components and connections.
- The project workspace will open, displaying all related resources such as connections and lookups.
- Finally, complete the necessary configurations before proceeding to activate and run the integration.
7 Steps to Configure the Oracle NetSuite Connection
Now it’s time to connect the dots. In this section, we’ll quickly walk through the steps to set up and authenticate your Oracle NetSuite connection so it can securely communicate with Oracle Integration and power the sync with QuickBooks.
- In the Connections section of the project workspace, select the Oracle NetSuite connection to begin configuration.
- Under the Properties tab, enter the required WSDL URL for your NetSuite instance. The format should be:
https://webservices.netsuite.com/wsdl//netsuite.wsdl and Replace <NetSuite_application_version> with your specific NetSuite version, such as v2015_1_0, to ensure proper connectivity. - Next, navigate to the Security Section and enter the following details:
- Security Policy: Select Token-Based Authentication.
- Consumer Key: Enter the Consumer Key generated from the NetSuite Integration Record.
- Consumer Secret: Enter the Consumer Secret associated with the Integration Record.
- Token: Provide the Token ID created for the user role in NetSuite.
- Token Secret: Enter the corresponding Token Secret generated along with the Token ID.
- Account ID: Enter your Oracle NetSuite Account ID exactly as provided.
- Note: Ensure that the account ID is written in the uppercase format.
- Click Save to apply the configuration changes. If a confirmation prompt appears, select Save again to proceed.
- Select Test to verify that the connection has been configured correctly.
- When the test dialog appears, click Test once more to initiate validation.
- Note: A confirmation message will display if the connection is successful.
- After successful testing, click Go Back to return to the project workspace.
11 Steps to Configure the Oracle and QuickBooks Connection
Now it’s time to link both platforms together. Here are the steps:
- In the Connections section of the project workspace, select the QuickBooks connection to begin configuration.
- Under the Properties tab, provide the required details. For the QuickBooks Environment field, choose Production to connect to your live QuickBooks account.
- In the Security section, provide the authentication credentials generated from your QuickBooks app configuration.
- Client ID: Enter the Client ID obtained during the QuickBooks app setup process.
- Client Secret: Enter the corresponding Client Secret generated when configuring QuickBooks.
- Click Save to apply the configuration settings. If a confirmation message appears, click Save again to confirm.
- Select Provide Consent to initiate the authorization process between Oracle Integration and QuickBooks.
- When the sign-in window appears, enter your Oracle Integration username and password, then click Sign In.
- Note: You will be redirected to the QuickBooks login page.
- Once you’re redirected, log in using your QuickBooks account credentials.
- Note: A permission request screen will appear asking for access approval.
- Click Yes to grant the required permissions and complete the authorization process.
- Note: Once access has been successfully granted, return to the Oracle QuickBooks Connection page in Oracle Integration to proceed with testing the connection.
- Click Test to validate that the QuickBooks connection has been configured correctly.
- When the test dialog appears, select Test again to run the verification process. A confirmation message will appear if the connection is successful.
- After successful validation, click Go Back to return to the project workspace.
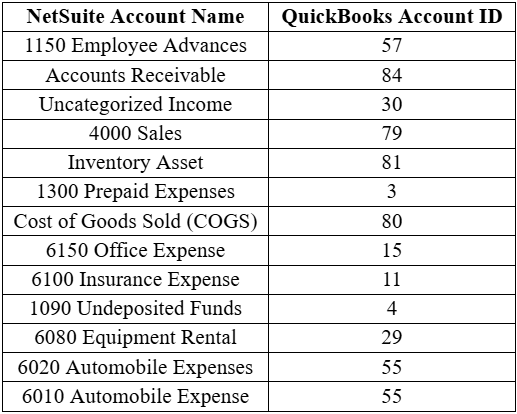
4 Steps to Configure the Account Mapping Lookup Table
Before activating and running the recipe, it is very important to configure the account mapping lookup table correctly. Here are the steps to successfully edit the account lookup table and map the account names in the Oracle NetSuite with the account IDs in QuickBooks.
- Navigate to the Lookups section and click the lookup name.
- Then, enter the correct values for the following keys:
- Click Save to store the changes. If a confirmation prompt appears, select Save once more to confirm.
- After saving successfully, click Go Back to navigate back to the project workspace.
By completing the above steps, you can successfully configure and activate the integration between Oracle NetSuite and QuickBooks, ensuring secure connectivity and smooth synchronization of item and product data. With the configuration complete, the final step is to activate the integration and execute the recipe to begin synchronizing data between NetSuite and QuickBooks.
How to Activate and Run the Recipe in QuickBooks?
Now comes the exciting part. In this final section, you’ll activate the integration and run the recipe, so the synchronization between NetSuite and QuickBooks officially goes live and starts doing the work for you.
- Go to the project workspace and click Activate.
- In the Activate Project panel, keep default deployment selected, choose tracing option, and click Activate.
- Note: Refresh the page to see updated status.
- In Integrations, click Actions on the flow and select Run.
- For service items: select Oracle NS ServiceItem QB Product Sync
- For inventory items: select Oracle NSInventoryItem QBProduct Sync
- Click Run on the Configure and Run page.
- Note: You can also configure this integration to run at a specific date, time, and recurring frequency as required. Refer to Define the Integration Schedule for details.
- Next, navigate to the project workspace, click Observe to monitor the integration flow execution. Confirm that the flow is triggered and runs successfully.
- For error handling within the project, refer to Manage Errors in a Project.
- In QuickBooks, verify the synced data:
- Sign in to your QuickBooks account.
- Go to Products and Services from the homepage and check for newly added products.
10 Key Benefits of Connecting Oracle NetSuite with QuickBooks Products
Integrating Oracle NetSuite with QuickBooks helps businesses streamline financial operations by ensuring smooth data synchronization between ERP and accounting systems. This connection reduces manual effort, improves accuracy, and provides better visibility into financial and operational data. Below are the key benefits of this integration.
- Real-Time Data Synchronization: Ensures that financial and transactional data between NetSuite and QuickBooks stays continuously updated in real time, reducing delays, mismatches, and inconsistencies across systems and reports.
- Reduced Manual Data Entry: Eliminates the need for repetitive manual input across multiple platforms, saving significant time for teams while also minimizing the risk of human errors and duplicated records.
- Improved Financial Accuracy: Maintains consistent, validated, and accurate financial records across both platforms, helping businesses achieve reliable reporting, smoother audits, and more dependable financial analysis outcomes overall.
- Streamlined Business Operations: Connects accounting and ERP workflows seamlessly, making overall business processes smoother, faster, more coordinated, and significantly more efficient across departments and operational functions.
- Better Inventory Management: Keeps product catalogs, stock levels, and inventory data aligned across systems, preventing mismatches, overselling issues, and ensuring accurate availability tracking across sales channels.
- Reduced Operational Costs: Cuts down administrative workload, reduces dependency on manual accounting processes, and lowers overall operational expenses related to data handling and financial management activities.
- Faster Reconciliation Process: Simplifies account reconciliation by ensuring consistent and synchronized financial data between NetSuite and QuickBooks, reducing manual effort and speeding up month-end closing activities.
- Enhanced Reporting and Insights: Provides unified, structured, and accurate financial data, enabling better business insights, deeper analysis, and more confident strategic decision-making across all levels of the organization.
- Scalability for Growing Businesses: Supports business expansion by efficiently handling increasing transaction volumes, users, and operational complexity without disrupting existing workflows or system performance stability.
- Improved Collaboration Across Teams: Ensures finance, sales, operations, and management teams work with the same real-time updated data, improving coordination, transparency, and overall organizational efficiency significantly.
Connecting Oracle NetSuite with QuickBooks is more than just a technical integration; it’s a strategic move toward smarter financial management. By eliminating manual work, improving accuracy, and enabling real-time data flow, this integration helps businesses operate with greater speed and confidence. It also strengthens collaboration across teams while supporting scalability and cost efficiency as the business grows.
Conclusion
Bringing Oracle NetSuite and QuickBooks together is a smart move for businesses that want to simplify how their financial and operational data works together. Instead of juggling between two disconnected systems, this integration creates a smooth flow of information that saves time, reduces manual effort, and improves overall accuracy. What once felt like a complicated and time-consuming process becomes far more structured and manageable.
From real-time data syncing to faster reconciliation and better reporting, the benefits directly impact day-to-day efficiency as well as long-term decision-making. Teams no longer need to worry about mismatched records or delayed updates, which means more focus can be placed on growth and strategy rather than fixing errors.
As businesses scale, managing finances and operations can quickly become overwhelming. This integration helps ease that pressure by keeping everything aligned and up to date across both platforms. It also encourages better collaboration between departments, ensuring everyone works with the same reliable data.
In the end, connecting NetSuite with QuickBooks is not just about improving systems but about improving how the entire business operates. If efficiency, clarity, and scalability are priorities, this integration is definitely worth considering as a long-term solution.
Frequently Asked Questions
The integration flow supports two separate scheduled synchronization processes to ensure accurate product data transfer. One flow is designed specifically for sales service items using Oracle NS ServiceItem QB Product Sync, while the other handles inventory items through Oracle NSInventoryItem QBProduct Sync. These dedicated flows help maintain proper classification, data consistency, and structured product creation within QuickBooks based on the corresponding item types in NetSuite.
Yes, once the integration has been successfully activated, you can configure a schedule to automate its execution. You can define a specific start date, choose an exact time, and set the desired frequency such as daily, weekly, or at custom intervals based on your operational requirements and business workflow needs.
After executing the integration, sign in to your QuickBooks account to review the results. From the homepage, navigate to Products and Services, and carefully check the product list to confirm that the newly synchronized items from NetSuite have been successfully created and displayed in your QuickBooks instance.
Yes, proper configuration is required before installing and running the integration recipe. You must set up and verify both your NetSuite and QuickBooks instances by establishing secure connections between the systems. This includes enabling and configuring token-based authentication (TBA) in NetSuite, generating the required credentials, and creating appropriate saved searches to define and control which specific items will be synchronized with QuickBooks. Proper setup ensures a smooth, secure, and error-free integration process.
