
Connecting your bank and credit card accounts to QuickBooks Online automates your financial transactions, making it easier than ever to track, categorize, and manage your finances in one central hub. This helps you to save time in updating your bank feeds. All you have to do is review and approve them. Say goodbye to manual data entry and hello to accurate, up-to-date financial information at your fingertips.
Linking your credit card to QuickBooks ensures real-time data sync, keeping you informed about business transactions. This integration provides a comprehensive view of credit card transactions, streamlining reporting and simplifying reconciliation. With online connectivity, setting up and managing credit card transactions becomes more efficient, enhancing your ability to track expenses and make informed financial decisions.
This article will explore the process of linking bank and credit card accounts to QuickBooks Online, enabling you to automatically retrieve all your latest transactions.
Note: Numerous banks are beginning to transition to a novel connection service known as OAuth. In line with this trend, we are also adopting OAuth to enhance the ease and speed of online banking for our customers.
Moving from QuickBooks Desktop
If you’ve utilized bank feeds within QuickBooks Desktop, it’s necessary to reconnect your bank/credit card accounts in QuickBooks Online as a security measure. In case you intend to import your data from Desktop, adhere to these steps before establishing the connection with your bank:
- Locate your most recently categorized transaction in QuickBooks Desktop.
- Take note of the transaction date.
- Follow the steps to import your Desktop data. Please note: It’s crucial to complete this process before linking your bank. Otherwise, your Desktop data will overwrite any downloaded bank transactions in QuickBooks Online.
- Categorized transactions will transfer from Desktop to Online, while uncategorized transactions will not be copied over.
- To connect your bank to QuickBooks Online, continue reading this article. To prevent the addition of duplicate transactions, ensure to only retrieve transactions after the date specified in Step 2. You can achieve this by adjusting the transaction pull date while establishing the connection with your bank.
If you happen to skip that particular step and accidentally download duplicate transactions, there’s no need to be concerned. You can simply exclude them when reviewing your books.
Steps to Connect Bank and Credit Card Accounts to QuickBooks Online
Here are the steps to connect your bank and credit card accounts to QuickBooks Online:
Step 1: Connect a Bank or Credit Card Account
Link your bank or credit card accounts to automate transaction entry, saving you from manual data input. Furthermore, you can connect numerous business and personal bank accounts to ensure your QuickBooks records remain current and accurate.
Note: If you possess an American Express Business account, you have the option to connect it to your QuickBooks Online account. However, this process involves several steps.
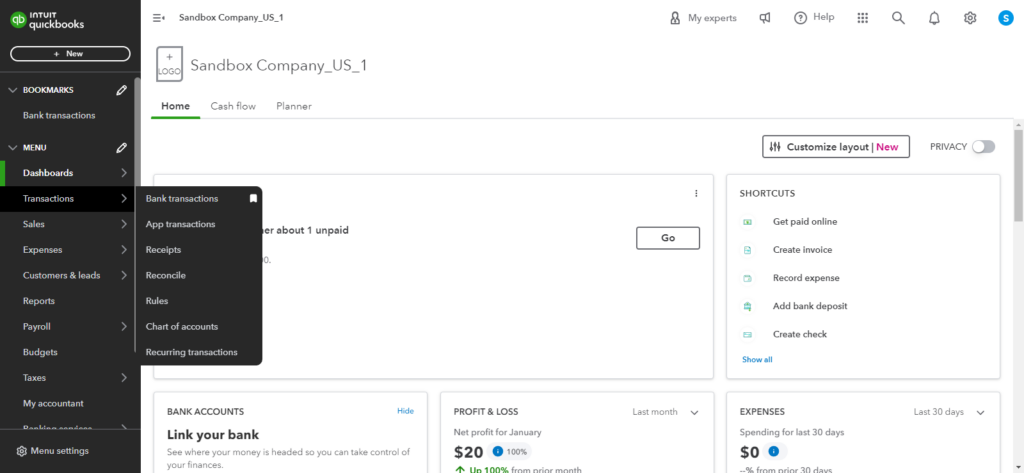
- Go to Transactions and click on Bank Transactions.
- Next, Choose Link Account.
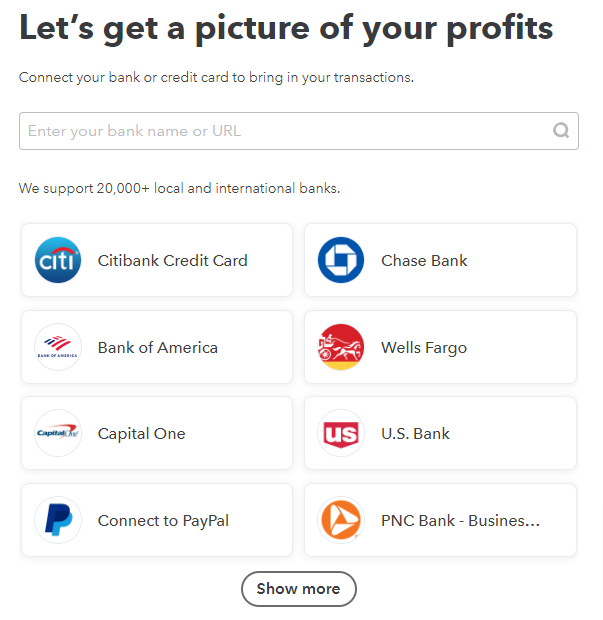
- Use the Search field to enter the URL or name of your bank, and then pick your bank from the options provided.
Note: If your bank isn’t listed, you can manually upload transactions.
- Enter your Sign-in information in the Login and Password fields, and then click Continue.
- Choose the account you wish to connect and the date range for pulling transactions from the dropdown menu ▼. Now click on Next.
Note: Some banks allow downloading transactions for the last 90 days, while others offer up to 24 months.
- From the Account type ▼ dropdown menu, choose your account type. Then click on Next.
Note: Select the appropriate account type that matches your chart of accounts in QuickBooks. If needed, select +Add new to create a new account type.
For New Bank Accounts:
- Choose Bank in the Account Type ▼ dropdown.
- Select Savings or Checking in Detail Type.
- Provide a name for the account and click Save and Close.
For New Credit Card Accounts:
- Select Credit Card in the Account Type▼ dropdown.
- Give the account a name and click Save and Close.
- Map the bank account in the Existing Accounts dropdown and then click Next.
- Select Connect, followed by Done.
Note: You have the option to modify the account name in the New account name field or make changes at a later time.
Connect your Bank Account from your Charts of Accounts
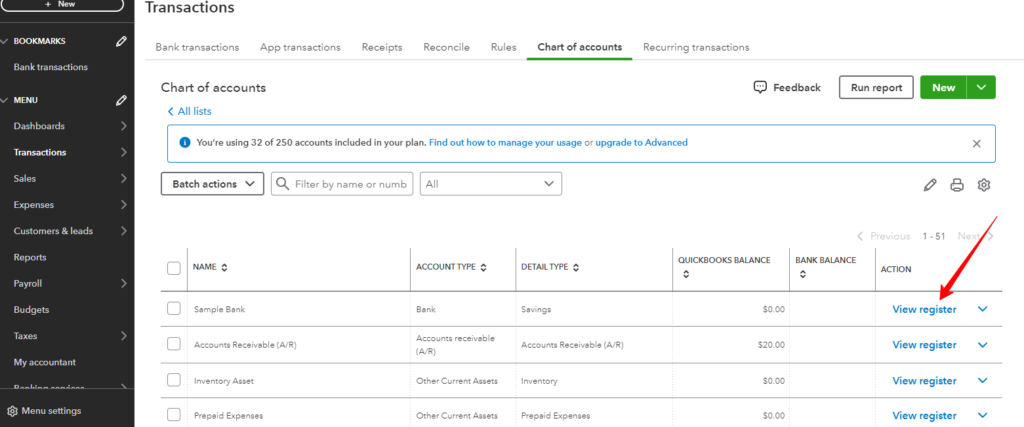
- Go to Settings ⚙, then click on Chart of Accounts.
- In the Action column, click the View register ▼ dropdown, and then choose Connect Bank.
- Enter the URL or name of your bank in the Search field, and then select your bank from the options provided.
Note: If your bank isn’t listed, you can manually upload transactions.
- Enter your Sign-in information in the Login and Password fields, and then click Continue.
- Choose the account you wish to connect and the date range for pulling transactions from the dropdown menu. Click on Next.
Note: Certain banks offer the option to download transactions from the past 90 days, while others extend this feature to include records dating back up to 24 months.
- From the Account type the dropdown ▼ menu and then choose Next.
Note: Choose the account type that corresponds to your QuickBooks chart of accounts. If you cannot find the appropriate account type, choose the option to add a new one by selecting +Add new.
Connect another Account if your Bank has already previously connected
If you’ve already linked your bank account, you can conveniently add more bank or credit card accounts from the same institution.
Follow these steps:
- Go to Transactions and choose Bank Transactions.
- In the Link account ▼ dropdown, choose Manage Connections. Subsequently, switch on the toggle icon for any additional account you intend to connect.
- If you don’t find the account there, return to Transactions and choose Link account.
- Next, follow the steps to connect to a new bank or credit card account.
For New Bank Accounts:
- In the Account Type ▼ dropdown, pick Bank.
- Under Detail Type, choose either Savings or Checking.
- Assign a name to the account, then click Save and Close.
For New Credit Card Accounts:
- Choose Credit Card from the Account Type▼ dropdown menu.
- Provide a name for the account, then click on Save and Close.
- Choose the bank account from the Existing Accounts ▼ dropdown, then click Next.
- Choose Connect, followed by Done.
Note: You have the option to modify the account name in the New account name field or make changes later.
Step 2: Retrieve Recent Transactions
Update your bank feed to automatically fetch your latest bank transactions.
- Go to Transactions, then choose Bank Transactions.
- Click on Update.
This action updates all your bank and credit card accounts.
Tip: If prompted for additional authentication, follow the prompts to complete the update. While not all banks require this step, some do it for enhanced security.
Note: QuickBooks identifies common vendors from your bank transactions and automatically adds new vendors to your account. You can disable this feature if you don’t wish to add new vendors by going to Settings in Bank Transactions and turning off Add New Vendors.
Step 3: Review and Categorize Downloaded Transactions
Review and categorize the downloaded bank transactions to ensure they’re correctly categorized. This makes it easier to accurately arrange your accounts charts.
Locate your Bank or Credit Card Account when you Connect to Online Banking in QuickBooks Online
When initiating online banking, you link your bank and credit card accounts for automatic transaction downloads. If your financial institution isn’t listed during setup, there could be various reasons. However, you can take steps to locate the correct institution.
Note (for Square 1 Bank Customers): To link your bank or credit card accounts to QuickBooks Online, you’ll need a user ID and temporary password, different from your online banking login. If you haven’t received these, reach out to Square 1 Bank.
| Reasons you Can’t Find or Merge your Bank |
|---|
| You might encounter difficulty locating or linking to your bank if: 1. Your bank has multiple names listed. Confirm you’ve selected the correct one and tried all possible options. Search using the bank’s sign-in URL to confirm the correct listing. 2. Your bank doesn’t support all account types, including personal versus business accounts. 3. Your bank isn’t part of the participating financial institutions. |
Steps to Find your Bank or Credit Card Account when Connecting to Online Banking:
Step 1: Find your Bank
If your bank isn’t found:
- Double-check the spelling, ensuring it matches your bank’s website.
- First, try specific names, then try broader terms like “Citi.”
- Use your bank’s URL for a search, for example, “hsbc.com” for HSBC.
- Search the name of the issuing bank on your card (e.g., “Chase,” “HSBC,” “Bank of America”). Avoid overly generic terms like “Visa.”
Step 2: Look for Alternative Versions of your Bank’s Name
Sometimes, a bank might have different names or account types but opt to release only one website for connecting to QuickBooks Online.
- Go to Transactions, then Bank Transactions.
- Click Link account.
- Enter your bank’s name and select it from the list.
- Access the bank’s website link in a new window.
- Confirm if you can access your account summary, history, and details without errors.
- Sign out from the bank’s website.
- Proceed with adding the account to QuickBooks Online.
Step 3: Request Assistance for your Bank
If you’ve exhausted all options matching your bank’s name and still can’t connect, or if your bank doesn’t appear, request assistance for your bank.
In QuickBooks Online:
- Access Transactions, then Bank Transactions.
- Click on the Link account.
- Search for your financial institution. If not found, you’ll see a message, “We can’t find [name of the bank you entered] in our list of supported banks,”. You’ll then receive helpful tips to try and find your bank account.
- If you still can’t find your bank, select Request.
- Enter your bank’s web address (URL), and click Request.
In QuickBooks Self-Employed
- Click the profile ⚙ icon.
- Next, choose Connect Bank.
- Search for your bank’s name. If it’s not found, you’ll receive tips to locate it.
- Opt Request to add your bank.
- Enter your bank’s web address (URL) and pick Request.
Tip: If the above-mentioned steps don’t resolve the problem, you can still download transactions from your bank’s website and manually upload them to QuickBooks Online.
How to Set up a Bank or Credit Card Account with Multiple Subaccounts
Easily set up a bank or credit card account with multiple subaccounts, simplifying linking it to your bank and reconciling downloaded transactions within QuickBooks Online.
Set up the Parent and Subaccounts
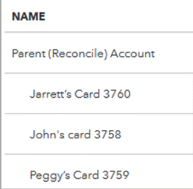
The usual approach to managing a bank or credit card account with multiple associated cards is to create a parent account under which each card is added as a subaccount.
In the Chart of Accounts, it appears to look like this:
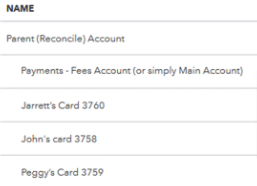
If you have an extra account where transactions like payments are received, you might need to include another subaccount, as shown:
Link the Accounts to Online Banking
Before connecting to online banking determine how your bank sends transactions. If transactions are directed to a single account, only connect the parent account. However, if transactions are distributed among individual accounts, connect the subaccount.
Note: Attempting to connect a parent account and its subaccounts will result in a notification stating that the account is already connected.
When you first connect your account, you might notice that the same opening balance transaction appears in all subaccounts. To reconcile accurately, delete duplicate balances except for one.
Banks may display the overall balance at the level of each subaccount. In this case, the bank offers the static balance of the entire account rather than the balance of each subaccount.
When your bank does not offer online services or if you do not want to link accounts, you can create checks and deposits manually or add transactions directly to your bank register.
Reconcile the Account
During reconciliation, only the parent account needs to be reconciled as all transactions in the subaccounts are consolidated within it.
Now, that’s how you set up a subaccount!
Conclusion
To effectively manage credit card transactions in QuickBooks, follow the solutions mentioned above for accurate financial tracking. Regularly reconcile transactions with bank statements to catch discrepancies. Assigning specific categories to transactions can help provide detailed insights into spending patterns and budget allocations. We hope that the provided information addresses all your inquiries about connecting bank and credit card accounts to QuickBooks Online. If you still require technical assistance, please don’t hesitate to contact us at our toll-free number +1-888-245-6075. Our certified QuickBooks Online experts are ready to provide instant help.
Frequently Asked Questions
In QuickBooks Desktop, you can configure your credit card account to monitor your charges and payments accurately. Note: If you’re utilizing QuickBooks Online, you can also log the payments you make towards your credit card.
1. Log in to your bank website and pick the date range of transactions you want.
2. Choose an approved file type to convert transaction data to.
3. Save the transaction file to your system.
4. Log into QuickBooks Online.
5. Go to the Banking tab and select Upload.
6. Under Browse choose your transaction file.
1. Click on the profile ⚙ icon, then choose Bank accounts.
2. Type the name or URL of your bank in the search box, and click on Continue. If you’ve connected an account previously, choose Connect Another.
3. Enter the sign-in details you typically use for your bank’s website.
4. When you’re prepared, click on Connect securely
Please be aware that merging accounts is a permanent action that cannot be reversed. QuickBooks designates specific accounts as defaults for particular features, such as those linked to online banking, which cannot be merged or deleted.
Here’s how to record a new transfer:
1. Choose + New.
2. Next, select Transfer.
3. From the Transfer Funds from the dropdown list, choose the bank account that the money is coming from.
4. From the Transfer Funds To dropdown list, select the bank account that the money is going to.
5. In the Transfer Amount field, enter the amount being transferred.
6. Modify the Date field.
7. Enter a description of the transfer in the Memo field (optional).
8. Click on Save and Close or Save and New to complete the transfer.
9. Choose Yes if you double-checked the date.
