

Managing business expenses is one of those behind-the-scenes tasks that quietly consume a huge amount of time and energy. From saving receipts and tracking employee spending to categorizing transactions and processing reimbursements, expense management can quickly turn into a complex and frustrating process. As your business grows, so does the volume of transactions, approvals, and reports, making manual handling not just inefficient but also prone to costly errors.
That is where smart expense management tools step in. Expensify is built to simplify and automate the entire expense reporting process. It helps businesses capture receipts on the go, automatically categorize expenses, enforce company policies, and generate accurate reports without endless spreadsheets. When you connect Expensify with QuickBooks, the process becomes even more powerful. Expense data syncs directly with your accounting system, reducing duplicate entries, minimizing errors, and improving overall financial visibility.
If you’re also looking forward to connecting Expensify with QuickBooks Online and Desktop, then you have landed on the right page. In this blog, we will walk you through everything you need to know. From understanding how both platforms function to exploring the benefits of integration and the steps involved, you will gain a clear roadmap to syncing Expensify and QuickBooks smoothly.
Expensify and QuickBooks: Where Smart Expense Tracking Meets Powerful Accounting
Expensify
Expensify is a cloud-based expense management platform founded in 2008 by David Barrett. It was created to simplify the tedious process of expense reporting and reimbursements for businesses and individuals. Today, Expensify has grown into a global software company that helps organizations manage receipts, expenses, and overall financial workflows more efficiently. Here’s what makes Expensify a leading expense management platform:
- It uses smart receipt scanning to capture and extract expense details instantly.
- It generates expense reports automatically to reduce manual effort and save time.
- It also provides real-time expense tracking for better financial visibility and control.
- It supports corporate card integration to sync transactions seamlessly.
- It leverages AI to automatically categorize expenses and enforce company policies.
- It also enables global reimbursements in multiple currencies for international teams.
QuickBooks
On the other hand, QuickBooks is accounting software developed by Intuit, first launched in 1983 to help small and medium-sized businesses manage their finances more effectively. It was designed to simplify bookkeeping by bringing essential financial tasks into one unified system. Here are some of its features:
- QuickBooks automatically tracks income and expenses to keep your financial records accurate and up to date.
- It creates professional invoices with integrated payment processing for faster collections.
- It connects seamlessly with bank and credit card accounts for real-time transaction tracking.
- It also generates detailed financial reports to help you monitor performance and make informed decisions.
- QuickBooks has an in-built payroll management to simplify employee payments and compliance.
- It provides tools that streamline tax preparation and reduce year-end stress.
How Expensify Works with QuickBooks Online?
Now imagine combining the strengths of both platforms. Expensify handles the front-end expense capture and reporting, while QuickBooks manages the accounting backbone of your business. When connected properly, they eliminate duplicate data entry, reduce errors, and ensure that every approved expense flows directly into your books without manual intervention.
And now that you understand how both platforms complement each other, let’s move ahead and explore the technical steps required to connect Expensify with QuickBooks Online and Desktop.
How to Connect Expensify with QuickBooks Online?
Expensify integrates with QuickBooks Online through a built-in connection that streamlines expense management. It enables you to import expense accounts, keep financial data consistently synced, and send expense reports directly into QuickBooks for faster and more accurate reconciliation.
Note: Always verify that your QuickBooks Online subscription includes the required features before starting the integration process.
System Requirements
- Operating System: Windows 10 or macOS (latest supported versions) for smooth access to QuickBooks Online
- Browser Support: Latest versions of Chrome, Firefox, Edge, or Safari (older browsers may cause sync or login issues)
- Internet Connection: Minimum 1.5 Mbps (3 Mbps or higher recommended for real-time syncing)
- Hardware: At least 2 GB RAM (4 GB recommended) with a modern processor for better performance
- QuickBooks Subscription: Active QuickBooks Online plan (Self-Employed version is not supported for integration)
- Expensify Account: Active Expensify account with integration enabled
- User Access: Admin credentials required to authorize and maintain the connection
- Data Setup: Employees or vendors must be properly configured with matching email addresses in both systems
3 Steps to Sync Expensify and QuickBooks Online
Step 1: Set Up Employees in QuickBooks Online
Before you connect Expensify with QuickBooks Online, make sure your employee records are properly configured in QuickBooks Online:
- All employees should be added either as Vendors or Employees within QuickBooks Online.
- Each submitter’s profile must include the same email address they use in Expensify.
Export Options Based on Record Type:
- Vendor Records: Can be exported as Vendor Bills, Checks, or Journal Entries.
- Employee Records: Can be exported as Checks or Journal Entries (when using a liability account).
Step 2: Connect Expensify to QuickBooks Online
- Open Settings from the left-hand menu.
- Go to Workspaces > Groups > [Workspace Name] > Accounting.
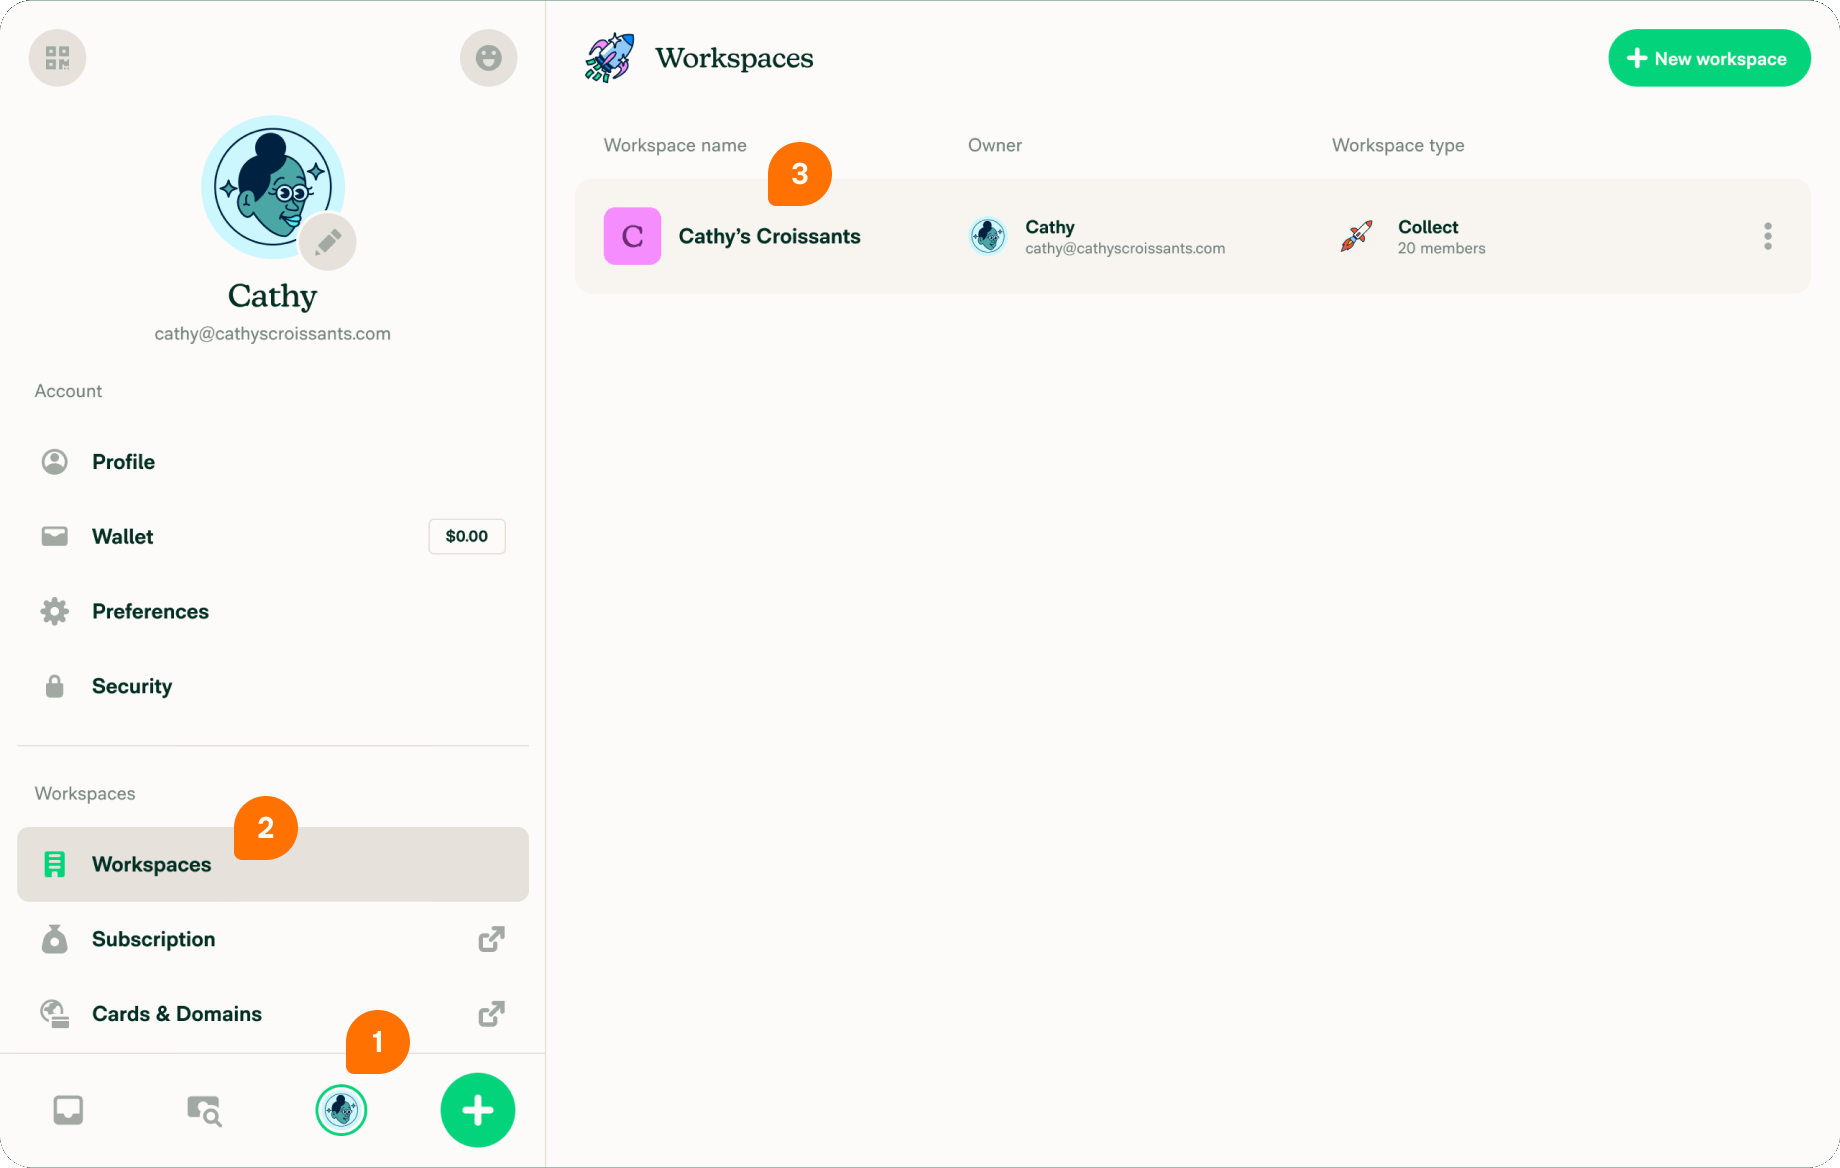

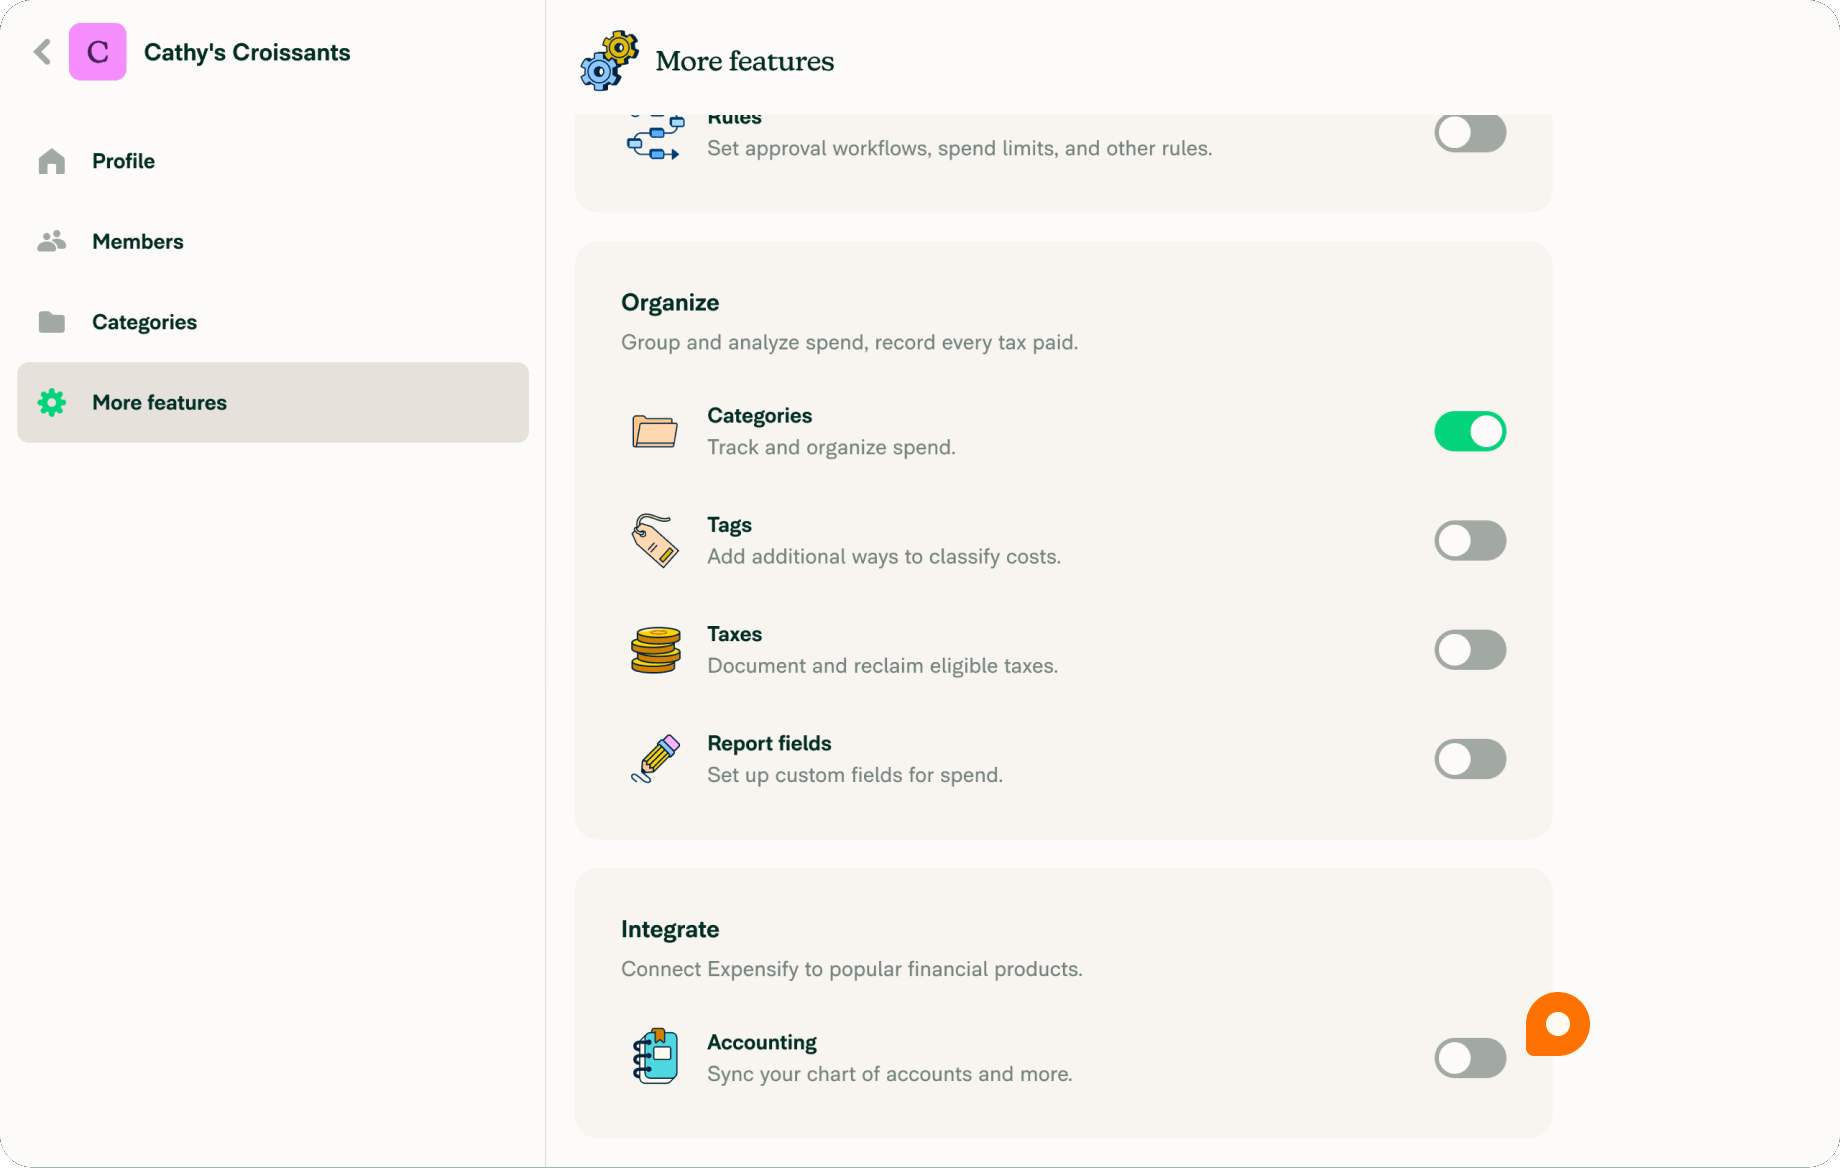
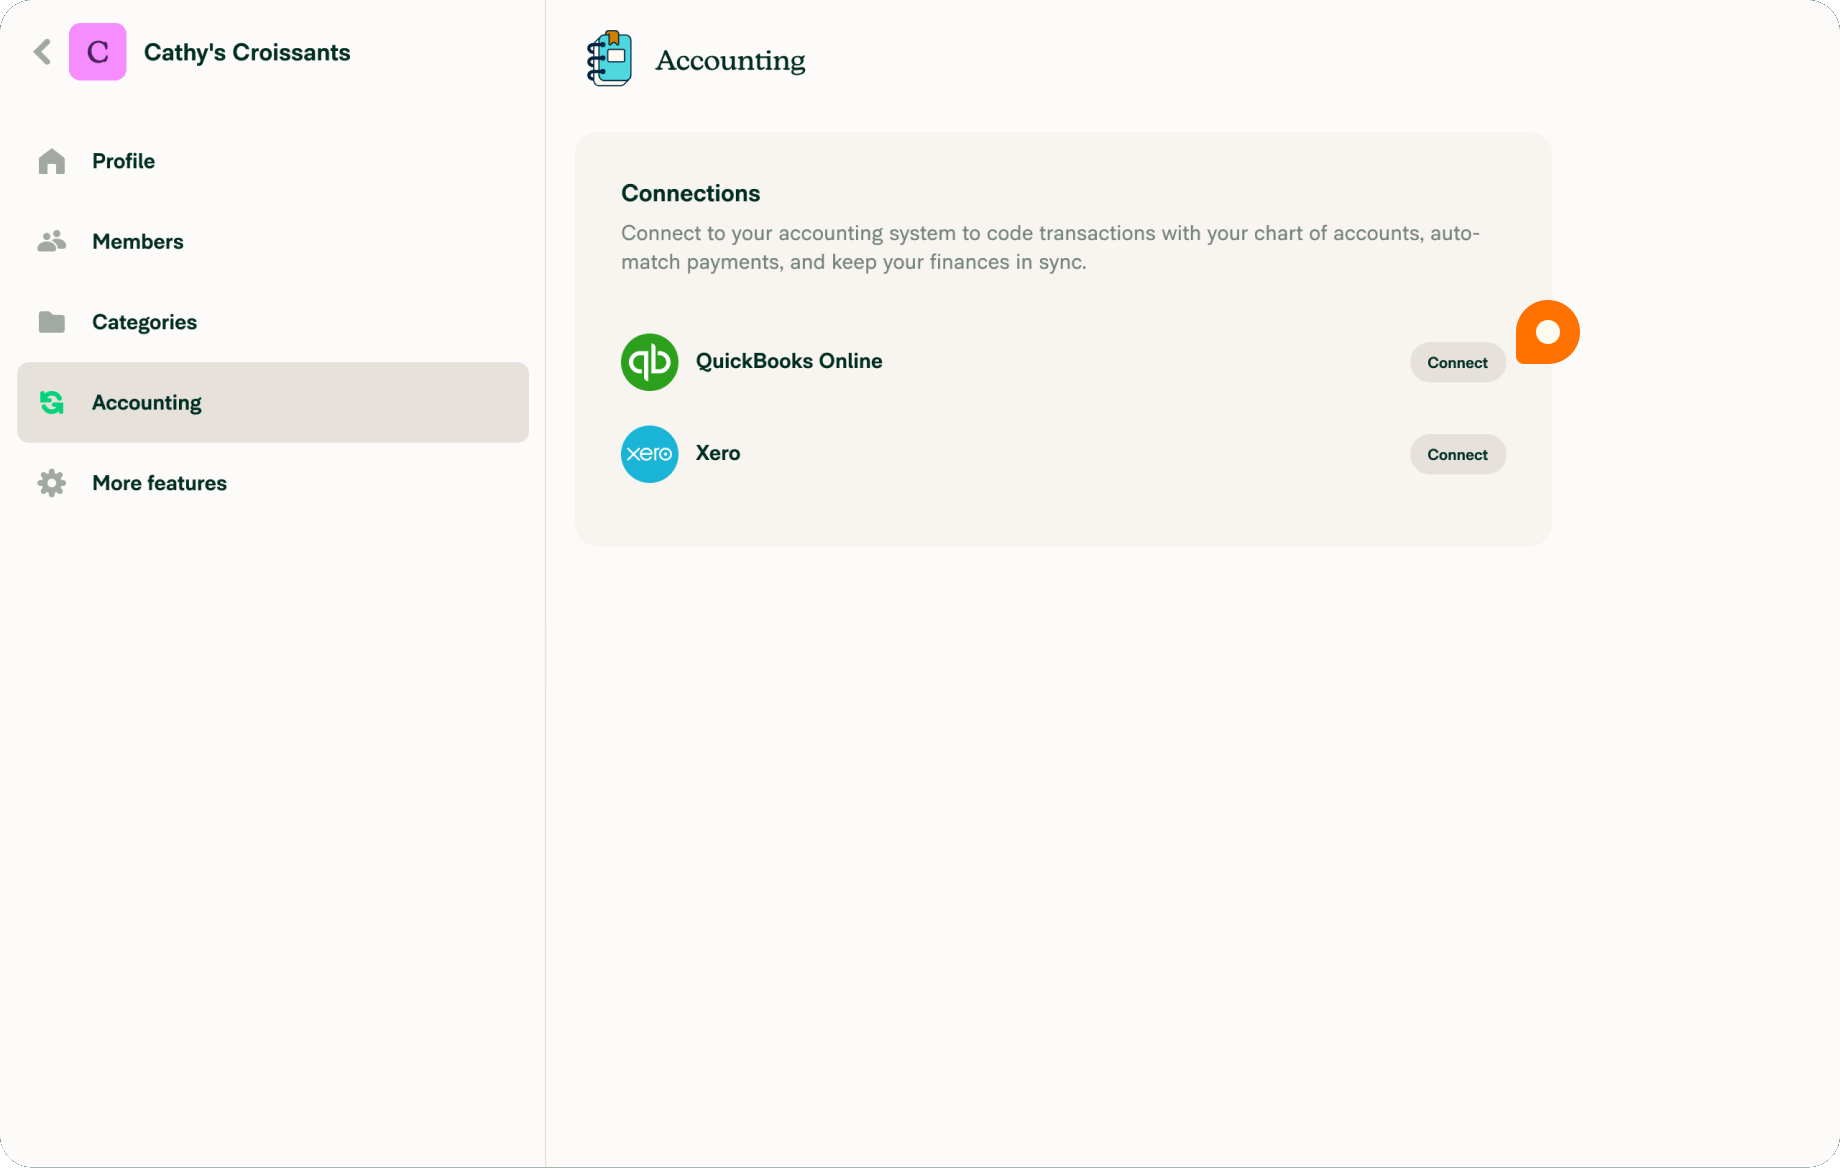
- Select Connect to QuickBooks Online.
- Choose Create a New QuickBooks Online Connection.
- Enter your QuickBooks Online Admin login credentials.
- Select the company file you want to connect (only one company file can be linked per workspace).
- Click Authorize to proceed.
After Authorization:
- You’ll be redirected back to Expensify.
- Initial settings will begin syncing automatically from QuickBooks Online.
- Once syncing is finished, the configuration window for QuickBooks Online will open automatically.
- Update export, import, and advanced settings as required.
- Click Save to complete the connection.
Step 3: Export Historical Reports to QuickBooks Online
Once the integration is set up, you can export previous reports from Expensify to QuickBooks Online in bulk.
To Export Multiple Reports:
- Open the Reports page in your web browser.
- Reset the filters, then modify them to display the reports you want to export.
- Select the checkbox next to each report.
- Click Export To, then choose QuickBooks Online.
- If there are reports you don’t want to export, select Mark as Manually Entered instead.
If you’re a QuickBooks Desktop user, don’t worry, we’ve got you covered. The following section walks you through the exact steps to connect Expensify with QuickBooks Desktop quickly and without confusion. Let’s move ahead and get your integration set up the right way.
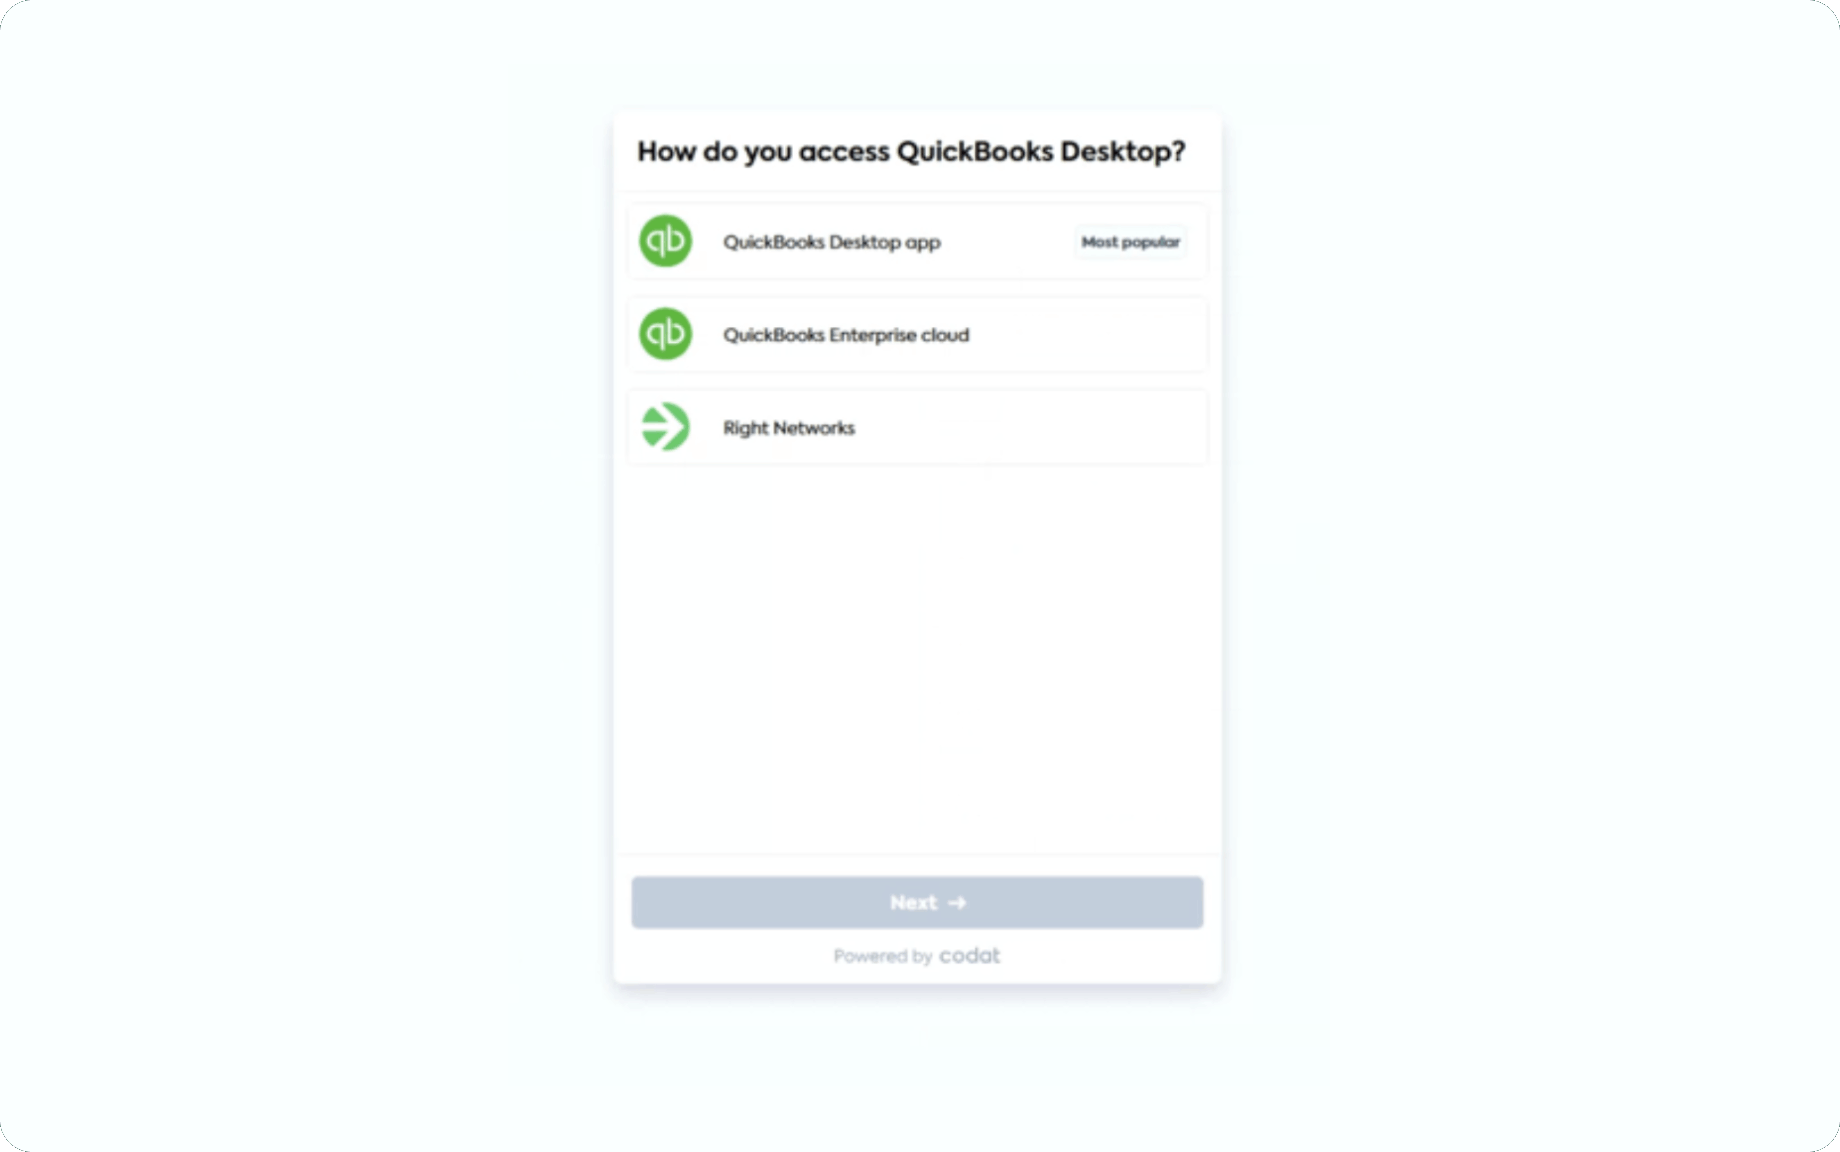
How to Connect Expensify with QuickBooks Desktop?
Integrating Expensify with QuickBooks Desktop helps businesses simplify expense tracking and improve overall financial management. The sync between Expensify and QuickBooks Desktop ensures that expense data stays consistent across both systems, reducing manual work and errors
Important: To complete the setup successfully, you must be logged into QuickBooks Desktop as an Administrator, and only the specific company file you want to connect should be open.
System Requirements
- Operating System: Windows 10 or Windows 11 (latest updates recommended); macOS not supported
- QuickBooks Version: Latest 3 supported versions of QuickBooks Desktop (Pro, Premier, Enterprise, Accountant, and related editions)
- Hardware: Must meet Intuit’s recommended system specifications
- User Access: Admin login required in QuickBooks Desktop
- Web Connector: QuickBooks Web Connector must be installed and running
- Company File: Only one company file should be open during setup
- Internet: Stable connection required for syncing with Expensify
Now let us look at the steps:
3 Steps to Sync Expensify and QuickBooks Desktop Effortlessly
Step 1: Configure the Connection in Expensify
- Sign in to your Expensify account and navigate to Settings then Workspaces
- Choose the workspace you want to link with QuickBooks Desktop
- Go to the Accounting section and click Connect to QuickBooks Desktop
- Copy the connection link provided
- Open that link on the computer where QuickBooks Desktop is installed
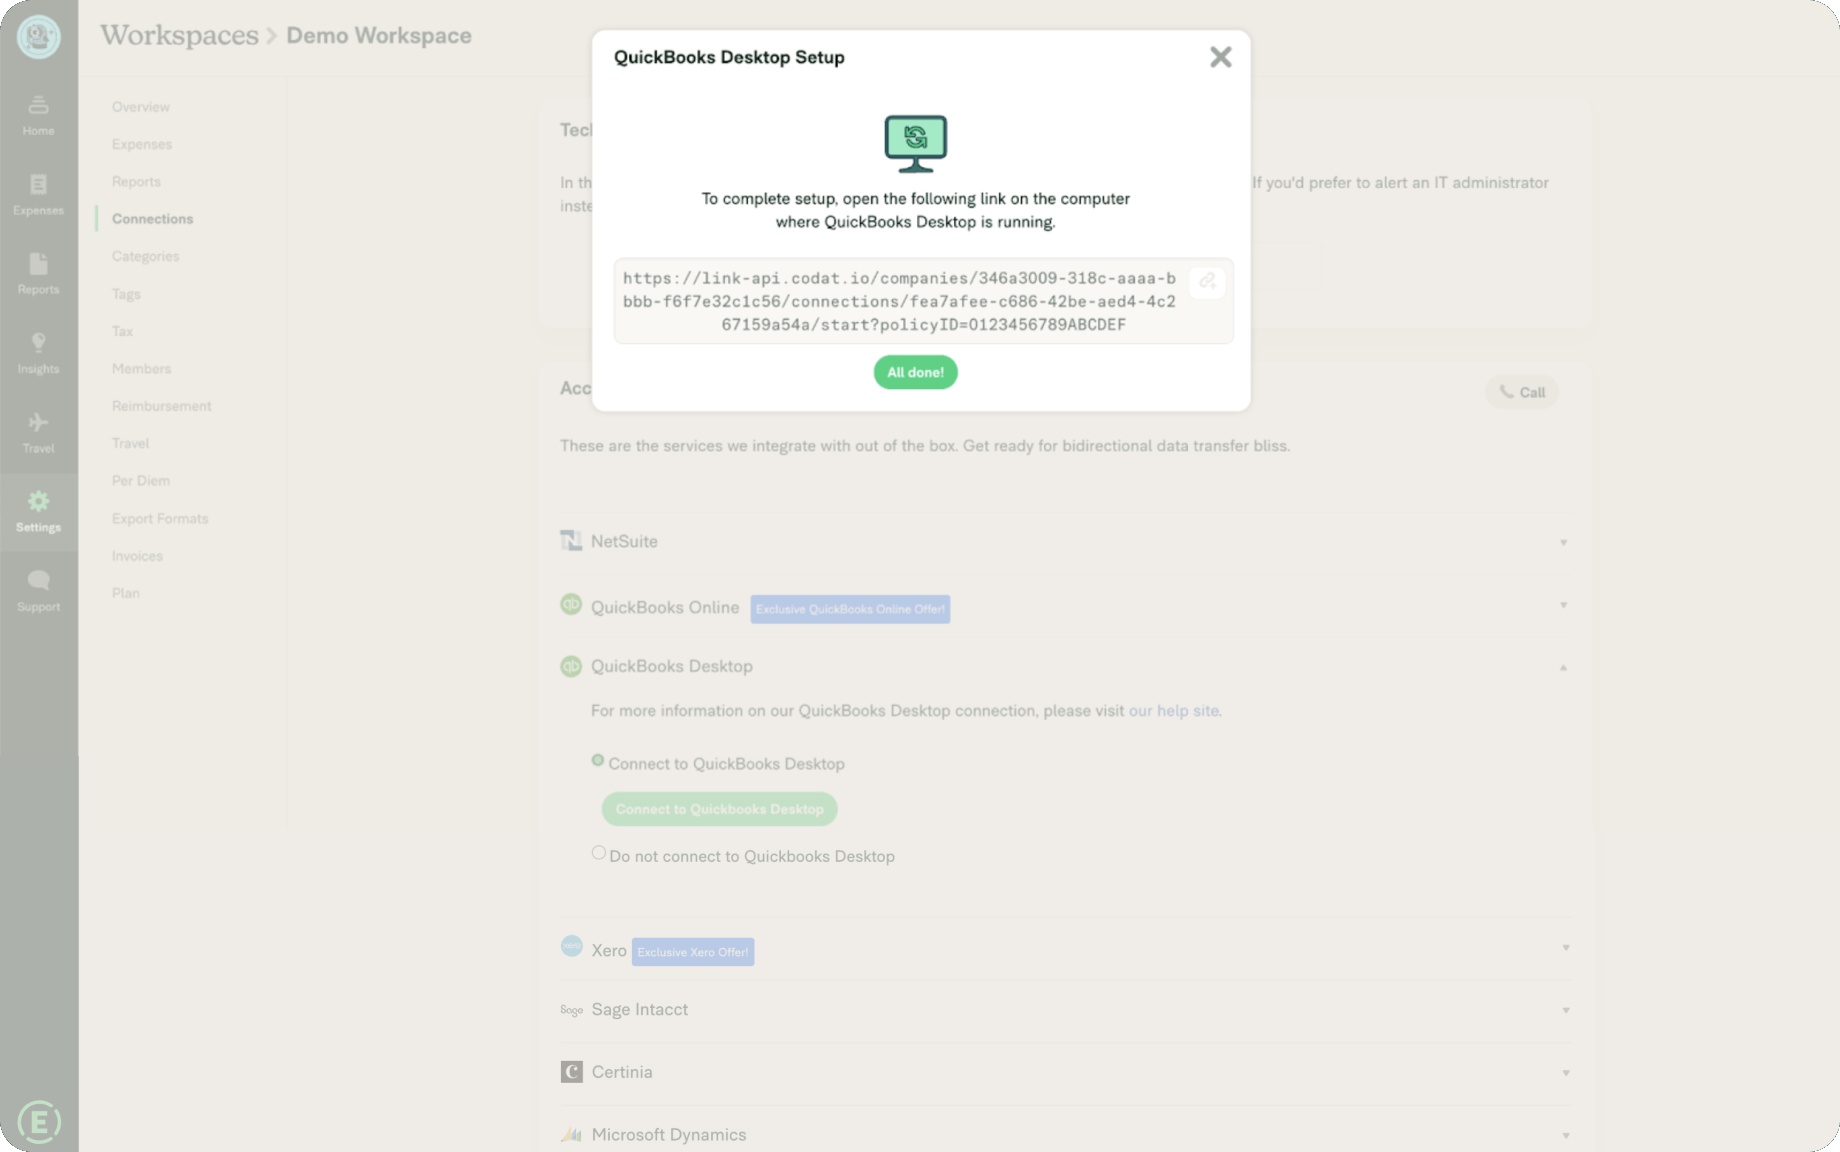
- When prompted, select your QuickBooks Desktop version to proceed
Step 2: Install and Set Up the Web Connector
- Download and install the QuickBooks Web Connector by following the setup instructions
- Once installed, launch the Web Connector
- Download the configuration file when prompted
- Open the file using File Explorer, which will automatically load the integration into the Web Connector
Tip: Please make sure that the correct QuickBooks company file is open and that no other company files are running during this process.
Step 3: Grant Access and Complete the Setup
- Open QuickBooks Desktop, select “Yes, always allow access, even when QuickBooks is not running”, then click Continue

- Choose OK, and confirm by selecting Yes

- Click Copy to copy the generated password in the Web Connector
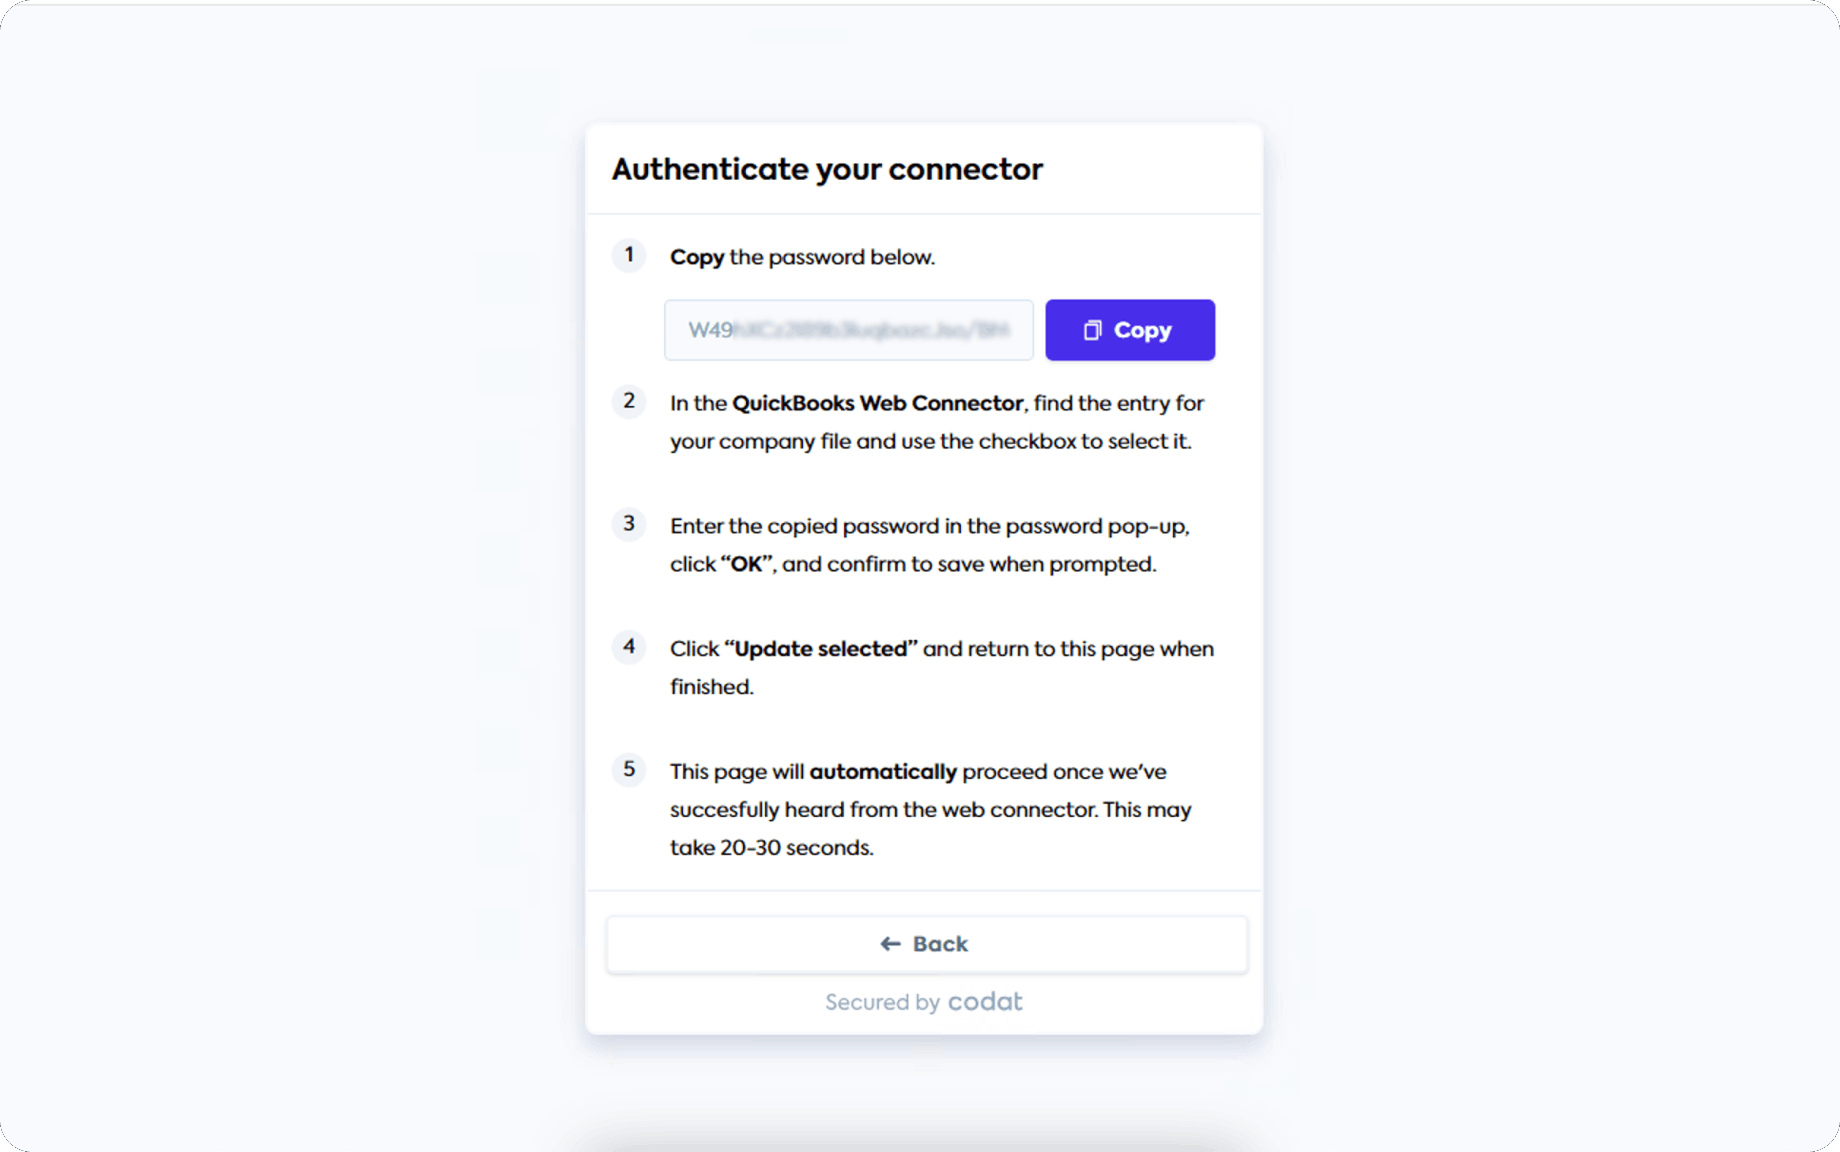
- You can paste the password into the Password field in the Web Connector and press Enter
- Click Yes to save the password
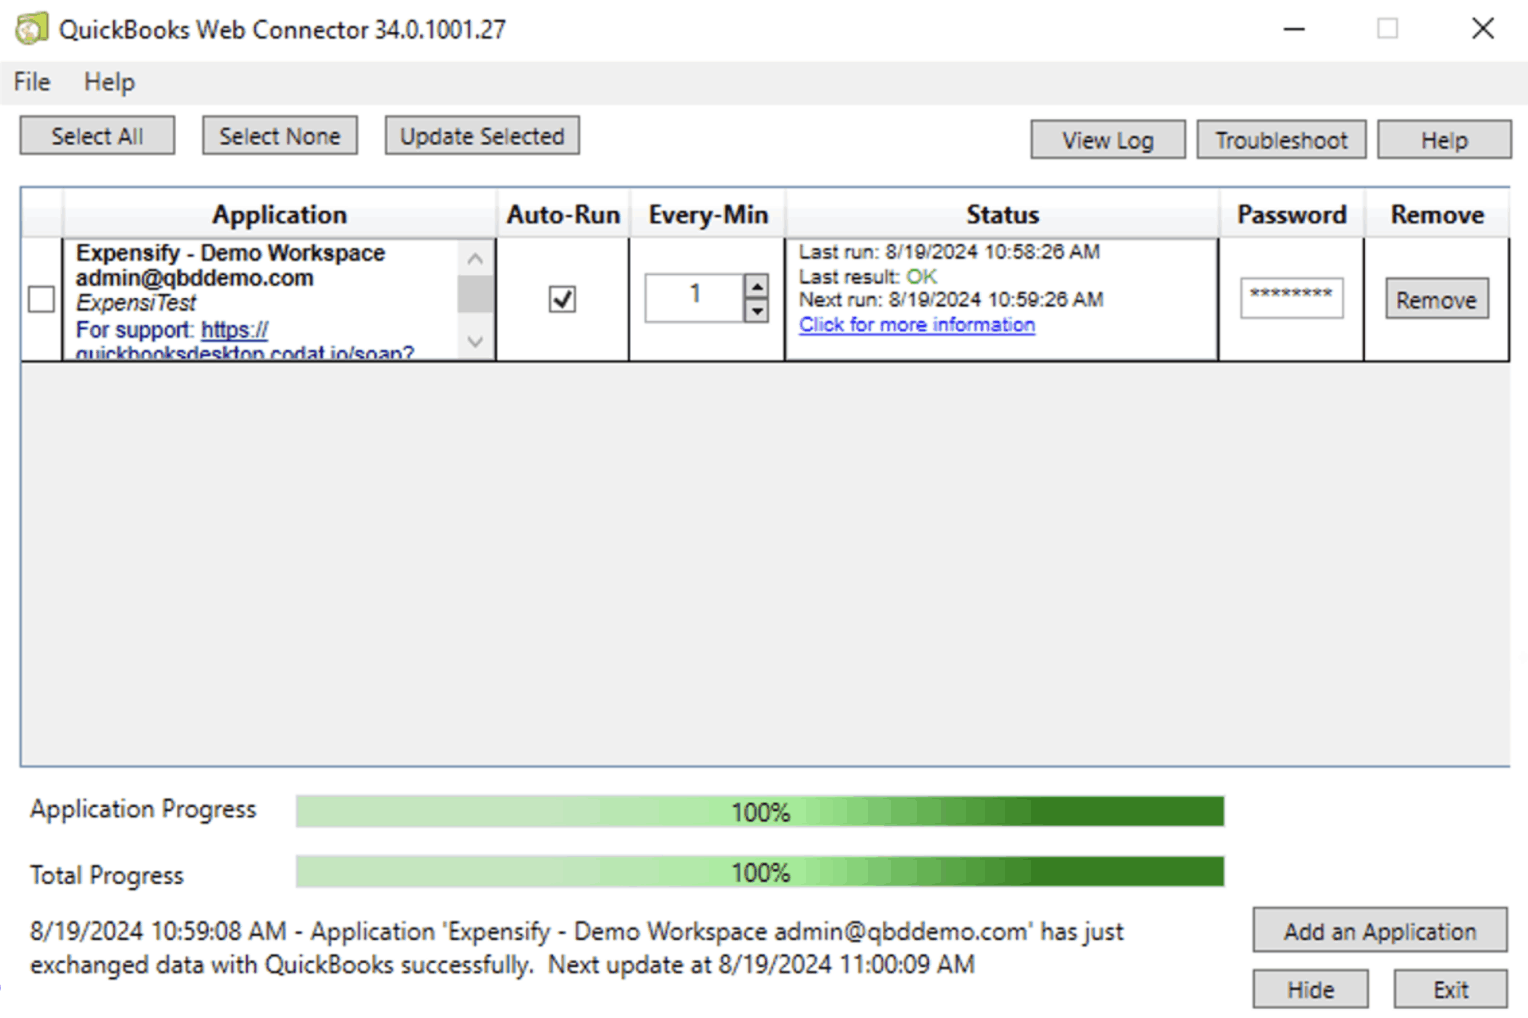
- The connection will now appear in the Web Connector, confirming successful setup
Tip: Save the password securely in a trusted password manager so you can easily access it later if needed.
So, these are the steps to create a sync between Expensify and QuickBooks Desktop. While the process may look straightforward on the surface, what truly makes the integration successful is not just following the steps, but understanding the fundamentals behind it. A strong foundation ensures that your sync remains stable, accurate, and error free in the long run.
Now that the technical setup is clear, let’s focus on building that strong foundation with a few practical habits you should follow.
Best Practices for Using Expensify with QuickBooks
Before you start troubleshooting syncing errors or fixing data mismatches, it’s always better to build the right foundation. A few smart habits can save you hours of manual corrections later and keep your expense workflow running smoothly. Here are some simple yet powerful best practices to follow:
- Keep Expensify and QuickBooks updated to the latest release, so you avoid compatibility issues and benefit from the newest security and performance improvements.
- Monitor integration logs and system notifications regularly, and stay proactive by carefully reviewing alerts, error messages, and sync reports. Address small syncing issues immediately before they escalate into larger accounting discrepancies or data integrity problems.
- Make sure expenses and transactions are categorized properly. And on top of that, also ensure to configure, manage, and use the chart of accounts and tax settings correctly.
Tip: You can also use Automated Sales Tax in QuickBooks Online to automatically calculate, track, and apply the correct sales tax rates to your transactions, reducing manual errors and ensuring compliance.
- Set clear and well-defined expense policies to reduce approval delays and prevent reporting mistakes before they happen.
- Reconciling bank and credit card accounts in QuickBooks is considered one of the most crucial and fundamental accounting practices for maintaining accurate financial records and preventing reporting errors. So, cross-check synced expenses with bank and credit card statements to catch discrepancies early before month-end closing.
- Back up your QuickBooks data regularly to safeguard your financial records and ensure business continuity. Especially for Desktop users, maintaining secure and consistent backups helps you quickly recover from sync conflicts, system crashes, or unexpected data corruption without disrupting your accounting workflow.
Now that you’re familiar with the best practices for connecting Expensify with QuickBooks Online and Desktop, let’s take a quick look at how these two platforms compare. Understanding their differences and strengths will help you choose the right setup for your business needs.
Expensify Integration: QuickBooks Online vs QuickBooks Desktop
| Feature / Aspec | QuickBooks Online Integration | QuickBooks Desktop Integration |
| Setup Process | Simple and quick; connect directly through Expensify using Intuit login | More complex; requires Web Connector installation and manual configuration |
| Connection Type | Cloud-based, real-time connection | Local connection via QuickBooks Web Connector |
| Sync Speed | Near real-time, automatic syncing | Manual or scheduled sync depending on Web Connector |
| Accessibility | Accessible from anywhere with internet access | Limited to the system where QuickBooks Desktop is installed |
| Ease of Use | User-friendly with minimal technical setup | Requires technical steps and admin-level access |
| Maintenance | Low maintenance; auto-updates handled in the cloud | Requires manual updates and monitoring of Web Connector |
| Data Sync Features | Imports categories, classes, customers, and auto-syncs reports | Syncs data through connector; may need manual control and checks |
| Error Handling | Easier to troubleshoot with simple reconnection | Errors may require checking logs, connector, or system setup |
| Compatibility | Not supported for Self-Employed version | Supports specific Desktop versions (latest supported editions only) |
| Best For | Small to mid-sized businesses needing flexibility and automation | Businesses needing advanced features and local control |
Both integration options offer powerful capabilities, but the right choice ultimately depends on your business needs and technical setup. QuickBooks Online provides a smoother, cloud-based experience with real-time syncing, making it ideal for businesses that value flexibility and automation. On the other hand, QuickBooks Desktop offers deeper local control and is better suited for companies that prefer on-premises systems.
How Expensify and QuickBooks Integration Helps Businesses Grow?
Integrating Expensify with QuickBooks creates a seamless workflow where expense data is automatically transferred and recorded within your accounting system.
Let us dive straight into the benefits:
1. Bidirectional Sync
Expensify provides real-time, two-way synchronization with QuickBooks. Any updates made in one system are automatically reflected in the other, ensuring your financial data stays consistent, accurate, and always up to date without requiring manual intervention or repeated checks.
2. Reduced Manual Work
The integration removes the need for duplicating data entry by automatically transferring expense information between platforms. This significantly reduces administrative effort, minimizes human errors, and allows your team to focus on more important financial tasks instead of spending time on repetitive bookkeeping activities.
3. Better Financial Visibility
With expenses syncing directly into QuickBooks, businesses gain a clearer view of their financial performance. Real-time access to spending data and cash flow insights makes it easier to monitor finances, identify trends, and make informed decisions without delays or relying on outdated reports.
4. Accurate Expense Coding
Expensify automatically imports categories and accounting data from QuickBooks, ensuring expenses are classified correctly. This reduces inconsistencies in records and helps maintain clean, organized financial data, which is essential for accurate reporting, audits, and overall financial management.
5. Vendor Matching
Expensify automatically matches expense merchants with vendors in QuickBooks during the export process. This improves accuracy in vendor records, reduces manual mapping, and makes it easier to track spending by vendor, helping businesses analyze costs and manage supplier relationships more effectively.
Common Integration Errors That Occur While Connecting Expensify to QuickBooks
Even with everything set up correctly, occasional issues can still occur. Here are some common problems and simple ways to resolve them.
1. Connection Issues
If the integration suddenly stops working, it’s often due to expired or incorrect authorization. Reconnecting your accounts and ensuring both platforms are updated usually fixes the issue quickly.
2. Expenses Not Showing in QuickBooks
When expenses don’t sync, it’s often due to mismatched categories or settings. Double-check that both systems are aligned, and the connection is still active. For managing synced transactions more effectively, you can also read how to update bank feeds and bank info in QuickBooks Online.
3. Duplicate Entries
Seeing the same expense twice? This usually happens when entries are added manually after syncing. Avoid double entry and use reconciliation tools to clean up duplicates.
4. Missing Receipt Images
If receipts aren’t visible in QuickBooks, confirm they were uploaded correctly in Expensify. Also, make sure receipt syncing is enabled in your settings.
5. Approval Bottlenecks
Slow approvals can delay the entire process. Simplifying workflows or enabling auto-approval for smaller expenses can significantly speed things up.
Conclusion
Managing expenses and accounting separately may work in the early stages of a business, but as operations grow, it often leads to inefficiencies, duplicate work, and avoidable errors. By integrating Expensify with QuickBooks, you bring expense management and accounting into one connected ecosystem where data flows seamlessly, accuracy improves, and financial visibility becomes clearer in real time.
Whether you opt for QuickBooks Online for its flexibility and cloud-based automation or QuickBooks Desktop for its control and advanced capabilities, pairing it with Expensify helps streamline your entire workflow. From capturing receipts and approving expenses to syncing transactions and generating precise financial reports, the process becomes faster, cleaner, and far more organized. With the right setup and best practices in place, your business can save valuable time, reduce risks, and make more confident financial decisions.
And if you prefer to avoid technical complexities and ensure a flawless, hassle-free sync, our QuickBooks integration service experts are always ready to help you get everything configured in the right way.
Frequently Asked Questions
The integration typically supports near real-time syncing, but some configurations may sync in batches depending on workspace settings and accounting preferences.
A red indicator typically signals a connection issue between Expensify and QuickBooks Online. It usually appears in the accounting section or on the integration panel and is often caused by incorrect or expired login credentials.
To resolve this:
1. Open the connection settings
2. Re-enter your login credentials
3. Reconnect the integration
Yes, Expensify helps simplify compliance by automating checks within your expense workflow. It can identify duplicate receipts, apply accurate exchange rates, and ensure that transactions follow company policies, making audits more efficient and reliable.
Uploading expenses in Expensify is quick and flexible. You can capture receipts using the mobile app, upload files, or use the Expensify card for automatic tracking. The system extracts key details like amount, date, and merchant, while also allowing manual entry when needed.
Yes, multiple connectors can be set up on a single machine. Each connector is linked to a specific company file, allowing you to sync multiple files from the same system. Just make sure you’re logged into the correct company file during each sync.
Yes, negative expenses can be exported, but there are some limitations. For example, if the export type is set to “Check,” the total amount must remain positive. Additionally, non-reimbursable expenses are typically exported as debit card transactions, which do not support negative values.
