
Managing customer payments and keeping track of outstanding balances is essential for maintaining healthy cash flow in any business. One of the most effective ways to achieve this is by creating and sending customer statements in QuickBooks. These statements provide a clear summary of a customer’s account activity, including invoices, payments, credits, and any remaining balance. They not only serve as a reminder for customers to pay on time but also help build transparency and trust in your business relationships.
QuickBooks, both Online and Desktop versions, offers easy-to-use features for creating and sending professional customer statements. Whether you are reminding customers of overdue payments or simply keeping them informed about their account status, QuickBooks streamlines the process with just a few clicks. The software allows you to customize statements, choose the format that best fits your needs, and send them directly via email or print them for mailing.
In this blog, we will walk you through the step-by-step process of creating and sending customer statements in both QuickBooks Online and QuickBooks Desktop. So, let’s begin with it.
7 Benefits of Creating Customer Statements in QuickBooks
Creating customer statements in QuickBooks offers several advantages that go beyond just tracking payments. These statements give customers a clear view of their account activity, including outstanding invoices, recent transactions, and any credits applied. Let’s take a look at the advantages of creating and sending customer statements in QuickBooks Online and Desktop.
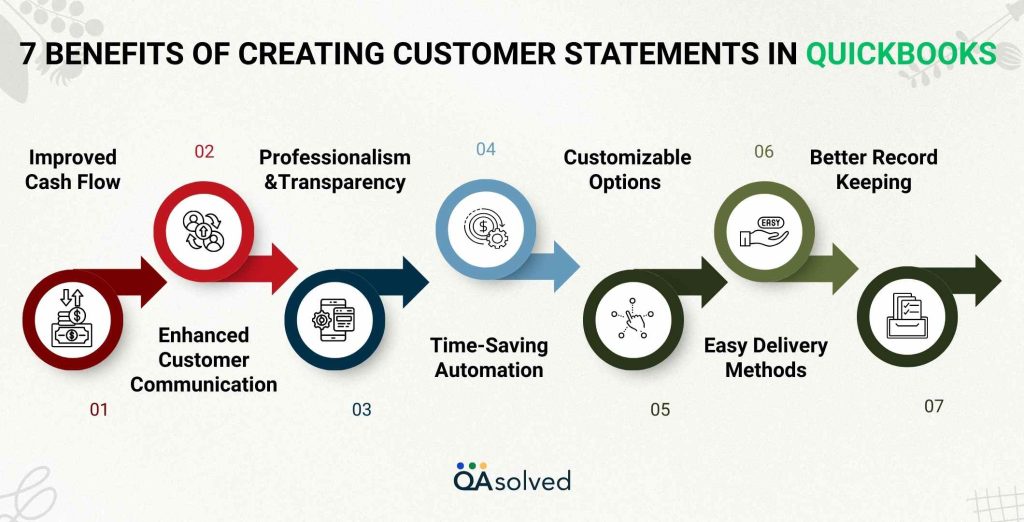
1. Improved Cash Flow
Invoice statements serve as timely reminders to customers of unpaid invoices, encouraging them to pay earlier, and reducing the number of overdue invoices.
2. Enhanced Customer Communication
Customers can view their account history on a single statement instead of being sent multiple invoices. This minimizes confusion and disputes.
3. Professionalism and Transparency
Billing statements reflect well on your company, ensuring customers trust your billing process by clearly explaining all financial transactions.
4. Time-Saving Automation
QuickBooks allows you to create recurring or batch statements, reducing manual work and ensuring consistency.
5. Customizable Options
Customize the report to meet the needs of your customers by selecting a Balance Forward, Open Item, or Transaction Statement format.
6. Easy Delivery Methods
QuickBooks offers flexible delivery methods to match your workflow, such as emailing statements directly or printing them for mailing.
7. Better Record Keeping
Customer statements provide a consolidated record of all transactions, making it easier for both businesses and customers to track financial activity.
Taking advantage of these benefits will simplify account management, reduce errors, and ensure customers know what they owe, which will improve client relationships and revenue forecasting. Now, let’s address the focal point of this blog.
Steps to Create and Send Customer Statements in QuickBooks Online
If a customer has an unpaid balance or invoices nearing their due date, sending a customer statement is a smart way to remind them. These statements act as polite yet informative notices, giving customers a clear view of what’s pending and when payment is expected. There are three different types of customer statements in QuickBooks.
- Balance Forward Statement – Displays invoices, payments, and the customer’s total balance within a chosen date range.
- Open Item Statement – Shows all open, unpaid invoices from the past 365 days of a selected date.
- Transaction Statement – Lists every transaction recorded within a specific date range.
Note: When you send a customer a statement, it will also include transactions from any of their sub-customers that are billed directly to them.
Prerequisite
Before creating statements, review your account settings to decide how charges should appear. You can choose to display each transaction on a single line or include additional details such as finance charges and other specifics for greater clarity.
Steps to Create a Customer Statement in QuickBooks Online
- Login to your QuickBooks Online account.
- From the left-hand menu, select Sales, and then choose Customers.
- Select the customer you want to create a statement for.
- Choose Statement from the New transaction dropdown.
- Pick the type of statement you want to generate.
- Enter the Start Date and End Date.
- Verify the customer’s email address.
- Hit Save and send.
- Click Send after reviewing the statement.
- Once ready, you can email the statement directly to the customer or print it for mailing.
So, these are the steps that can help you create and print customer statements in QuickBooks Online. Now, let’s also take a look at the steps to review and edit past customer statements in QuickBooks Online.
How to Review and Edit Past Customer Statements in QuickBooks Online?
Here are the steps to review and edit past customer statements in QuickBooks Online.
- Open QuickBooks Online.
- Navigate to the Sales menu.
- Choose the customer whose statements you’d like to view.
- Click on the Statements tab.
- Use the Date dropdown to set the desired date range.
- Pick the statement you wish to open and review.
- To email the statement as a PDF to one or more recipients, click Send. Once finished, select Send statement.
- To view the statement as a PDF for printing or downloading, choose Print or Preview.
- Find and select the customer whose statement you need to access.
- Go to the Statements tab.
- From the Date dropdown, choose the appropriate date range.
- Click on the statement you’d like to view.
- To draft an email and send the statement as a PDF attachment to one or more recipients, click Send, then select Send statement once you’re ready.
- To generate a PDF version of the statement for printing or downloading, choose Print or Preview.
- You can also click on Delete in case you want to remove the statement from QuickBooks Online’s records.
So, these are the steps that can help you review, edit, and delete customer statements in QuickBooks Online.
Steps to Create and Send Customer Statements in QuickBooks Desktop
Creating and sending customer statements in QuickBooks Desktop is a simple yet effective way to keep your customers updated on their account activity. The process allows you to generate statements that summarize open invoices, payments, credits, and outstanding balances, all in a clear and professional format. Follow the steps given below to get customer statements in QuickBooks Desktop.
Create a Billing Statement
Follow the steps to create a billing statement in QuickBooks Desktop for Windows and for Mac as well.
A. QuickBooks Desktop for Windows
When creating statements, you can review up to 4,500 customer records at a time. If your customer list exceeds this limit, you’ll need to manually select the customers you want to include.
- Open QuickBooks Desktop.
- Select the customers you want to include.
- From Batch action, choose Create statements.
- Select the appropriate A/R account.
Note: The A/R Account field in QuickBooks appears only if your Chart of Accounts includes more than one accounts receivable. - Verify the statement date.
- Choose the transaction date range to be included.
Note: You can either set specific dates for the statement or include all open (unpaid) transactions up to the statement date. - Choose the customers for whom you want to generate statements.
- Click on Additional options.
- Select Print or Email, based on your preferred delivery method.
B. QuickBooks Desktop for Mac
Follow the steps as mentioned below to successfully create a billing statement in QuickBooks Desktop for Mac:
- Open QuickBooks Desktop in your Mac
- Navigate to the Sales and then click on Customers.
- Now, select Create Statements.
- Choose the correct A/R account to use for the statement.
- Define the statement date range.
- (Optional) Select the template you’d like to use for the statement.
Note: To customize your template, select New Template to open the Layout Designer. From there, you can choose options such as adding a Ship To address or other details. - In the Customer section, select the customer whose statements you want to print.
- Click on Additional options.
- Choose Print or Email based on how you’d like to deliver the statements.
Also Read: What is Accounts Receivable in QuickBooks? How to Set Up, Track, and Manage It
Troubleshooting: Email Button Not Working When Sending Statements
If the Email button doesn’t work (no error message, but the email isn’t sent), follow these steps:
- Ensure all preferences are correctly set to generate a statement:
- The correct customer is selected.
- The customer has an invoice or sales receipt within the statement period or before the statement date.
- If the customer has a zero balance, make sure the box Do not create statements for customers with a zero balance is unchecked.
- Select the Intuit Standard Statement as the template.
- If Create One Statement is blank, choose Per Customer or Per Job from the dropdown.
- Verify the customer’s email address is set up and that email preferences are properly configured:
- Go to Edit > Preferences.
- Select Send Forms.
- Confirm the email setup is working, then select OK.
- If emails still fail, the issue may be an overflow error:
- Check the option with a balance less than and set the amount to 0.00.
- Try re-sending the email.
Note: If the problem persists, the issue may be related to your email service provider.
In a nutshell, keeping your customers informed about their account activity by creating, customizing, and sending billing statements is a crucial aspect for businesses. Both QuickBooks Online and Desktop versions ensure accurate capture of every detail, whether you print or email them. By doing this, you can easily manage outstanding balances, improve collections, and maintain clear communication with your customers. With these steps, it’s easier than ever to get customer statements in QuickBooks and stay on top of your accounts receivable.
Conclusion
Creating and sending customer statements in QuickBooks, whether Online, Desktop, or Mac, helps businesses maintain clear communication, streamline collections, and improve cash flow. By leveraging the built-in tools to generate professional, accurate statements, you can remind customers of outstanding balances, reduce disputes, and present your business in a trustworthy, organized manner. QuickBooks also provides flexible options for customizing templates, selecting statement types, and choosing delivery methods, making it easy to fit your workflow and customer needs.
Regularly sending statements not only supports timely payments but also strengthens customer relationships by keeping account activity transparent and easy to understand. By following the steps outlined in this guide, you can efficiently manage accounts receivable, save time on manual processes, and ensure your financial records remain accurate and up-to-date.
Start using customer statements today to simplify your billing process and enhance your business’s financial management.
Frequently Asked Questions
1. From a Customer’s Profile – Go to Sales > Customers, select a customer, and create a statement directly from their profile.
2. From the New Transaction Menu – Open the + New button, choose Statement, and fill in the details for a specific customer.
3. In Bulk for Multiple Customers – Go to Sales > Customers, select multiple customers, then use the Batch actions > Create statements option.
Method 1: Export to Excel
1. Open QuickBooks Desktop.
2. Go to the Reports menu.
3. Select Customers & Receivables > Customer Contact List (or another report that has the details you need).
4. Customize the report if needed (add/remove columns like phone number, email, etc.).
5. At the top, select Excel > Create New Worksheet.
6. Choose the new workbook or existing workbook, then click Export.
7. The report with customer information will open in Excel, where you can save and format it.
Method 2: Export via IIF File
1. Go to File > Utilities > Export > Lists to IIF Files.
2. Check Customers (or multiple lists if needed).
3. Select OK, then choose a folder and save the .IIF file.
4. This file can be opened in Excel or imported into another QuickBooks file.
1. Go to the Gear icon and select Recurring Transactions.
2. Click New.
3. From the Transaction Type dropdown, select Statement, then click OK.
4. Enter a Template Name for your recurring statement.
5. Under Type, select Scheduled (so QuickBooks sends it automatically).
6. Set the interval (daily, weekly, monthly, etc.) and the start date.
7. Choose the customers you want to receive automatic statements.
8. Customize the statement details (date range, type – Balance Forward, Open Item, or Transaction Statement).
9. Verify the customer email addresses are correct.
10. Select Save Template.
1. Go to Customers > Create Credit Memos/Refunds.
2. Select the customer and add the items or services being refunded.
3. When prompted, choose one:
– Give a Refund – Issue a check, cash, or credit card refund.
– Apply to an Invoice – Reduce an outstanding invoice.
– Retain as Credit – Apply to future invoices.
4. Click Save & Close.
