
QuickBooks makes it easy to manage inventory for small businesses with limited product lines. However, managing inventory becomes more challenging as your business grows and you start selling more items.
Many business owners don’t realize how important good inventory management is. Errors can lead to overselling, wasted resources, and unhappy customers. When your inventory grows, manually counting items becomes too time-consuming and inaccurate, leading to potential problems like running out of stock and unfulfilled orders.
QuickBooks Online provides advanced inventory management features that help you stay organized and efficient as your inventory grows. It allows you to monitor stock levels, reorders, and product performance, enabling you to make informed decisions.
This article will walk you through the step-by-step process of managing your inventory in QuickBooks Online. You will learn how to add products and services, track sales and purchases, and maintain accurate and up-to-date inventory records.
Why should you use QuickBooks Online Inventory Tracking?
QuickBooks Online offers the following key benefits for inventory tracking:
- Efficiency and Organization: Manage your inventory efficiently even as it grows.
- Real-Time Updates: Get real-time inventory updates so you can make informed decisions.
- Error Reduction: Automate tracking to avoid mistakes such as overselling and stockouts.
- Insightful Reporting: Detailed sales trends and inventory valuation reports provide valuable insights.
- Time-Saving: Automate inventory management to save time.
- Seamless Integration: Integrate with other accounting features to get a complete picture of your finances.
- Scalability: Easily scale your inventory management as your business grows.
Let’s get started!
Steps to Set up and Track Your Inventory in QuickBooks Online
Note: Inventory features are accessible in QuickBooks Online Plus and Advanced plans.
Steps at a Glance:
1. Turn on Inventory Tracking
2. Add your Inventory Products
3. Keep Track of What Sells
4. Stock up on Inventory
5. Use Reports to Check the Status of Your Inventory
Step 1: Turn on Inventory Tracking
- Go to Settings by clicking the gear icon.
- Choose Account and Settings.
- Head over to the Sales tab.
- In the Products and Services section, click Edit.
- Enable the option to Show the Product/Service column on sales forms.
- If you need flexible pricing, turn on price rules.
- Activate both Track quantity and price/rate and inventory quantity on hand.
- Click Save and then Done.
Did you know that QuickBooks operates on a “first in, first out” (FIFO) basis, meaning the items you buy first are the ones you sell first?
It’s important to note that not all accounting software employs FIFO. If you are transitioning from software that uses average costing to QuickBooks’ FIFO system, remember to inform the IRS about this change.
Step 2: Add your Inventory Products
QuickBooks allows you to enter inventory items, products, and services. As a result, you can easily include them on your sales forms.
Product Types in QuickBooks:
- Inventory: You track the quantities of products you sell. QuickBooks Online Plus and Advanced offer various inventory features.
- Non-inventory: You buy or sell non-inventory items without tracking their quantities. For example, nuts and bolts are used in installation jobs that you don’t sell directly.
- Services: These refer to the services you offer to customers.
- Bundle: This is a collection of multiple products or services sold together as one item, such as a gift basket.
Add products you want to Track as part of your Inventory
Step 1: Turn On Inventory Tracking
- Adding inventory items is easier when inventory tracking is turned on.
Step 2: Add a Product
- Access Settings ⚙ and choose Products & Services.
- Click on New and then select Inventory.
- Complete the necessary fields.
Step 3: Add your Product’s Quantity, Reorder Point, and Inventory Asset Account
- Input the quantity of your product on hand. Then, specify the date you began tracking this quantity in the As of date field.
- Next, set a Reorder point to receive notifications when it’s time to restock.
- From the Inventory Asset account ▼ dropdown menu, choose Inventory Asset.
The initial quantity will be determined when you begin monitoring your business inventory. Start with a quantity of zero for new products from a vendor.
To avoid duplication, keep track of the quantities received from vendors after saving.
Step 4: Enter Information about your Product’s Sales, Taxes, and Purchasing
- Fill out the sales form with the product’s description.
- Enter the sales price or rate for the product.
- Pick the Income account ▼ dropdown and choose the account used to track sales.
Note: Use the pre-set income account in QuickBooks or select + Add new to create a new account.
- Click Edit sales tax.
- Select the appropriate product type to specify how the item should be taxed.
- If this option is not visible, set up sales tax in QuickBooks.
- Indicate if the item is nontaxable.
- Provide the product’s description so it appears on bills, purchase orders, and other forms sent to vendors.
- Input the Purchase cost of the product. If the price changes when you buy supplies, update it accordingly.
- From the Expense account, choose Cost of Goods Sold
- Choose a preferred vendor.
- Enter Save and close to complete the entry.
Add Products and Services you Buy or Sell but don’t Track
Note: QuickBooks will not monitor the quantities for these items.
- Service Items
- Non-inventory items.
- Bundles
Add Product and Service Items to QuickBooks Online
Step 1: Add a New Product or Service Item
- Access Sales and then Products & Services.
- Add New.
- Choose Non-inventory or Service.
- Provide a Name for the product or service.
- Select the category for your product or service from the Category dropdown.
- If you sell the item, ensure the “I sell this product/service to my customers” checkbox is selected.
- Enter a Description on sales forms to show what your customers will see.
- Input the Sales price/rate. (If the rate varies, leave this field blank and fill in the price on the invoice or sales receipt.)
- Select an Income Account:
- From the Income account ▼ dropdown, choose the account to track the sale.
Note: Changes to an Income account mapping will only affect future transactions.
- By default, sales tax is applied based on location. To access more specific tax options, select Edit sales tax.
- If the item is tax-exempt, select Nontaxable and then Done.
- Select the appropriate type of tax if the item has a special tax rate using the Search field or Browse All.
- Hit Save and Close.
Step 2: Add a Service or Product’s Purchasing Info
- Go to the Sales menu.
- Next, select Products & Services.
- Locate the product or service in the list. In the Action column, hit Edit.
- Make sure I purchased this product/service from a vendor is checked.
- Enter Item Details.
- Enter the cost. When buying supplies, update the price if it changes.
- From the Expense account ▼ dropdown, choose the account used to track the cost of the items you sell.
- Select your preferred vendor for this item.
- Save the Changes.
Step 3: Track and Manage Product and Service Items you Sell
Once your setup is complete, you can effortlessly monitor your purchases and sales.
Edit a Product or Service Item:
- Go to the Sales menu.
- Choose Products & services.
- Find the specific product or service you want to update.
- In the Action column, select Edit.
- Update the necessary details.
- Click Save and close once you’re finished.
Change a Product or Service Item Type:
You can easily correct the item’s type if you mistakenly add an inventory item as a non-inventory item or a service item as an inventory item. Here’s how to do it.
To Deactivate an Item:
If you deactivate items, they will no longer appear on sales forms, lists, or financial reports. Here’s how:
- Go to the Sales menu.
- Pick Products & services.
- Find the product or service you want to deactivate.
- Click the ▼ dropdown in the Action column and select Make inactive.
- Confirm your choice by clicking Yes.
To Reactivate an Item:
- Head to the Sales menu.
- Click on Products & services.
- Click the Filter icon.
- Choose All from the Status ▼ dropdown and click Apply to display all active and inactive items.
- Find the item you wish to reactivate.
- Select Make Active from the Action column.
Step 3: Keep Track of What Sells
After setting up your inventory products, you can monitor their sales.
- For Deferred Payments: Create an invoice if the payment will be received later.
- For Immediate Payments: Add a sales receipt if the customer paid at the time of purchase.
Note: QuickBooks will reduce the on-hand quantity by the amount specified on the invoice or sales receipt.
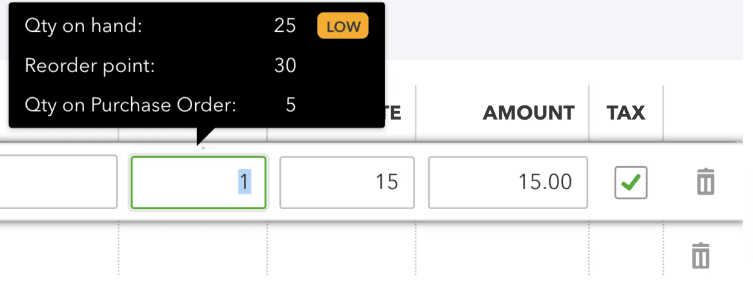
Keep an Eye on what’s Available and what’s on Order
When working on an invoice, sales receipt, or any other transaction, you can view the on-hand and on-order quantities by dragging your pointer over them.
As long as you have set reorder points in QuickBooks, you will be notified when your stock runs low. When inventory runs low, QuickBooks will notify you.
Step 4: Stock up on Inventory
QuickBooks alerts you when it’s time to fill up your stock. You can place inventory orders directly within QuickBooks and keep track of incoming items and pending orders. On-hand quantities are automatically updated when new items are received.
Edit a Product to Add a Reorder Point
- Go to Settings.
- Next, opt for Products & services.
- Choose the product to be reordered.
- In the Action column, enter Edit.
- Set the threshold for reordering more stock in the Reorder point field.
- Enter Save.
Monitoring Low or Out-of-stock Items
To check for low or out-of-stock items, follow these steps after setting up your reorder points:
- To access Products & Services, go to Settings.
- There is an indicator at the top of the page for items that are out-of-stock or low in stock.
- Click on the relevant indicator to filter and view those items.
Create a purchase order based on your alerts if your inventory is low or out of stock.
Creating a Purchase Order
Note: Purchase orders are documents you send to vendors to request items.
Let’s create one.
- Select Products & Services from Settings.
- Choose Low Stock, Out of Stock, or See All. Avoid using these filters if you must reorder low-stock and out-of-stock items from the same vendor.
- Select the boxes you wish to reorder.
- From the Batch actions dropdown, choose Reorder.
- You must include all necessary details in the purchase order and any additional items you need from the vendor.
- To finalize and dispatch the purchase order, click Save and Send.
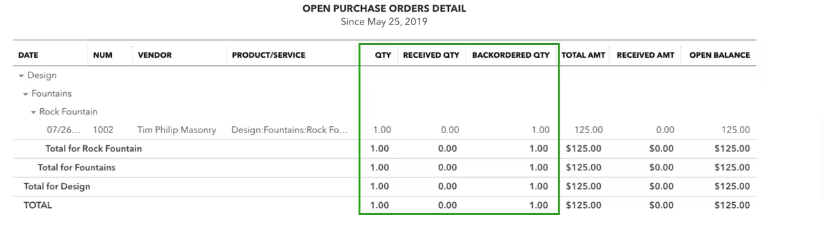
Check What’s still on Order
- Select Business Overview.
- Next, click on Reports.
- Then, locate and run the Open Purchase Order Detail report.
It will tell you how many items you have ordered and how many you have received.
Track what you Receive from your Vendor
- If you will pay your vendor later, create a bill from the purchase order.
- Create a check or expense from the purchase order if you paid your vendor upfront.
As a result of these actions, QuickBooks receives notification of your inventory’s restocking, automatically updating the quantity by the number of items received.
Pay your Vendor
Once you have paid your vendor, log the payment in QuickBooks. You can use QuickBooks Bill Pay to pay your vendor directly within QuickBooks.
Step 5: Use Reports to Check the Status of your Inventory
- Go to Reports.
- Click on Standard.
Check Your Best Sellers:
- Find the Sales and customer reports.
- For an overview of your product and service sales, run these reports:
- Sales by Product/Service Summary: Products and services sold in total.
- Sales by Product/Service Detail: Transactions by product or service.
Checking Inventory Levels
- Access the Sales and customers group of reports.
- To track stock, run the following reports:
- Inventory Valuation Summary: Each product is listed along with its quantity, value, and average cost.
- Inventory Valuation Detail: The section describes each inventory item’s transactions and how they impact quantity, value, and cost.
- Physical Inventory Worksheet: Lists inventory items with space to enter your physical count, allowing you to compare it to the quantity on hand.
Checking Items on Order
- Select the Expenses and Vendors group of reports.
- Run the Open Purchase Order Detail report.
Access the list of the items that are still on order and those that have already been received.
Verifying Inventory and Orders
While working on transactions, you can monitor what’s in stock and on order. To view this, select the quantity field of any item in the transaction.
QuickBooks will alert you if you’ve set reorder points when a product runs low.
Customize your Reports
Adjust each report to display the information most relevant to you. At the top of any report, you can modify the report date, grouping, and more.
- Select Customize to view all customization options.
Conclusion
Using QuickBooks Online to manage and track your inventory simplifies your business operations. With its inventory management features, you can easily monitor stock levels, get low-stock alerts, and manage orders. Customizable reports and real-time tracking ensure you have accurate inventory records and make better purchasing decisions. Use these tools to keep your business running smoothly and efficiently.
However, if you struggle to set up your inventory, contact our experts for immediate assistance at toll-free number +1-888-245-6075 or fill in the contact form.
Frequently Asked Questions
Turn on Inventory Tracking:
1. Access Settings and then Account and Settings.
2. Opt for the Sales tab.
3. In the Products and Services section, choose Edit.
4. Turn on the Show Product/Service column on sales forms.
5. Turn on both Track quantity and price/rate, and inventory quantity.
6. Enter Save and then Done.
Below are the Steps to do so:
1. Turn on inventory tracking.
2. Add in the inventory items.
3. Keep track of the sales you make.
4. Restock the inventory.
5. Use the reports to monitor the inventory status.
1. Turn on Projects
2. Choose Settings and then Company Settings.
3. Pick the Advanced tab.
4. Find the Projects section and select Edit.
5. Choose the Use project financial tracking. Switch.
6. Hit Save, then OK to confirm.
FIFO Rule: When you initially enter the sale and add the $6 units, QuickBooks Online follows the FIFO rule. Since you only have five $6 units in your inventory, each of the remaining fifteen units for this order is worth $7.
Add a Time-tracking User:
1. Access Settings ⚙ and then Manage Users.
2. Pick Add User.
3. Choose Time tracking only.
4. Hit Next.
5. Locate the vendor or employee you like to add, click Next, and provide their contact information.
6. Enter Save.
Services, bundles, non-inventory, and inventory are the four main categories of items. Inventory items are goods a company sells and must keep track of the number of units sold.
Turn on Class Tracking:
1. Go to Settings.
2. Pick Advanced, then select the Categories section to edit.
3. Turn on the Track classes switch.
4. Select Warn Me when a transaction isn’t assigned a class.
5. Under Assign classes, select One for the entire transaction or One for each row in a transaction.*
6. Enter Save, then Done.
Turn on Location Tracking:
1. Go to Settings. Choose Account and Settings.
2. Pick Advanced.
3. In the Categories section, select Edit.
4. Turn on the Track locations and switch to track locations.
5. Enter Save, then Done.
Access Time travel. Select whether you want to try a QuickBooks Time account with extra time tracking tools or just basic time tracking in QuickBooks Online. You can obtain timesheets from QuickBooks Online in any case.
