Table of Contents
ToggleFor businesses that engage in independent contractor relationships or make payments to freelancers and other non-employees, filing 1099 forms is a crucial part of their tax reporting obligations. These forms are essential for reporting non-employee compensation and other types of payments made to vendors throughout the tax year. QuickBooks offers an efficient and user-friendly way to generate and file 1099 forms. However, errors while filing Forms 1099 can lead to penalties and complications during tax season.
If your business pays contractors through cash, checks, or direct deposits, it becomes necessary to file 1099s with the IRS. Fortunately, QuickBooks Online offers a seamless solution to help you prepare your 1099s effortlessly, utilizing the information already present in your account.
In this article, we will walk you through the steps to create and file 1099s using QuickBooks Online, ensuring compliance with tax regulations.
If you find yourself short on time or prefer not to navigate through these steps on your own, worry not! Our team of expert QuickBooks ProAdvisors is just a call away, ready to assist you in resolving any issues.
What is the 1099 Form?
The IRS-mandated 1099 form is used to record payments made to non-employees. It’s critical to be aware of the 1099-NEC and 1099-MISC among the different IRS 1099 form variations. Due to the importance of these papers in tax returns, there are specified deadlines for filing them. The deadline for electronically filing the 1099-NEC form is January 31 and the deadline for electronically filing the 1099-MISC form is March 31.
Why should you Configure 1099s Forms in QuickBooks?
All business owners are required to provide Forms 1099 for certain payments received during the year. These payments consist of:
- Payment for Services like Contract Employees, Unincorporated Maintenance People, Bookkeepers, Accountants, etc.
- Legal Counselling Fees
- Rent
- Interest Paid
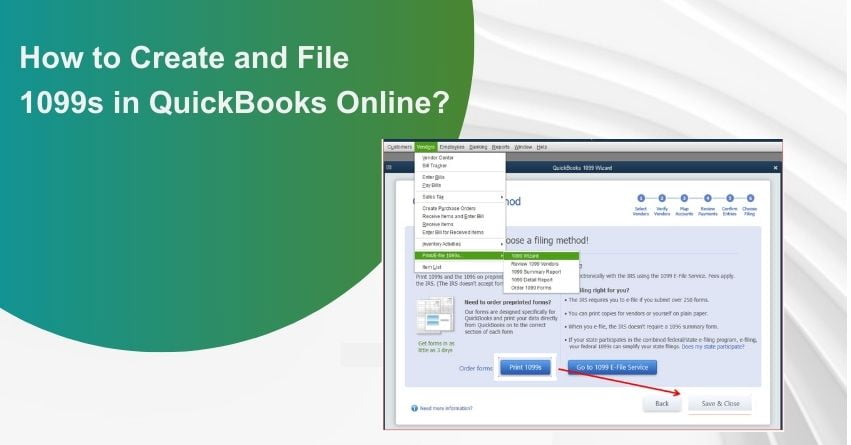
How to Print 1099 in QuickBooks?
How to set up 1099s Forms in QuickBooks?
- Create the vendor account or, if it has already been created, edit it.
- Select the vendor from the navigation bar, and then click Vendor Center.
- Select the vendor from the vendor list or click the drop-down arrow next to the new vendor on the left side of the screen to choose a different vendor.
- Add the vendor’s contact information and name in the New Window for Address Info.
- Add the seller’s tax ID number to the Vendor Tax ID field by selecting the tax settings option on the left side of the page.
- Select the checkbox next to “Vendor eligible for 1099” to confirm.
- Choose “Ok”.
Follow the Steps to Create and File 1099s:
Step 1: See what and when you need to report
1. Is it necessary to file a 1099?
The IRS mandates filing a Form 1099-NEC for non-employees in the following cases:
- Payments of $600 or more in cash during the previous year.
Note: Certain electronic payments like credit card, debit card, gift card, or PayPal payments cannot be reported on Form 1099-MISC or 1099-NEC. QuickBooks Online automatically excludes these payments on your behalf as the payment companies will report them, relieving you of this responsibility.
- If you withheld any federal income tax under the backup withholding rules.
2. When are 1099s due?
- The deadline for filing 1099s with the IRS and sending them to your contractors is January 31. To ensure timely delivery to your contractors, it is advisable to e-file before January 27 at 5:00 PM PT. By doing so, your 1099s can be postmarked on January 31 as required. You have the option to e-file 1099s until January 31 to meet the IRS deadline. If needed, e-filing remains open until April 30.
3. Need to file 1099s in your state?
- The 1099 E-file service is exclusively for federal 1099-MISC and 1099-NEC filings. If you need information regarding which states necessitate a 1099 filing or support combined filings, you can refer to the “File your state 1099 forms” section. For specific details on state requirements and filing procedures, it is best to reach out to your respective state authorities for guidance and assistance.
Step 2: Set up your 1099 accounts
- If you are required to file both a 1099-NEC and a 1099-MISC, you might need to make adjustments to your accounting and contractor payments. These adjustments will determine the specific boxes you need to select for the types of payments made to non-employees. Typically, businesses only need to select “non-employee compensation” for contractor payments, which doesn’t require any further changes. However, if you need to report other types of payments, additional accounting work is necessary to ensure your books are prepared correctly. To update your company file accordingly, follow the guidelines provided in this article.
Step 3: Create your 1099s
Follow these steps to prepare your 1099s for e-filing or printing. It will help you organize your contractors and payments to ensure accurate filings:
- Go to the “Payroll” section and select “Contractors” to proceed.
- Click on “Prepare 1099s” and then choose “Let’s get started.”
- Verify that your company name, address, and tax ID are correct and match the information on tax notices or letters received from the IRS.
- Select the appropriate boxes that represent the type of payments made to all your contractors during the year. Also, choose the corresponding accounts used for these expenses or payments. Click “Next” to proceed.
Important: Carefully select the relevant boxes, with most businesses opting for “Nonemployee compensation (Box 1 1099-NEC).” If you made other types of payments, consider consulting your accountant.
- Review your list of contractors to ensure their personal information and email addresses are accurate. Click “Next” to proceed.
- Check the payment totals for each box you selected in Step 4. The system will automatically separate payments between the 1099-NEC and 1099-MISC forms. Click “Next” to proceed.
Note: Certain electronic payments to contractors, such as credit card payments, are excluded as they are reported by the credit card company or bank. If you do not see all expected payments, double-check the year and threshold settings above the Name column.
- Choose “E-File for me” if you wish to electronically file your 1099s. Alternatively, select “I’ll file myself” if you prefer to print and mail the forms on your own.
Note: If you receive a message stating that there are no 1099s to file, you may have already submitted those 1099s. To view the 1099s you have previously filed, navigate to the “Taxes” section and select “1099 filings.”
to resolve your query in no-time.
Step 4: E-file your 1099s
Once you have completed the preparation and verification of your 1099s, it’s time to proceed with the e-filing process.
- After preparing your 1099s, click on the E-File option and review the information to ensure its accuracy.
- Follow the on-screen instructions to complete the 1099 e-file process. If prompted, provide your billing information. You will also have the opportunity to review each contractor’s 1099.
- If asked, choose the delivery option for your contractor’s copies. If you don’t see this option, it means you have already opted to provide your contractors with online access to their 1099s when you added them to QuickBooks. In case you need to update a contractor’s email address, make the necessary changes in QuickBooks and then go back through the 1099 e-file process.
Note: The paper version of Copy A of Form 1099 is for your records only and should not be printed or mailed to the IRS.
QuickBooks 1099 Wizard Simplifies Filing 1099 – MISC Forms
Step 5: Check your filing status
Once you have successfully filed your 1099s to the IRS following the steps mentioned above, we will keep you informed about your filing status through email notifications. Additionally, you can conveniently check the status anytime within QuickBooks Online.
- To view your filing status, follow these simple steps:
- Go to the “Taxes” section and then click on “1099 filings.”
- Under “Filing status,” you can see the current status of your e-filing. Here are the different statuses and their meanings:
– Not Submitted: This status indicates that you haven’t e-filed Form 1099-NEC or 1099-MISC with the IRS. You can continue making revisions as needed.
– Submitted: This status means that you have successfully e-filed the form to the IRS. Please note that if you need to make further revisions, you might have to file a manual amendment. Refer to the provided IRS instructions and form for guidance.
– Received by IRS: When your form has been received by the IRS, it will either be in the processing stage or may have already been processed and approved. Please be aware that customers who have submitted their 1099 E-File forms will generally receive a confirmation email about a week after the IRS accepts and confirms the submissions. However, confirmation emails might not be received until the middle of January or later.
- For your convenience, you can click on “View 1099” to access and review a PDF copy of the filed 1099.
Don’t hesitate to reach out for expert guidance and seamless support! Contact us now and experience the ease of managing your QuickBooks with our professional assistance.
Conclusion – Create and File 1099s
Filing 1099s forms with QuickBooks Online is a convenient and efficient process for businesses working with independent contractors and vendors. By following the steps outlined in this article, you can ensure that your vendor information is accurate, transactions are properly categorized, and the correct 1099 forms are generated. If you face any issues, kindly reach out to us via our toll-free number: +1-855-875-1223.
Frequently Asked Questions
Yes, you can. If you have already sent a 1099s form, QuickBooks Online allows you to make and submit more 1099s forms.
1. Go to QuickBooks Online
2. Next, go to taxes and select 1099 fillings.
3. Select view 1099 to view a PDF copy.
You will need to work directly with the IRS to make a manual amendment to your 1099 forms. Use these IRS instructions to do so. Once corrected you will need to provide the corrected return to the recipient or contractor yourself.
1. Locate the folder containing your company file.
2. Right-click on the folder and choose the option “Copy.”
3. Now, access the external device you intend to use for file transfer or navigate to the desired location on your hard drive.
4. Finally, select “Paste” to complete the process.
1. To rename the file, right-click on it
2. And choose the option “Rename.” The current file name might display as either [CompanyName].qbw or simply [CompanyName].
3. Modify the file name as desired,
4. Next press Enter.
5. When prompted, click “Yes” to confirm the renaming action.
