

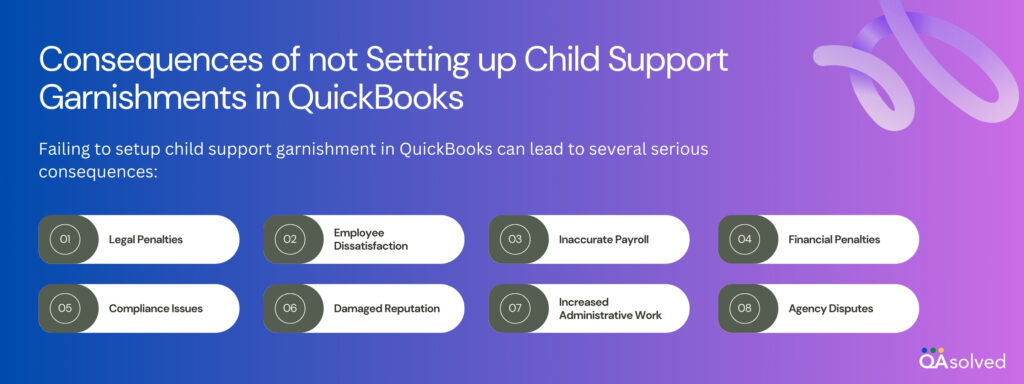
Setting up child support garnishment in QuickBooks is more than just a task; it is a crucial step for businesses to ensure both compliance and accuracy. Child support is a payroll deduction mandated by a court order that requires employers to deduct a specified amount from an employee’s wages and remit it to the designated child support agency. It ensures accurate payroll deductions in compliance with legal requirements. The system is configured to automatically withhold the specified amount from an employee’s wages based on the child support order.
Hence, child support deductions in QuickBooks or any other accounting software should be handled correctly to make sure that your business remains in compliance with legal requirements and maintains employee trust and satisfaction. QuickBooks helps streamline deducting and remitting child support payments by configuring payroll taxes and deductions correctly. As a result, payroll management is simplified and financial obligations are met efficiently and accurately.
In this blog, we will help you with the process to setup child support garnishments in QuickBooks to ensure accurate and compliant payroll management. But first, let us understand the major benefits of recording child support garnishment in QuickBooks.
5 Benefits of Setting Up Child Support Garnishment in QuickBooks
The child support system helps ensure children receive the care and resources they need. The non-custodial parent provides this support to the custodial parent, and it covers a variety of child-related expenses, depending on the location. Managing child support payments through payroll requires setting up child support in QuickBooks. Given below are the 5 major benefits of setting up child support garnishment in the employee record via QuickBooks.
- Accuracy and Compliance: QuickBooks automates the garnishment process, reducing errors and ensuring compliance with legal requirements.
- Time Efficiency: Garnishment runs automatically during payroll processing, saving time and effort compared to manual calculations.
- Consistency: Garnishments are consistently applied every pay period, preventing missed or incorrect deductions that could cause legal issues.
- Record Keeping: QuickBooks keeps detailed records of all garnishments, making it easier to track payments, run reports, and respond to inquiries.
- Employee Trust: Managing garnishments accurately and transparently builds trust among employees, showing that their financial affairs are handled responsibly.
So, setup child support in QuickBooks to meet legal requirements, achieve accuracy, save time, and build employee trust.
Things to Consider For Child Support Garnishing
The following points should be kept in mind when handling child support garnishments:
- It is a direct deduction from an employee’s paycheck for child support.
- Processing multiple child support garnishments may be necessary for an employee.
- In the payroll item list, garnishment deductions are tracked.
- In the chart of accounts, employers are not required to include each employee’s garnishment obligations.
- In the chart of accounts, employers are not required to include each employee’s garnishment obligations.
So, these are some of the points that every employee should be aware of. Coming back to the focal point of the blog, let us highlight the steps to setup child support garnishment in QuickBooks.
Steps to Setup and Collect Child Garnishments in QuickBooks Online and Desktop
An employer is required by a court, federal agency, or state agency to withhold wages from an employee’s pay and send the money to an agency or creditor. Additionally, you might be able to charge the employee an administrative fee.
In the event of a court-ordered wage garnishment or tax levy, you are legally obligated to withhold the employee’s wages. For multiple garnishments, there are specific guidelines that determine how much to withhold and how to handle them.
There are three essential steps involved in setting up and collecting garnishments in QuickBooks. The first step is to identify the type of garnishment. The next step is to enter the garnishment details into QuickBooks using either QuickBooks Online or Desktop Payroll. Lastly, submit the garnishment payment to the designated agency.
Step 1: Identify the Garnishment Type
Garnishments are added to QuickBooks in a variety of ways depending on their type. They can take a variety of forms, such as:
- Federal and state tax levies
- Child or spousal support withholding orders
- Bankruptcy
- Federal and state student loans
- Federal agency debt orders (non-tax)
- Creditor garnishments
Note: Garnishment orders are also known as “withholding orders,” “federal tax levies,” “support orders,” “bankruptcy orders,” “writs of garnishment,” or “garnishment summons.”
Step 2: Enter the Garnishment into QuickBooks
In your payroll service, follow these steps to deduct a garnishment from an employee’s disposable income. The process of entering a garnishment into Quickbooks Online Payroll and QuickBooks Desktop Payroll are different from one another. The steps to enter garnishment in QB Online and QB Desktop are as follows:
For QuickBooks Online Payroll
- Select Employees from Payroll.
- Setup garnishment for the employee you want to garnish.
- Select Start or Edit from Deductions & Contributions.
- Then click the + Add Garnishment button.
- Choose the Garnishment Type from the dropdown menu.
- For clear identification of the garnishment, enter a description that will appear on reports and pay stubs.
- If you selected a garnishment type, fill in the following fields:
- Child/Spousal Support:
- Amount Requested: Enter the amount deducted per paycheck, including any administrative fees if allowed. It is important to note that this amount may be adjusted based on disposable income.
- Maximum % of Disposable Income: Verify that the total withheld, including fees, does not exceed the specified percentage.
- Federal Tax Levy:
- Amount Exempt: Enter the amount specified in the order as exempt.
- Other Garnishment:
- Total Amount Owed: Enter the total amount due. Upon reaching this amount, the garnishment will cease.
- Amount per Period: Determine whether the deduction is a percentage of gross pay or a fixed dollar amount, and enter the amount as specified.
- Alternate Garnishment Cap: Be sure the total withheld does not exceed the order’s cap, including administrative fees.
- Child/Spousal Support:
- Hit Save.
- Use the dropdown menu next to Garnishment weighting to choose the order of garnishments.
- Click Done.
For QuickBooks Desktop Payroll
In QuickBooks Desktop, you’ll need to add payroll items (or multiple payroll items for separate garnishments) to the employee’s profile to track garnishments. As a result, each paycheck will automatically reflect the deduction.
There are two steps involved in entering the garnishment into QuickBooks Desktop Payroll. The first step is to prepare the garnishment payroll item. The second step is to add the garnishment to the employee’s payroll record.
Step 1: Prepare the Garnishment Payroll Item
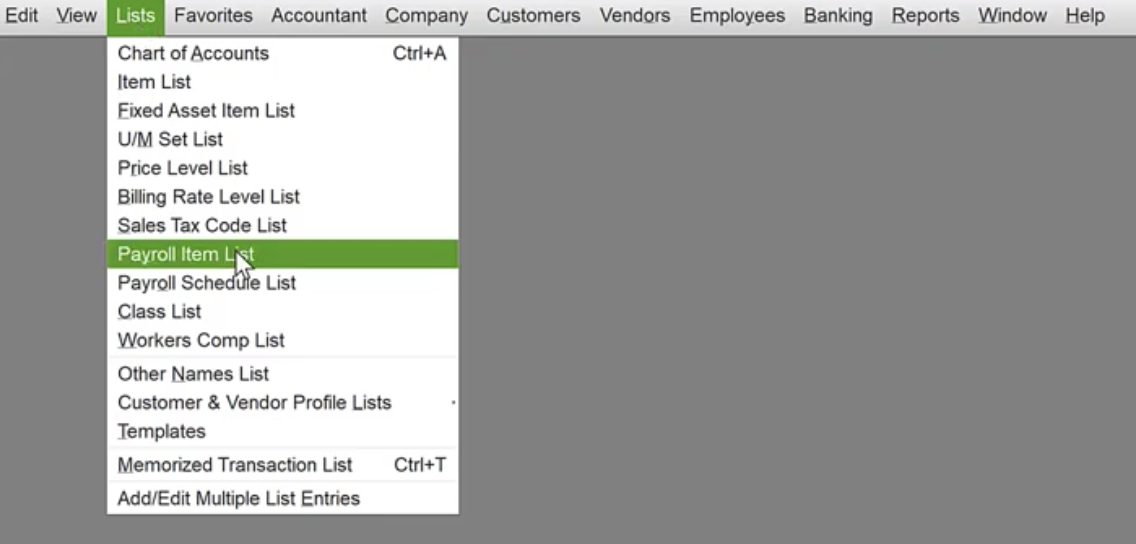
- Select Payroll Item List from the Lists menu.

- Choose New from the Payroll Item dropdown.
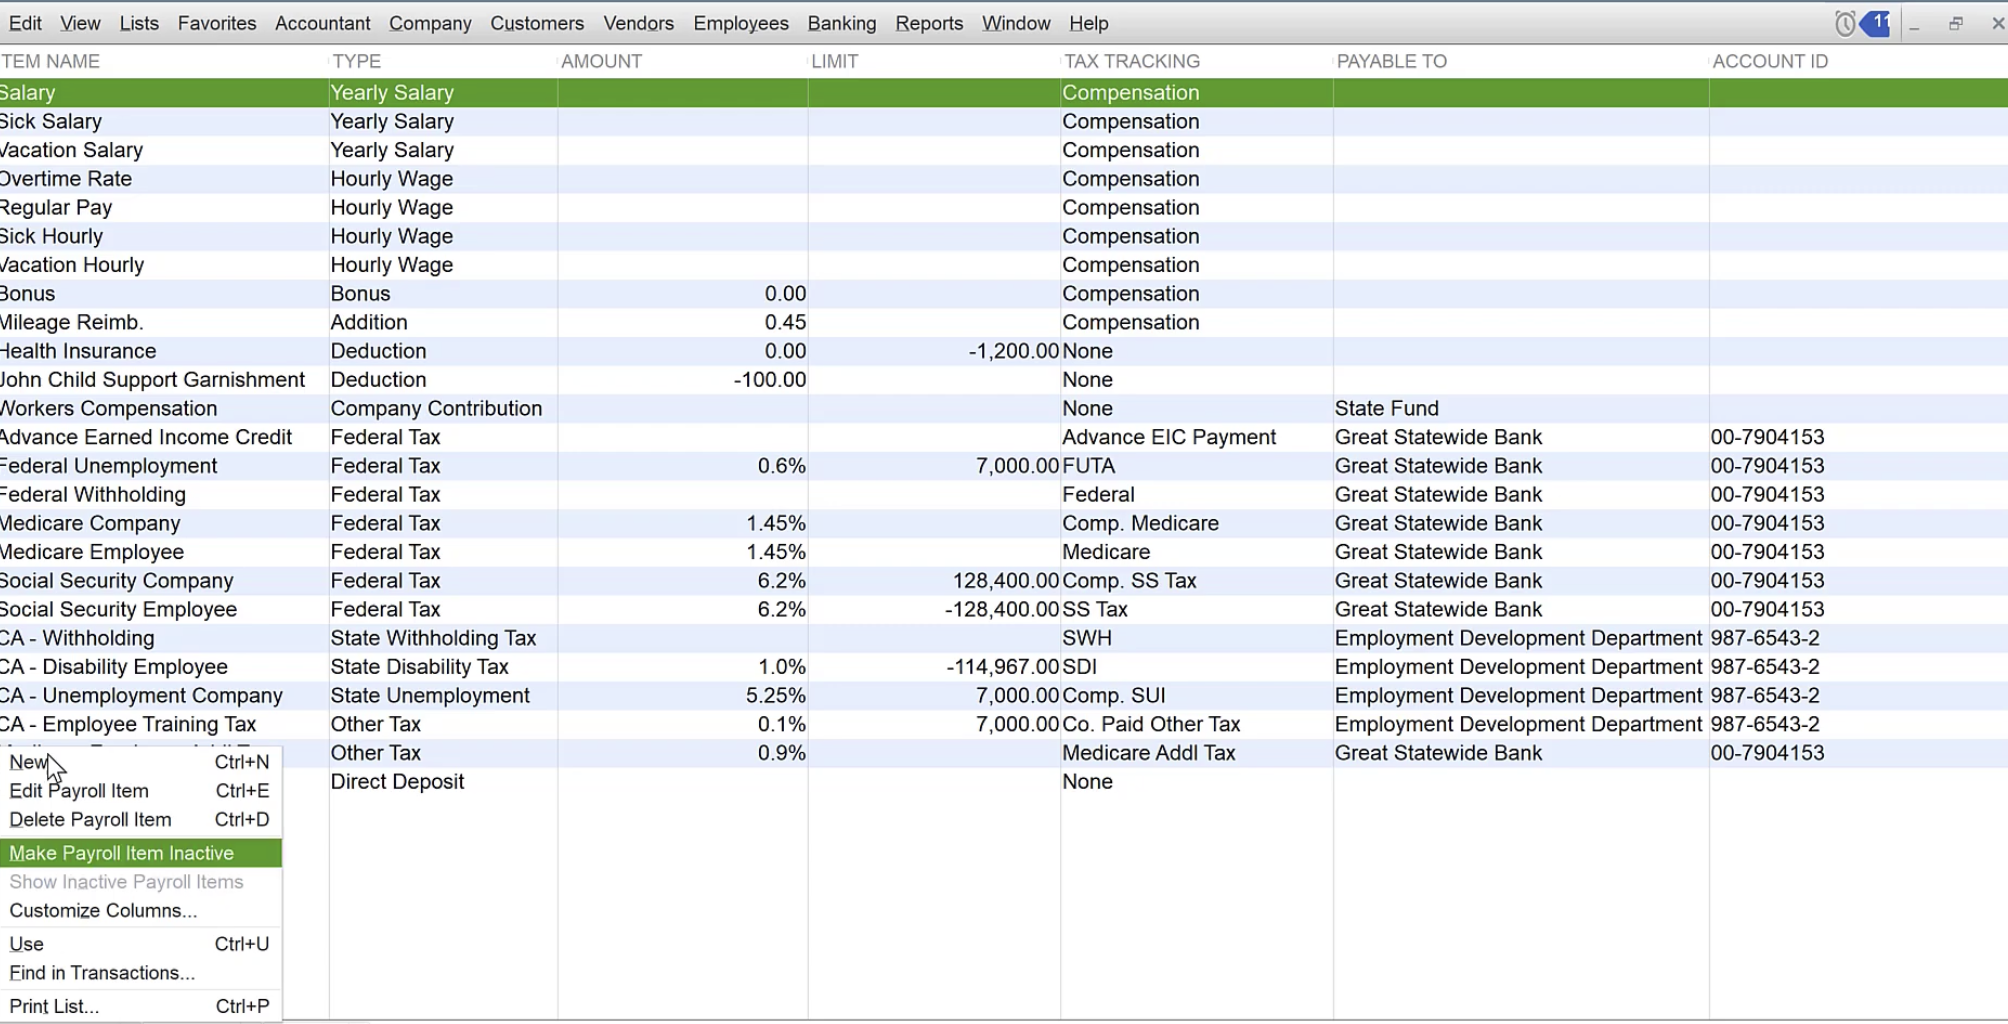
- Click Next after selecting Custom Setup.

- Then select Deduction and click Next.
- Choose a name for the deduction, such as “Child Support Wilson” for employee William Wilson.
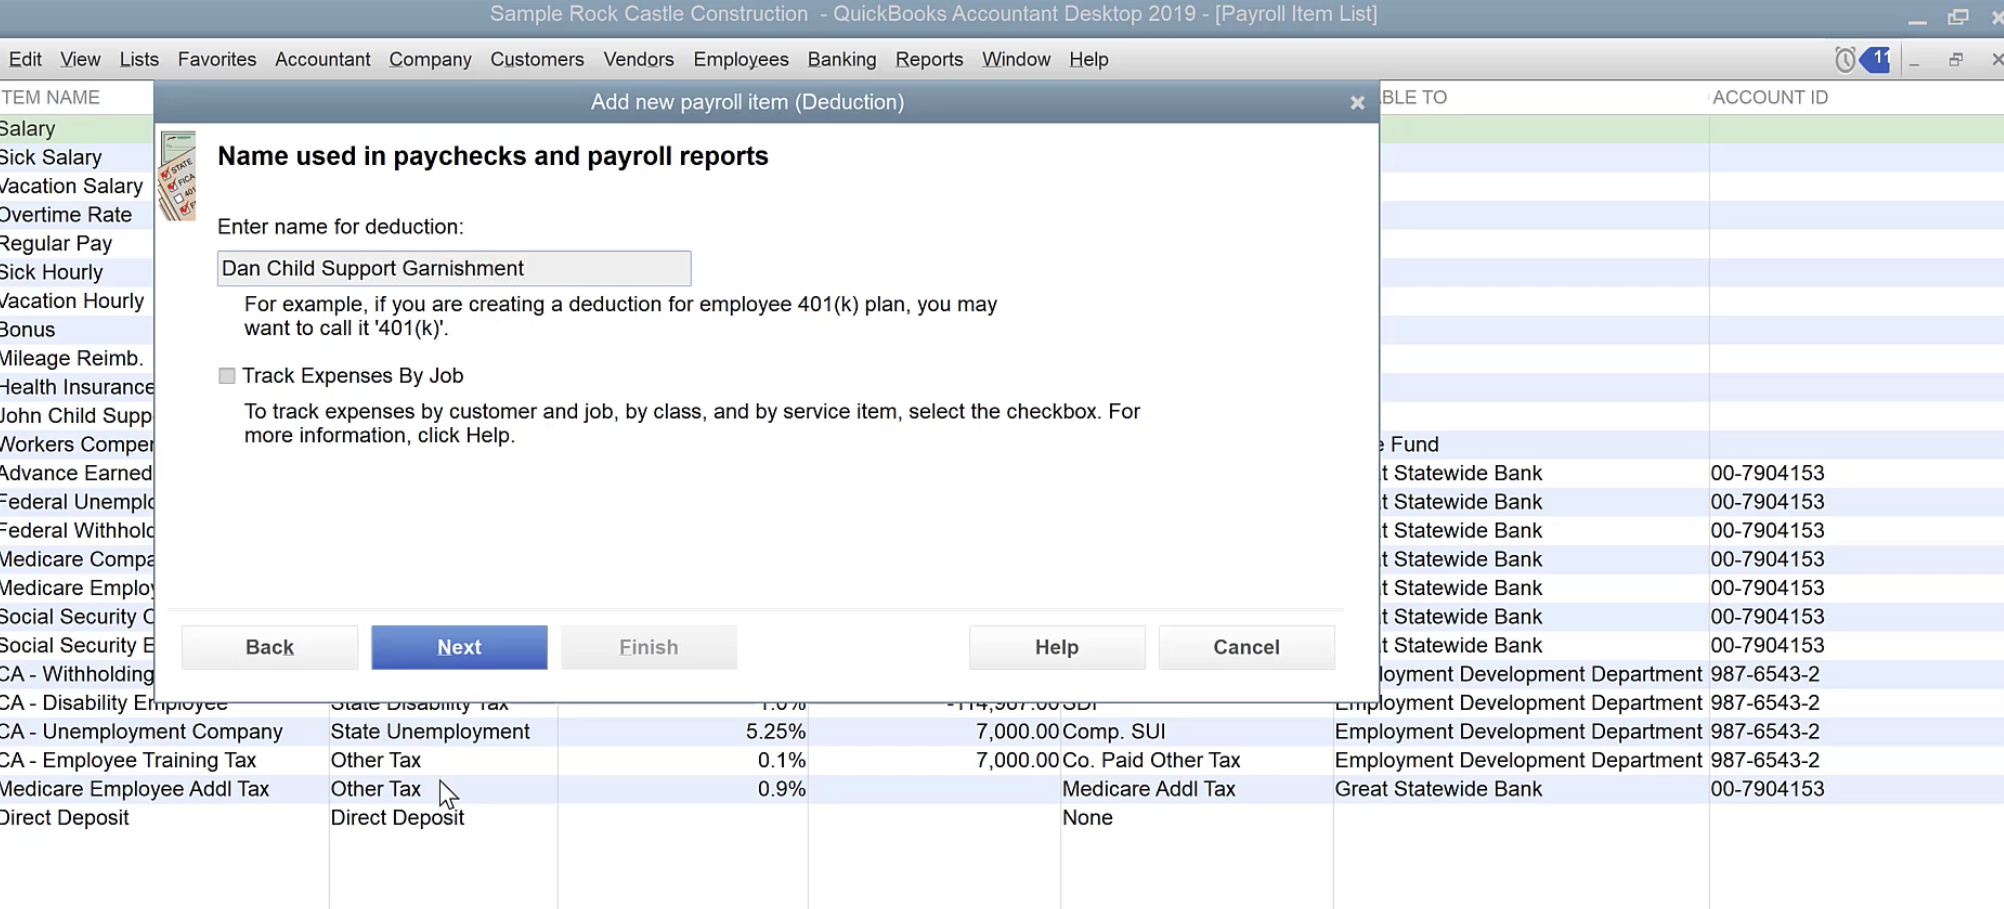
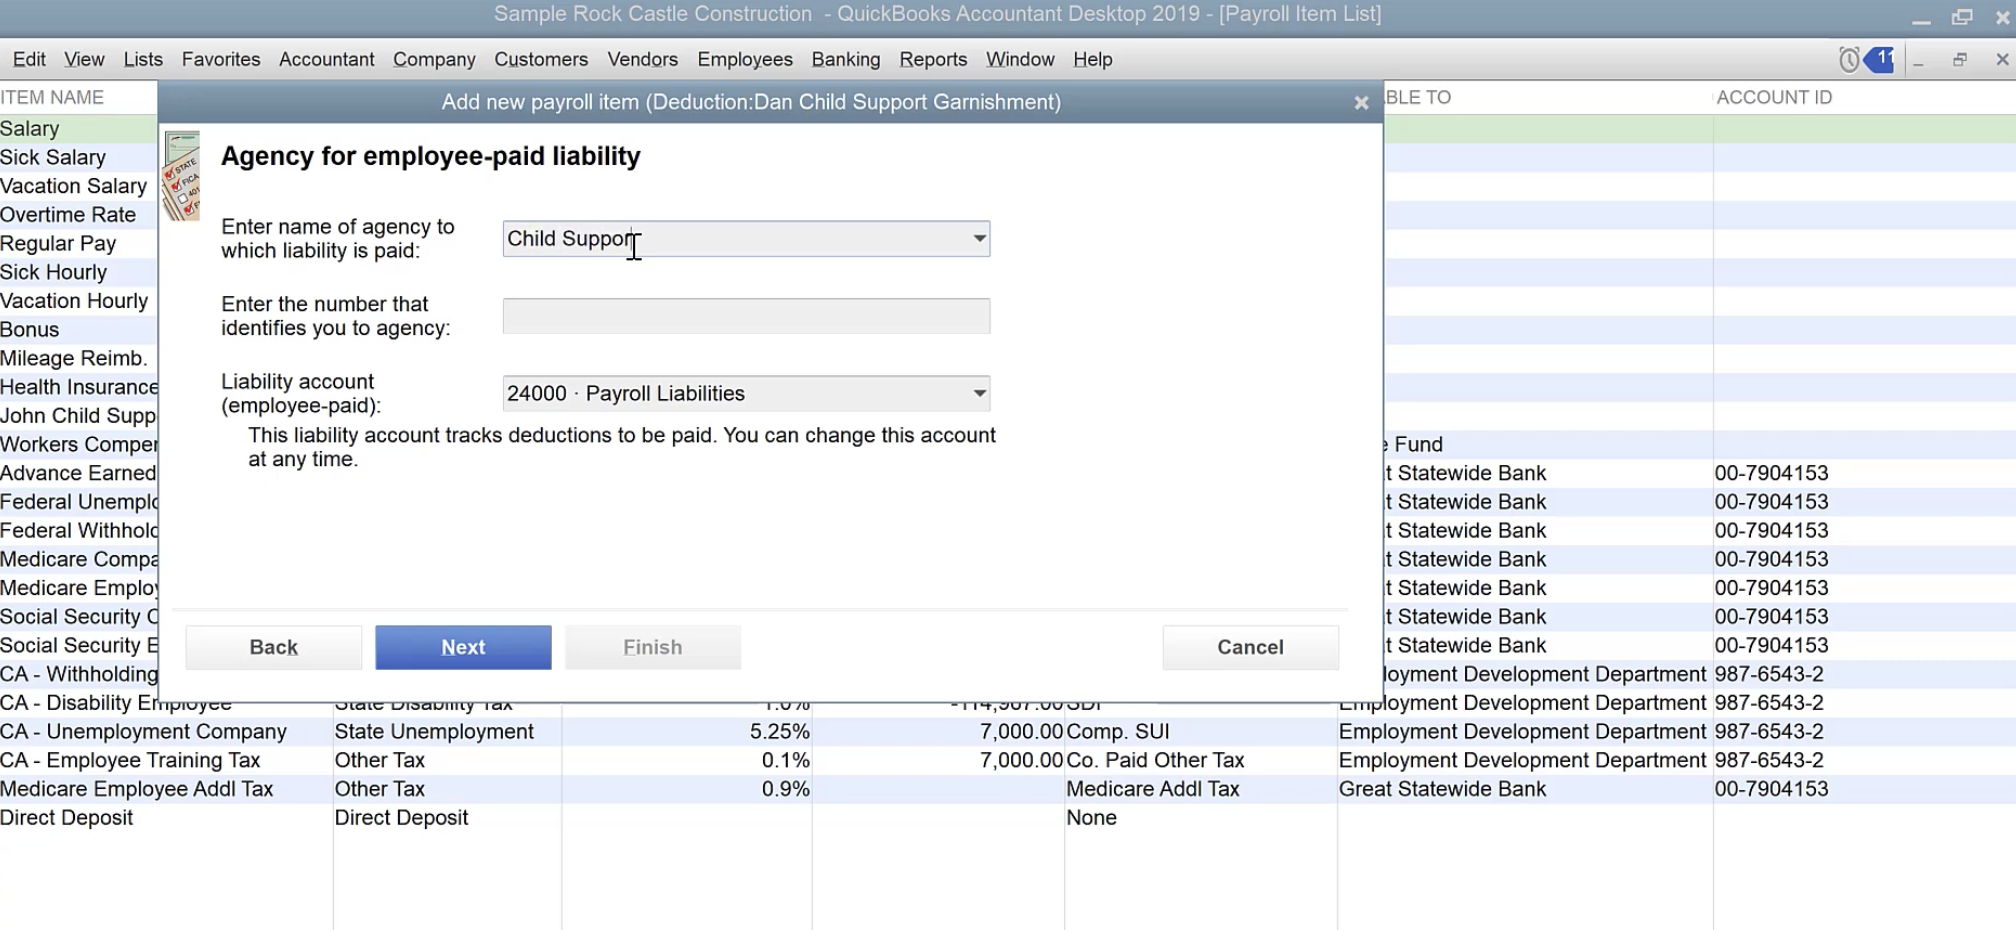
- Enter the name of the agency receiving the payment. You can add the agency name later if you are unsure. Hit Next.
- Select None in the Tax Tracking Type dropdown.
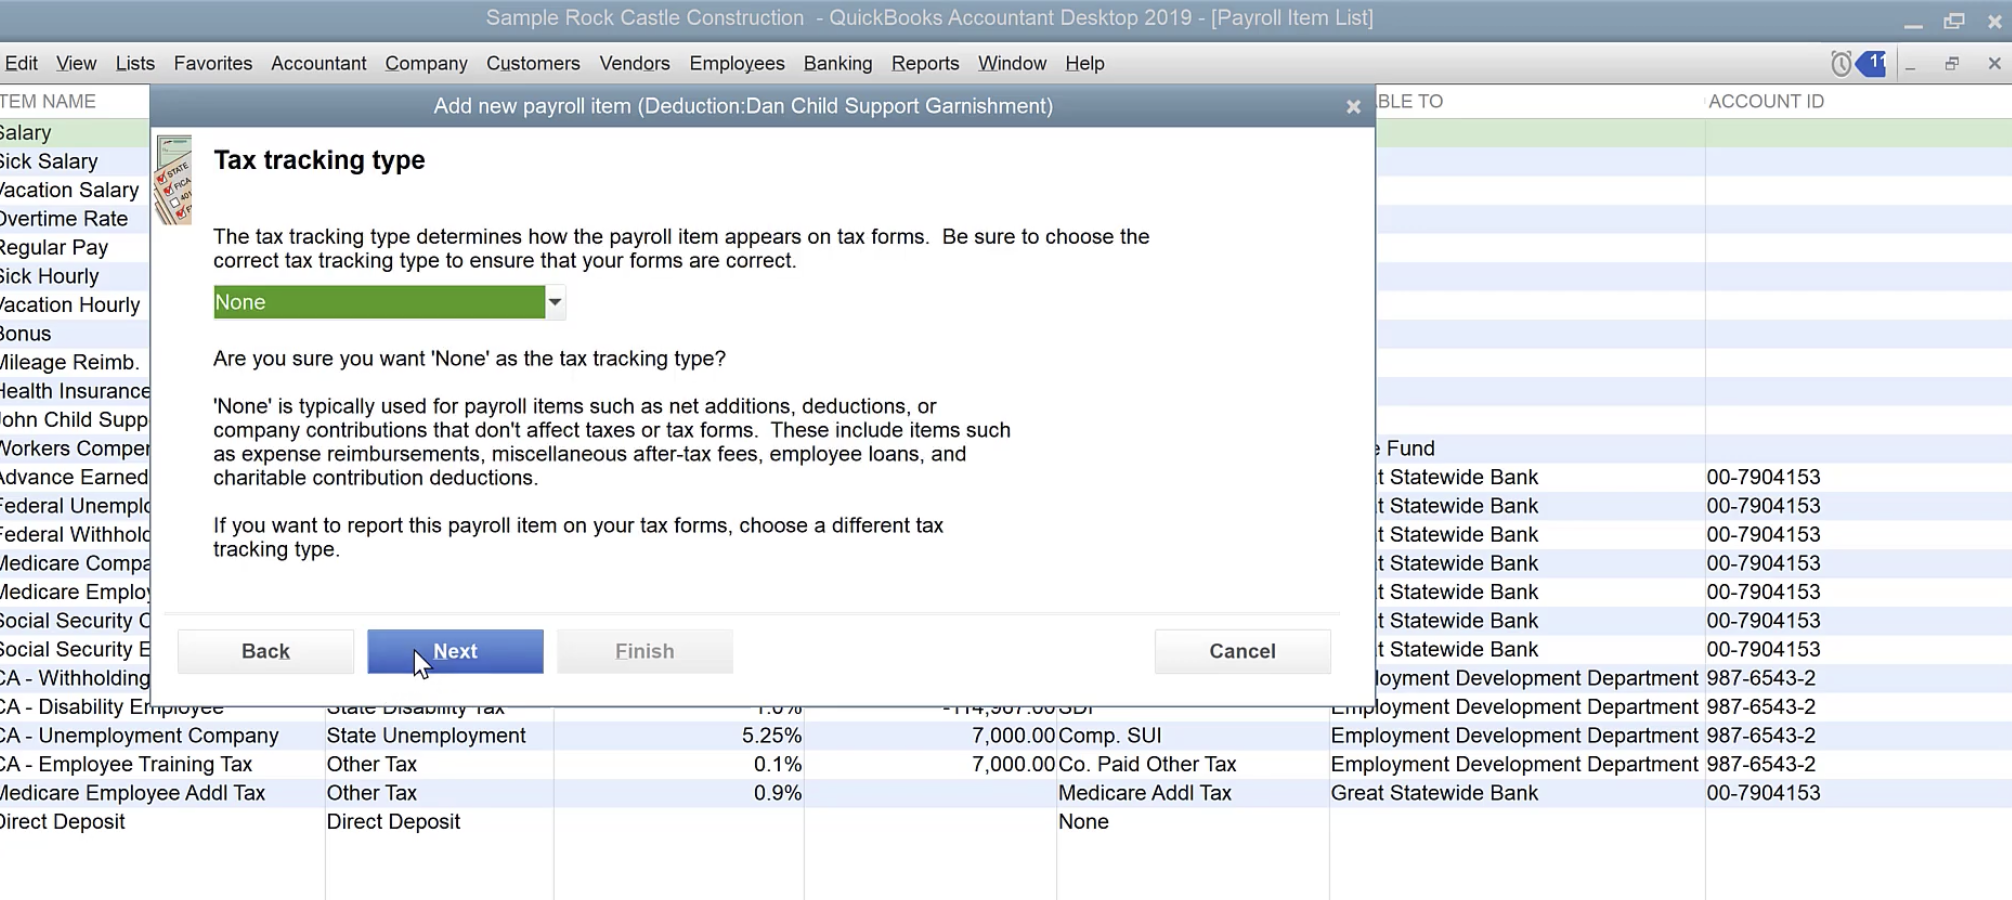
- Choose Next to skip the Taxes section.
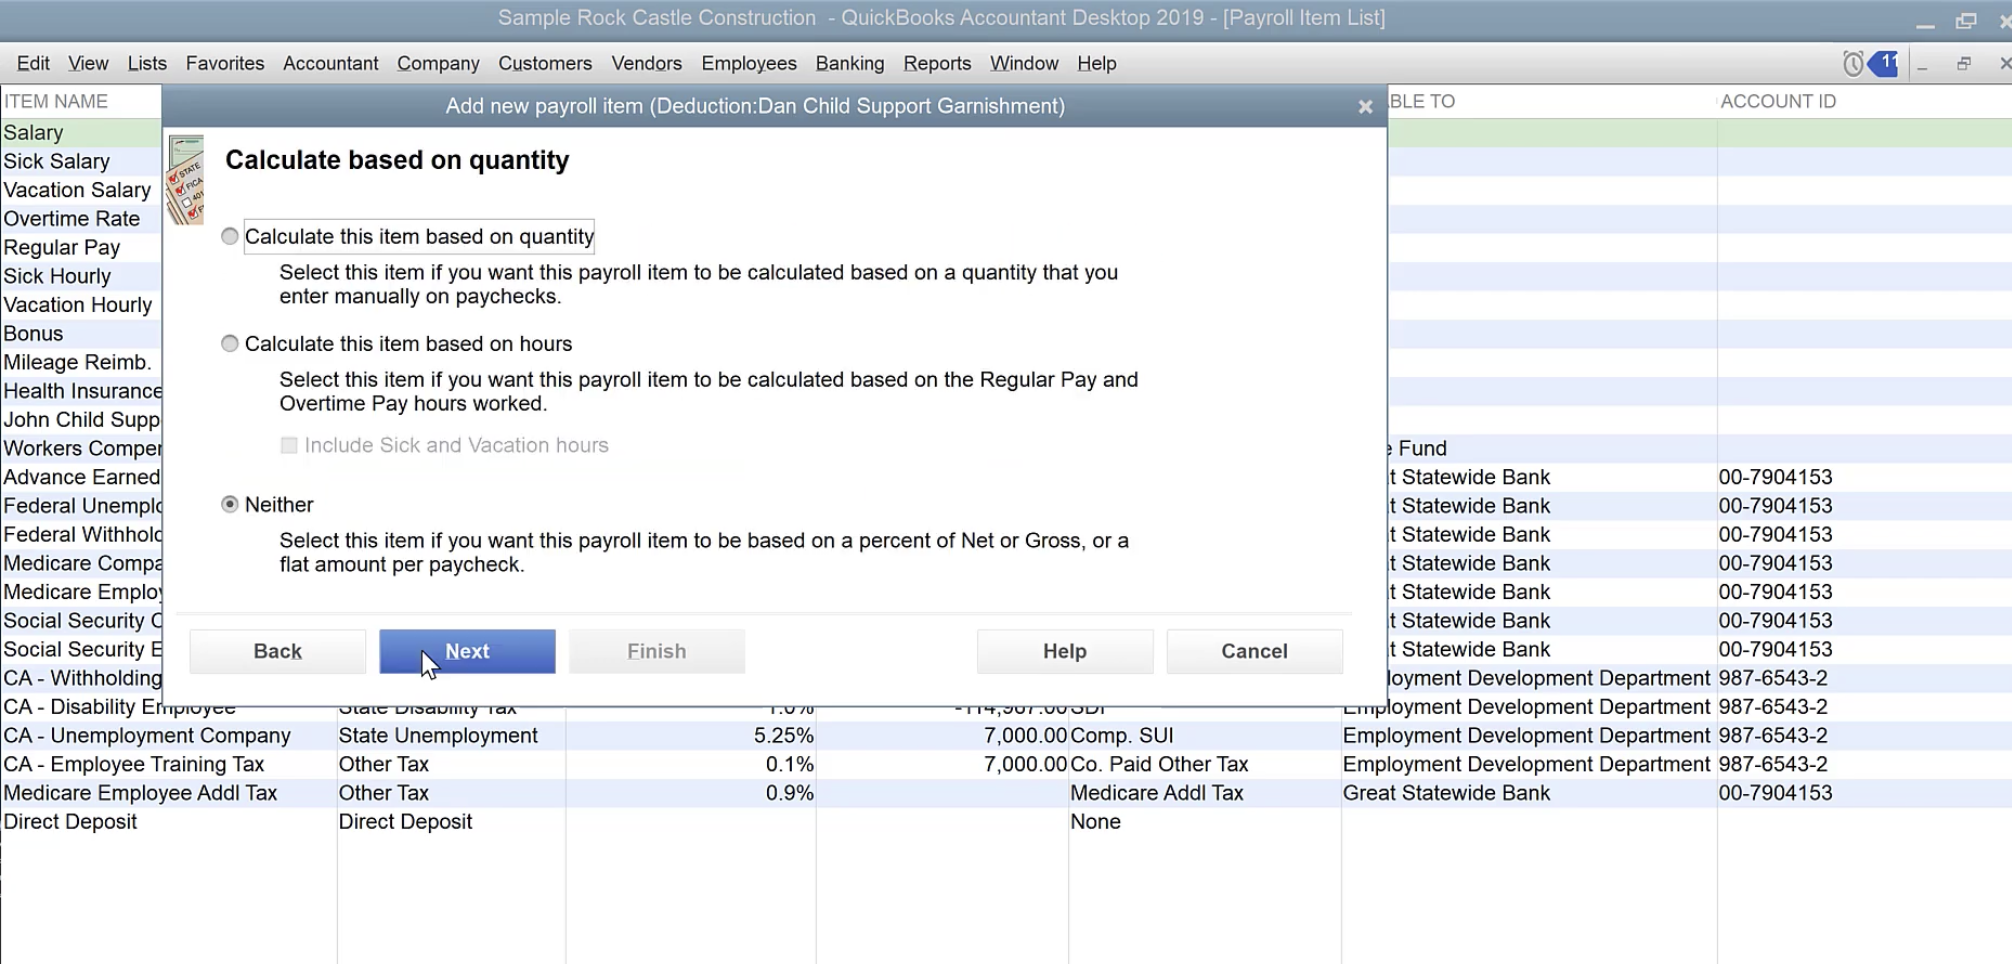
- Opt for Neither under Calculate Based on Quantity and hit Next.
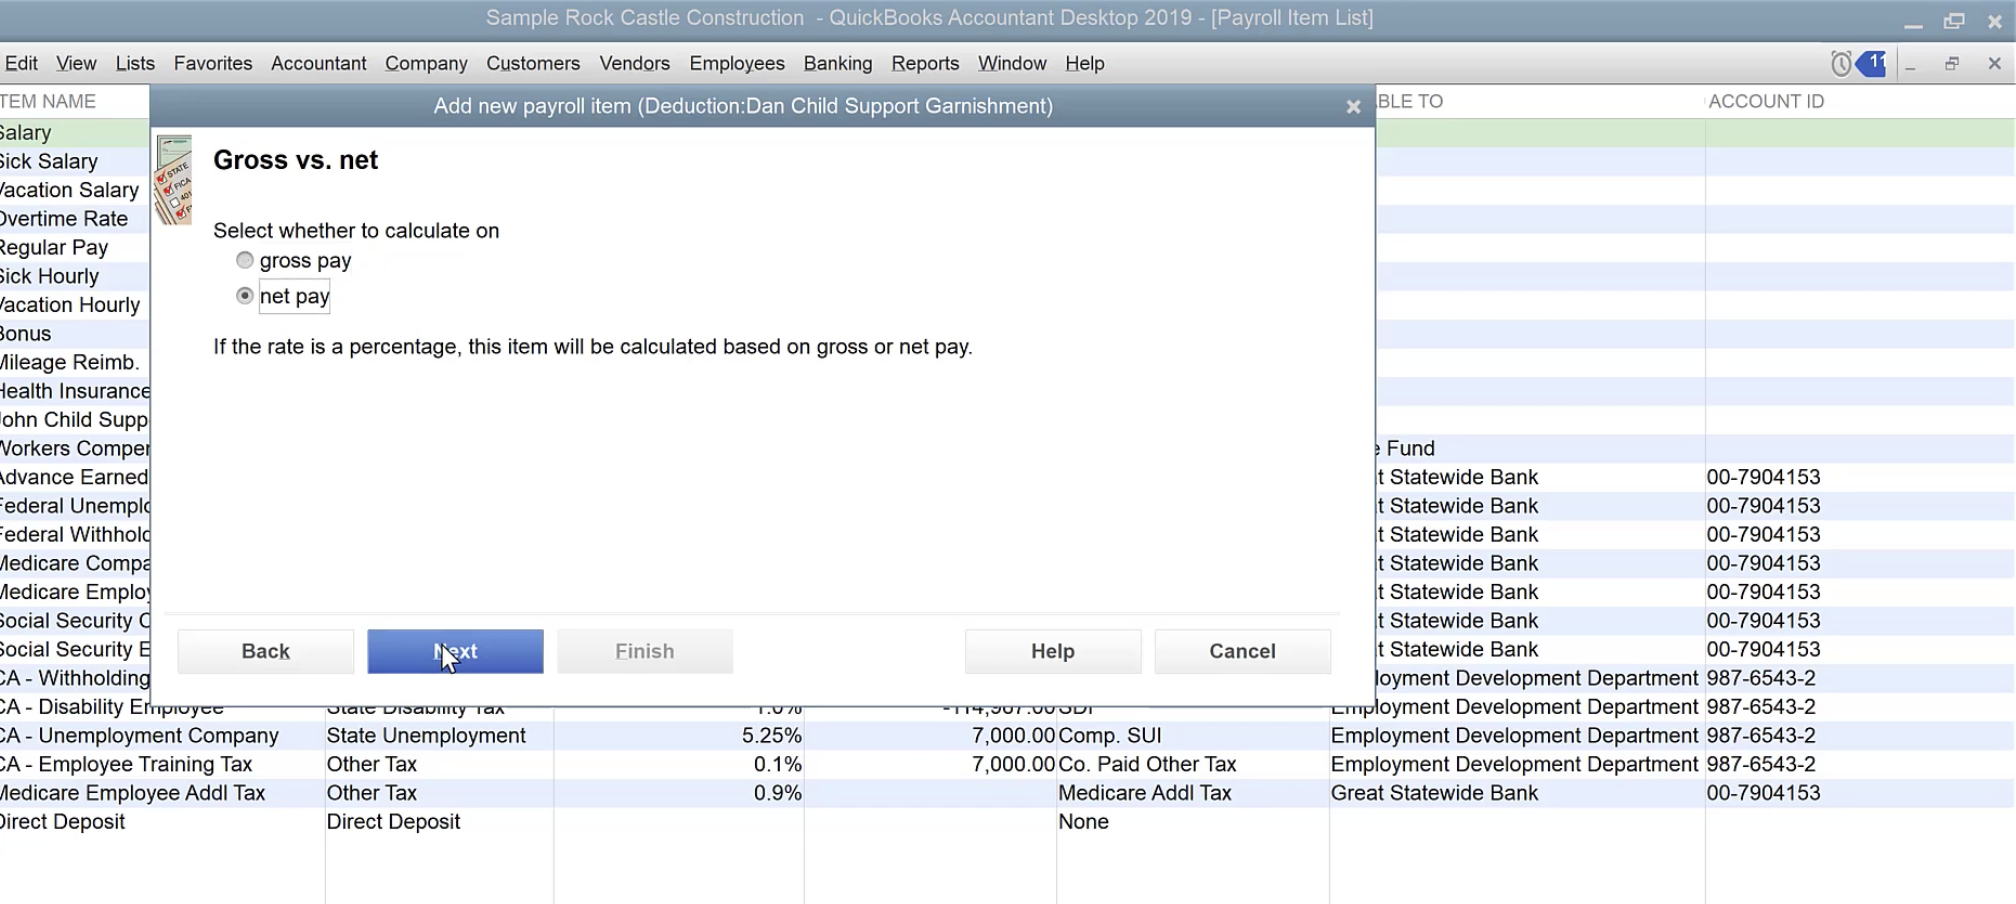
- Click Net under Gross vs. Net to calculate the amount after taxes.
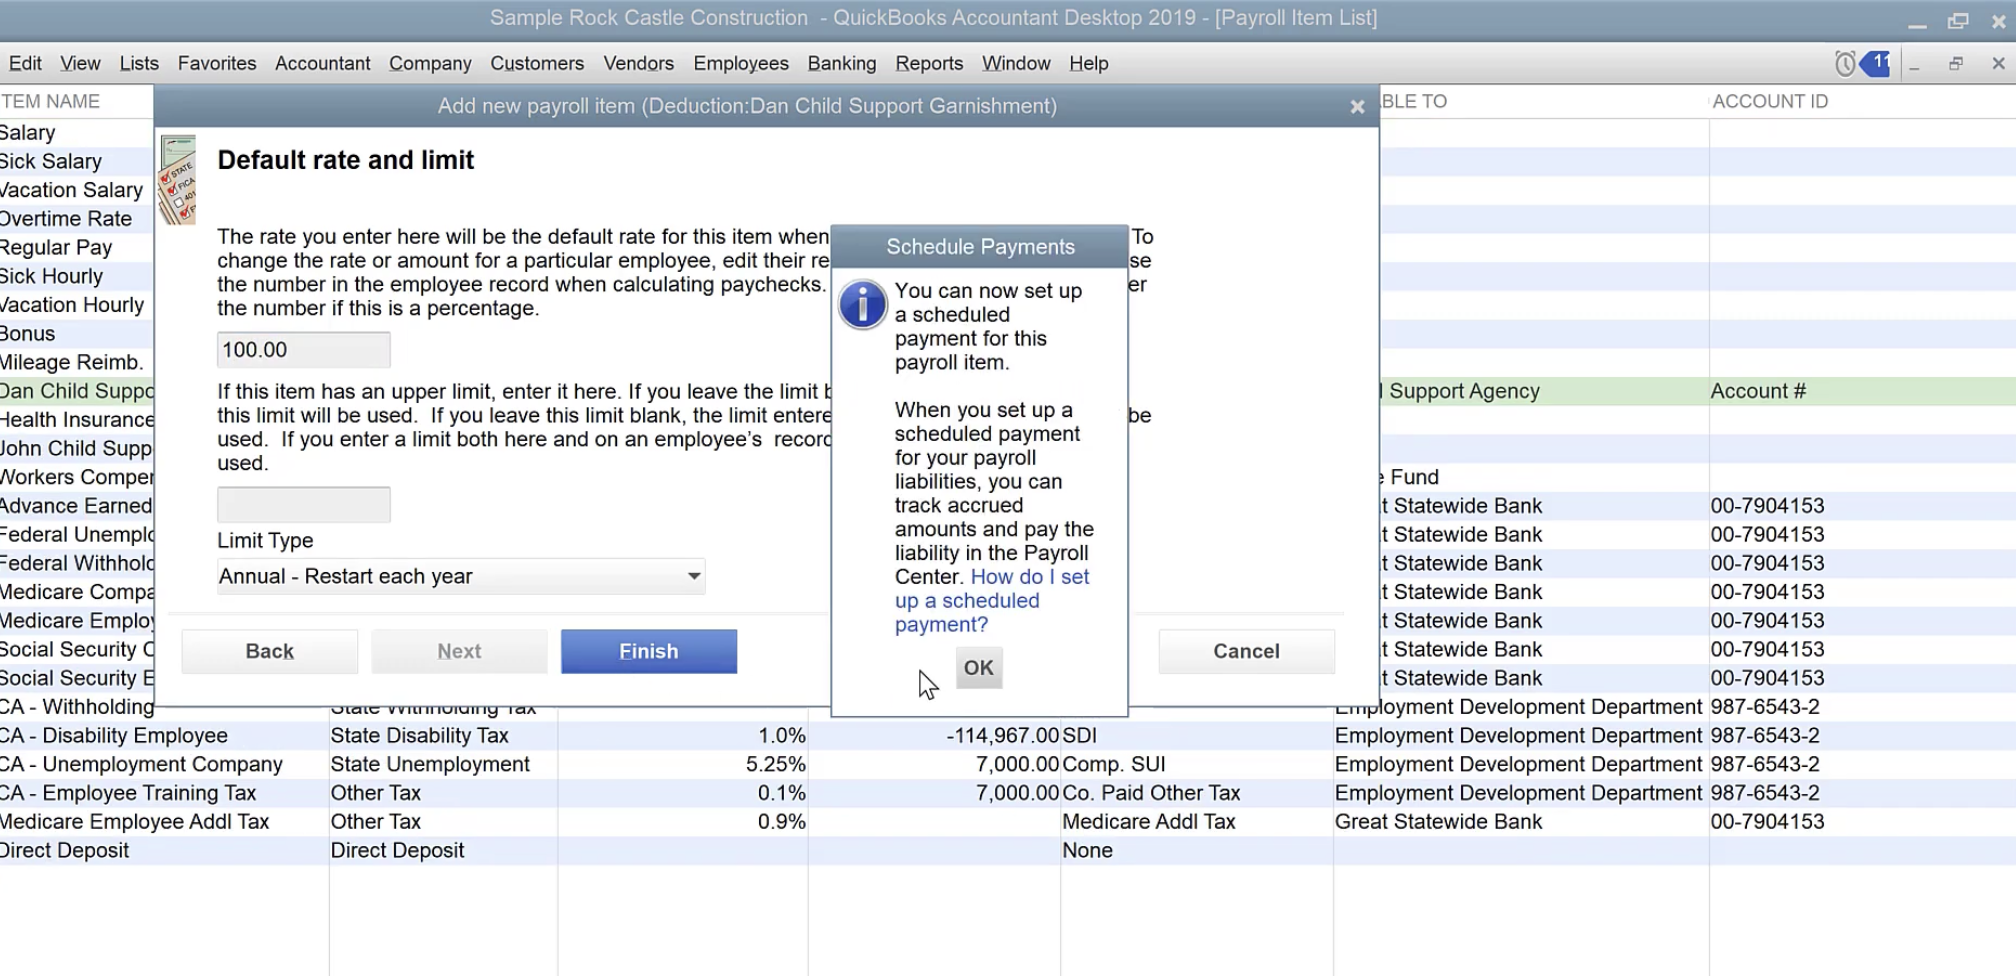
- Set a default rate and limit, if necessary. For percentages or dollar amounts, use a percentage sign.
- Finally, click Finish.
Step 2: Add the Garnishment to the Employee
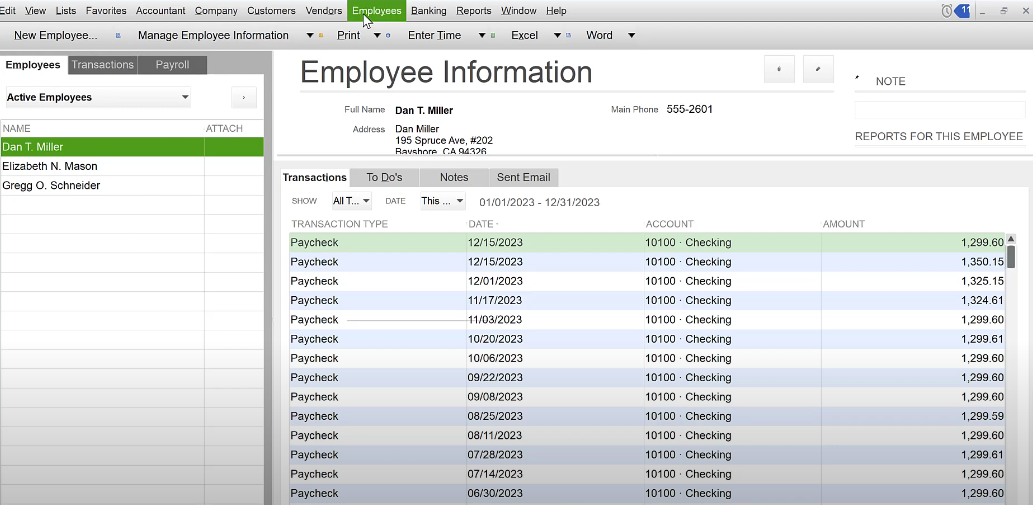
- Select Employee Center from Employees.
- Click on the employee’s name twice.
- Select Payroll Info from the drop-down menu.
- Add your newly created garnishment item under Additions, Deductions, and Company Contributions.
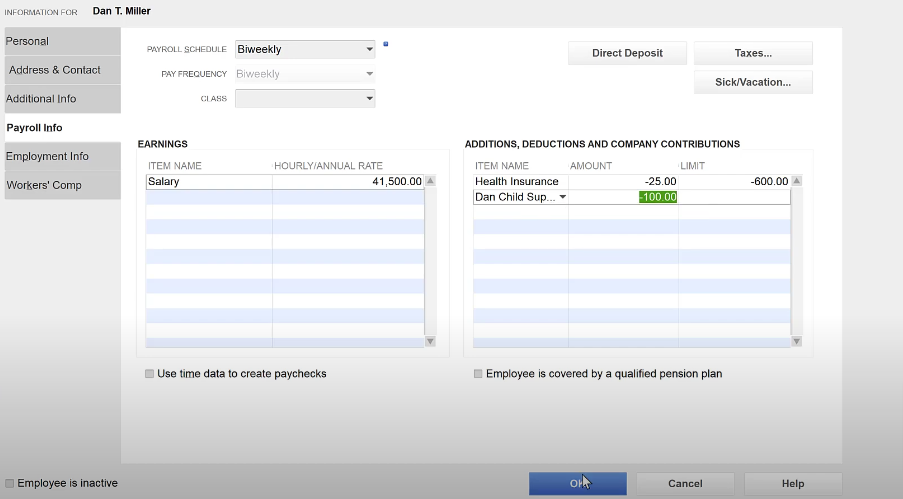
- Enter the deduction amount in the Amount column.
- To save your changes, click OK.
Having entered the garnishment into QuickBooks either Online or on Desktop, let’s move on to the final step. The final step for users with QB Online and QB Desktop is the same.
Step 3: Pay the Garnishment Amount to the Designated Agency
According to the garnishment order or tax levy, you must make the payments directly to the agencies or creditors. Having followed the steps outlined above, you have now set up and collected child garnishments in QuickBooks.
Conclusion
Hence, the process of setting up child support garnishment in QuickBooks is straightforward and significant for businesses to ensure compliance with legal requirements. Automating garnishment deductions can be simplified if you configure them carefully, link them to employees, and understand the specifics of each garnishment order. The steps mentioned above will help you manage child support obligations efficiently, giving you peace of mind and ensuring that all necessary deductions are handled in your payroll system.
If you have any queries, please fill out our contact form, and one of our QuickBooks ProAdvisors will contact you shortly.
Frequently Asked Questions
Child Support is deducted from an employee’s paycheck after tax. Child Support Deductions may be available to more than one employee.
QuickBooks automatically calculates payroll deductions, such as child support, on paychecks. QuickBooks does not automatically send Child Support payments. You must write a check and send it to them manually. Furthermore, the payment only requires one check.
In QuickBooks, you must first create a withholding account for child support payments. All payments will be tracked in this account, and a summary of the total payments will be provided. After creating this account, you can set up recurring payments for child support.
Yes, QuickBooks allows you to garnish child support for multiple employees. Depending on the court order, you can create individual deduction items for each employee.
Yes, child support garnishment deductions are usually capped by court orders. For compliance with the garnishment order, enter this limit when setting up the garnishment in QuickBooks.
