
Are you considering using QuickBooks Desktop for Mac? If yes, then kudos to your choice!
For professional and certified accountants, bookkeepers, financial analysts and managers, QuickBooks for Mac has become the ideal solution to manage their clients’ and employers’ finances. QuickBooks Desktop for Mac provides an easy-to-use, robust, and features rich solution for macOS users. Whether you’re a freelancer, small business owner, or professional accountant, this software automates several bookkeeping tasks like tracking expenses, generating invoices, and managing payroll.
Although the interface is user-friendly, it’s important for users to understand the installation and setup processes for QuickBooks Desktop for Mac. This ensures optimal software performance, reduces the risk of potential errors, and allows you to fully leverage QuickBooks features from the start. So, let’s begin!
System Requirements to Install QuickBooks Desktop for Mac
Ensure your Mac meets the necessary requirements before installing QuickBooks Desktop for Mac. If you run the software on an unsupported system, you may encounter compatibility issues, performance problems, or unexpected errors:
Minimum Requirements
- The operating system must be macOS Monterey (12.0) or later.
- iOS 12.0 or later is required to use iPhone-related features.
- It is compatible with both Intel and Apple Silicon (M1/M2).
- Activation and online features require an Internet connection.
- A multi-user server setup requires a processor with at least Intel Core 2 Duo capability.
- RAM should be at least 2GB (we recommend 4GB or more for better performance).
- Free storage space of at least 250MB is required.
- Printing invoices, checks, deposit slips, purchase orders, mailing labels, reports, or graphs requires a Mac-compatible printer.
- For compatibility, Intuit Checks is recommended.
Integration and Compatibility Requirements
- Data Export: Compatible with Apple Numbers (v12.0 or later) and Microsoft Excel (2016 or later, including Microsoft 365).
- Emailing as PDF: Compatible with Apple Mail and Microsoft Outlook (2016 or later).
- Compatibility with File Conversion:
- One-way conversion to QuickBooks Online is possible with QuickBooks Mac 2024.
- Provides one-way conversion from QuickBooks Desktop for Windows (2021 and 2023).
- It supports two-way conversion with QuickBooks Desktop for Windows 2024.
Now that we’ve covered the system requirements, let’s move ahead to understand the installation process. Getting your Mac to meet the necessary specifications is just the first step; now it’s time to download, install, and set up QuickBooks Desktop for Mac.
Steps to Install and Set Up QuickBooks Desktop for Mac
Now that your Mac meets the system requirements, we’ll walk you through the steps of getting started with QuickBooks. With a smooth installation, you can begin managing your finances immediately. Here we go!
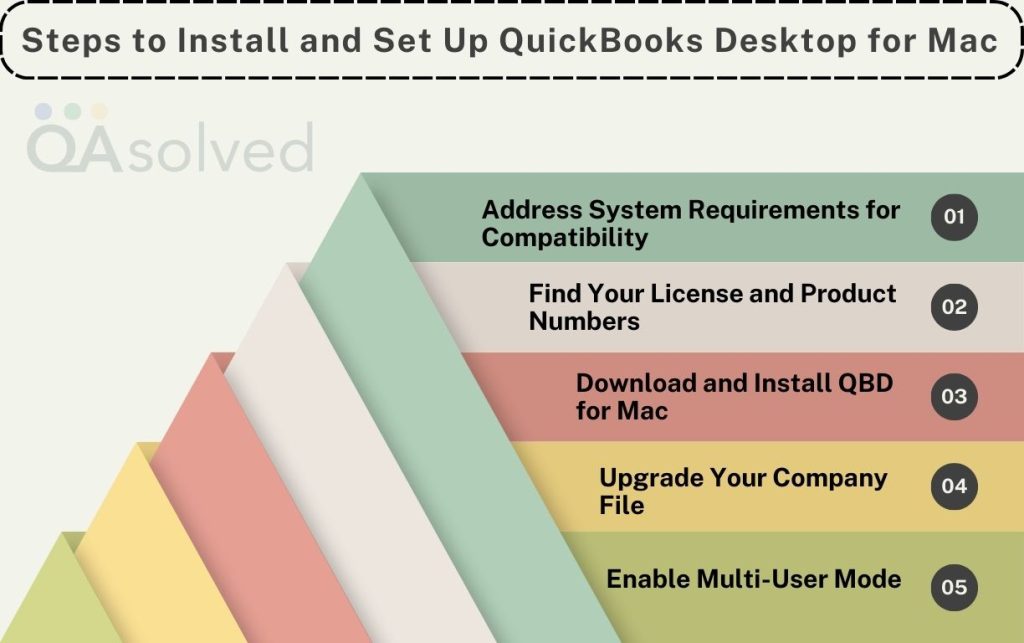
Step 1: Address System Requirements for Compatibility
Before installing QuickBooks Desktop for Mac, it’s essential to verify that your system meets the necessary requirements. Ensuring compatibility helps prevent technical issues and ensures smooth performance. Check factors like your macOS version, hardware specifications, and software updates to avoid interruptions.
Refer to the above-mentioned section to meet the compatibility requirements.
Step 2: Find Your License and Product Numbers
- For Digital Downloads: You will receive an email confirmation with your license and product number. In case you’re unable to find your License Number and Product Key, then click here.
- For Physical Copies: Look for a scratch-off label containing your license and product number on the package.
Step 3: Download and Install QBD for Mac
- Get the Installer: Install QuickBooks Desktop for Mac or use the CD installer if you purchased it from a retailer. Switch to another browser if your download fails. Try clearing your browser’s cache and cookies.
- Prepare for Installation: Close all running applications.
- Start Installation: Run the downloaded installer or insert the CD into your Mac’s drive. You should be able to launch the installation window automatically.
- Install QuickBooks: Drag the QuickBooks icon into the Applications folder, which will automatically open.
- Launch QuickBooks: Click on the QuickBooks icon to launch it.
Read More: Fix QuickBooks Desktop Installation Errors in Windows and Mac
Step 4: Upgrade Your Company File
Are you planning to upgrade from a previous QuickBooks Desktop for Mac version? Then you’ll need to update your company file to ensure compatibility with the newer version.
- Access your company file in the latest QuickBooks version.
- When prompted, select Upgrade to update the file.
- If a confirmation message is prompted, hit OK.
- Finally, review your balances, reports, and accounts to confirm the upgrade was successful.
Step 5: Enable Multi-user Mode
If multiple users need access to QuickBooks, enable multi-user mode, to allow them to work on the same company file simultaneously from different workstations.
So, these are the 5 steps to successfully install QuickBooks Desktop for Mac. If you encounter any issues during installation or while using QBD for Mac, our certified ProAdvisors are ready to assist you every step of the way. Call us at +1-888-245-6075 to unlock the full potential of QuickBooks for your day-to-day accounting operations.
Also Read: How to Setup Multi-User Mode in QuickBooks Desktop for Mac?
Summary
Setting up and installing QuickBooks Desktop for Mac are key steps to streamlining your business finances. Ensure a smooth, efficient accounting experience by checking system requirements, downloading the software properly, and carefully following the installation steps outlined above. After installing QuickBooks, you can configure it to meet your business needs, such as setting up your company file, enabling multi-user mode, and customizing preferences.
In case you’re facing any trouble with QuickBooks Desktop for Mac, don’t worry—we’re here to help! Contact our QuickBooks Mac support team for personalized assistance, so you can get back to managing your finances without any interruptions.
Frequently Asked Questions
Currently, QuickBooks Desktop for Mac 2024 is available, but older versions have been discontinued. Stay up to date with Intuit’s announcements, since future versions may be phased out. We recommend QuickBooks Online for long-term Mac compatibility and cloud-based access.
Yes, the features and interface of QuickBooks Desktop for Mac are different from those of the Windows version. The Mac version is tailored for macOS, but it does not include some advanced features such as batch invoicing, industry-specific editions, and advanced reporting. Nonetheless, it is compatible with Apple applications and offers an experience akin to that of a Mac.
1. Access the app on your Mac.
2. Choose QuickBooks from the upper menu, and then select Register QuickBooks.
3. Enter your product and license number (these can be found in your email confirmation or on the retail package).
4. Use your Intuit account to sign in by following the prompts on the screen.
5. Once your registration is verified, QuickBooks confirms it and you’re all ready to go!
Yes, it is possible to transfer QuickBooks Desktop from Windows to Mac, but you will need to convert the files because the two versions use different formats. Here’s the way:
On QuickBooks Windows:
1. Access your company file.
2. Navigate to File > Utilities > Copy Company File for QuickBooks Mac.
3. Save the file using the .qbb extension (backup format).
On QuickBooks Mac:
1. Launch QuickBooks and navigate to File > Restore.
2. Select the .qbb file and follow the prompts to convert it.
1. Access QuickBooks and select the QuickBooks▼ menu.
2. Choose Check for QuickBooks Updates.
3. If an update is available, hit Install Update.
4. When prompted, choose Install and Relaunch.
5. Once the update is complete, QuickBooks will reopen automatically.
