

Want to ensure timely payment for your products or services? Then sending out progressive invoices on time is the answer!
Businesses often tackle projects, and then send invoices to clients for payment once the work is done. However, in the case of larger, long-term projects, waiting until the end for payment can pose cash flow challenges. This is where progress invoicing becomes essential, allowing for periodic billing throughout the project’s duration to maintain financial stability.
Progressive invoicing, also called progress billing, involves billing your client in stages as you complete different parts of the project. Instead of waiting until the end to get paid, you receive multiple smaller payments along the way.
QuickBooks simplifies this process by allowing you to send partial invoices based on the project’s progress. You can charge either a percentage of the total estimate or a specific amount each time you reach a milestone. This helps keep your finances in order and ensures you get paid for the work you’ve completed as you go along.
As you progress on the project, you can add items from the original estimate to these invoices, keeping your payments organized and linked throughout the process.
In this article, we’ll walk you through the process step by step, ensuring you can manage your billing for ongoing projects.
Note: The appearance of your estimates or invoices will vary depending on whether you’re using the old or new estimate and invoice interface.
Steps to Set Up and Send Progress Invoices in QuickBooks Online
Step 1: Turn On Progress Invoicing
- Click on the Settings gear icon, then choose Account and Settings.
- Go to the Sales tab and find the Progress Invoicing section.
- Next, select Edit.
- Toggle on the switch to Create multiple partial invoices from a single estimate.
- If prompted, select Update in the Update your Invoice template. window.
- Click Save, then Done.
Step 2: Create a Progress Invoice Template
QuickBooks has the option to automatically create a default progress invoicing template. Wherein you just have to turn on the feature. You can then use the pre-made Airy new style template to create your progress invoice.
Here’s how to create a new template:
Note: QuickBooks Solopreneur doesn’t offer customization form styles.
- Access Settings and choose Custom form styles.
- Click on New Style and then Invoice. Alternatively, if you want to update an existing template, find it and choose Edit.
- Make sure to give the template a distinctive name.
- Under the Design tab, choose either Change up the template or Dive in with a template.
- Select the Airy new template, as it’s the only one compatible with progress invoices.
- Under Edit print settings, ensure the checkbox for Fit to window envelope or Fit printed form with pay stub in window envelope is unchecked.
- Move to the Content tab.
- Click Edit on the table section of the form.
- Select the Show More Activity Options link.
- Tick the Show progress on line items checkbox if you want item details to appear on the progress invoice.
- Edit the footer section of the form (the third section with Total and Balance Due).
- Select the Estimate summary checkbox to display the estimated amount, individual progress invoice amounts, and total invoiced amount so far.
- Finally, click on Done.
If you frequently send progress invoices, we suggest making this your new default template for all invoices.
To set the template you just made as your default:
- Access the Custom form styles.
- In the Action column, click the dropdown menu ▼ beside the template and choose Make Default.
- Confirm your selection by clicking Change template.
Note: Use this template for some progress invoices, and another default one for regular invoices. Select Customize for progress invoices, and click ⚙️Manage, then Design for the updated layout.
Step 3: Create an Estimate
- Click on + New and then Estimate.
- Choose your customer.
- Complete the rest of the estimate.
- Click Save and new, Save and close, or Save and send.
Please be aware that the totals in the remaining column of your estimate do not incorporate sales tax, discounts, or shipping expenses.
Tip: Add an estimate to a project before you begin creating progress invoices if you use the Projects feature in QuickBooks Online Plus and Advanced.
Edit Progress Invoice
Edit the original estimate, not the invoice, unless you’ve already invoiced the full estimated amount.
Also Read:- Create an Estimate & Convert it to an Invoice in QuickBooks Online
Step 4: Creating Progress Invoices from the Estimate
- Access Sales, then All Sales.
- Locate the estimate on the list.
- If the estimate has been marked accepted, you can select Convert to Invoice from the Actions column.
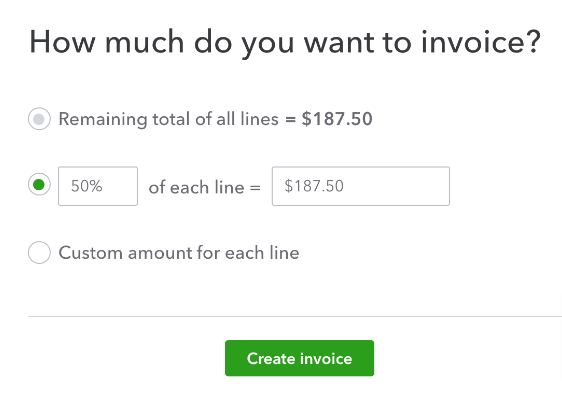
- Choose the amount you wish to invoice for, then click Create Invoice. You can charge for a percentage or a specific amount. Choose a Custom amount for each line, and input a specific amount for each item.
- Complete the rest of the invoice.
- Click Save and new or Save and close.
Connect an Estimate to a New Invoice:
- Click on + New and then Invoice.
- Choose your customer from the dropdown menu. If there’s an open estimate for the customer, QuickBooks will show the Add to Invoice or Suggested Transactions sidebar.
- Locate the estimate in the sidebar and select Add.
- Decide how much you want to invoice for, then click Copy to invoice.
- Complete the rest of the invoice.
- Select Save and new or Save and close.
Note: When you create a progress invoice, your original estimate remains unchanged. QuickBooks maintains records of both documents.
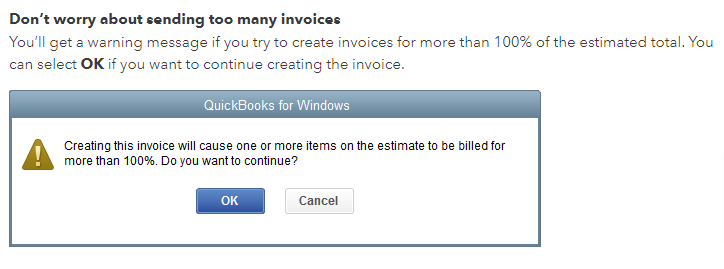
Once you’ve invoiced the total estimate, the estimate status changes to Closed automatically. You will only be able to add the remaining balance if the estimate exceeds 100%.
To Unlink a Progress Invoice:
- Click on the bin icon next to the estimate line item within the invoice.
- QuickBooks will ask if you want to unlink the entire invoice. If you do, select Unlink it.
- For the new layout, choose Linked Transactions, then Remove.
Also Read:- Create an Estimate & Convert it to an Invoice in QuickBooks Online
Step 5: Keep Track of your Progress Invoices
To view all progress invoices related to the original estimate:
- Select Sales, then All Sales.
- Locate and open the estimate.
- Click on the blue linked transaction(s) to view the invoices you’ve created. If you’re using the updated layout, select Manage to see the link.
Review Progress Invoices
Progress invoices contain a summary of the estimate with the total amount invoiced, along with links to the original estimate and any related progress invoices.
Estimate summaries aren’t included in invoices by default, but you can add them for your customers to see their remaining balance.
Check Projects:
When estimates are added to projects, you’ll locate the relevant information in the Transactions tab on the project page.
Run Reports:
All estimates and progress invoices are listed in the Estimates & Progress Invoicing Summary by Customer report.
To access the report:
- Go to Reports.
- Open the Estimates & Progress Invoicing Summary by Customer report.
Steps to Set up and Send Progress Invoices in QuickBooks Desktop
Below are the steps to set up and send progress invoices in QuickBooks Desktop:
Step 1: Turn On Progress Invoicing
- Sign in to QuickBooks Desktop as an admin.
- Access the File menu and choose Switch to Single-user mode.
- Access the Edit menu and choose Preferences.
- Choose Jobs & Estimates from the menu list.
- Click on the Company Preferences tab.
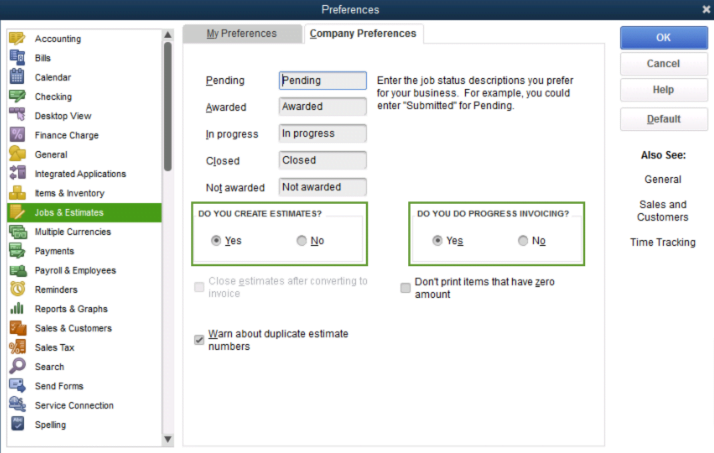
6. Choose Yes in the “DO YOU CREATE ESTIMATES?” section, and then select Yes in the “DO YOU DO PROGRESS INVOICING?” section.
7. Click OK to save and close your preferences.
8. If necessary, return to the File menu and select Switch to Multi-user mode.
Step 2: Create an Estimate
- Access the Customers menu and pick Create Estimates.
- Select your customer.
- Complete the estimate details.
- Choose Save & New or Save & Close.
Tip: If you use the jobs feature, add the estimate to the job before creating progress invoices.
Step 3: Create Progress Invoices from the Estimate
For progress invoices, follow these steps instead of the normal invoice workflow:
- Go to the Customers menu and click on Customer Center.
- Find and select your customer from the list.
- Locate and open the estimate on the customer’s page.
- Click Create Invoice from the toolbar.
- Choose the amount to charge on the invoice. You have the option to charge a percentage or a specific amount. Then click OK.
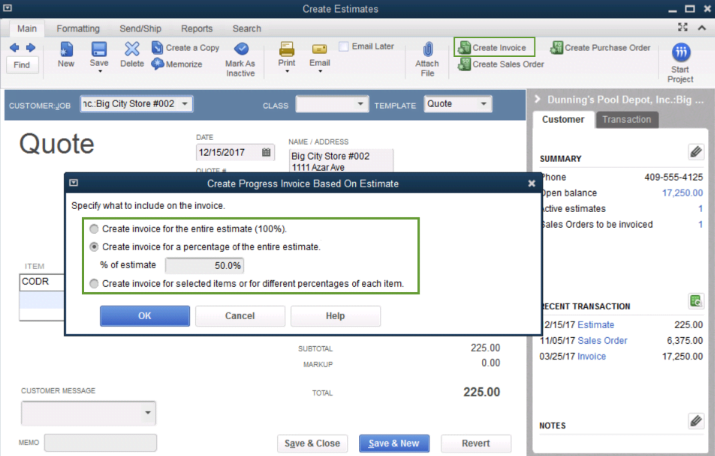
6. Finish the invoice and send it to your customer.
Your original estimate stays the same when you make a progress invoice. QuickBooks records both documents.
Create Progress Invoices for a Job on QuickBooks for Mac:
- Access the Estimate and select Customers.
- Then click on Create Invoice.
- Select the desired information for the invoice and click OK.
- You can select to include:
- A percentage of the estimate.
- Amounts Remaining
- Specific items or percentages for each item.
5. Click OK once you’ve selected the necessary information for the estimate.
- Review the amounts to include on the invoice and click Save.
Repeat Step 1 to create the next progress invoice for this job. With the next invoice, you will continue with the remaining estimated amount.
Step 4: Keep Track of your Progress Invoices
Estimates
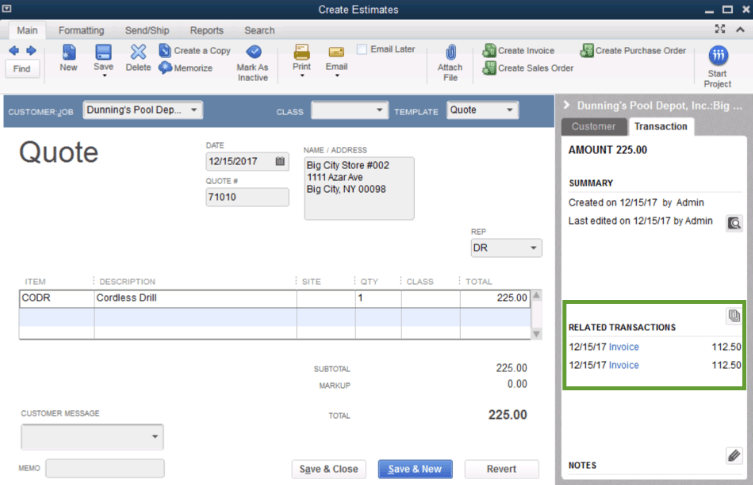
The estimate panel offers useful details, like the count of open estimates for a customer. To view all progress invoices created from an estimate, go to the Transactions tab and find the Related Transactions section.
Reports
To monitor your progress invoices, follow these steps:
- Go to the Reports Center.
- Choose Jobs, Time & Mileage from the list.
- Click on Job Estimates at the bottom of the page.
- Choose Job Progress Invoices vs. Estimates.
Review the Job Progress Invoices vs. Estimates report tracking the invoiced amounts for each estimate.
Conclusion
Progress invoicing is a convenient way to bill clients for ongoing work and projects with multiple stages. Setting up and sending progress invoices in QuickBooks Online and Desktop is crucial for efficient financial management. By utilizing this, businesses can improve invoicing, improve cash flow management, and foster stronger client relationships. Whether you are using QuickBooks Online or Desktop, grasping progress invoicing is critical to effectively manage projects and finances.
If you need help with progress invoicing or you have any other QuickBooks query, reach out to our experts at +1-888-245-6075.
Frequently Asked Questions
Progress invoicing allows you to divide an estimate into multiple invoices. Rather than requesting full payment upfront, you can bill customers in installments. As you finish portions of the project, you can include corresponding items from the estimate in each invoice.
Step 1: Turn on progress invoicing. If you haven’t already, turn on progress invoicing.
Step 2: Create an estimate. Go to the Customers menu and select Create Estimates.
Step 3: Create progress invoices from the estimate.
Step 4: Keep track of your progress invoices.
1. Access Settings and choose Account and Settings.
2. Click on the Sales tab.
3. In the Progress Invoicing section, select Edit.
4. Turn on the Create multiple partial invoices from a single estimate switch.
5. In the Update your invoice template? window, select Update.
6. Select Save, then Done.
Both QuickBooks Online and QuickBooks Desktop support progress invoicing. Progress Invoicing is available in all versions of QuickBooks Online. To start using Progress Invoicing, click on the Gear in the upper right corner, then choose Account and Settings > Sales > Progress Invoicing. Make sure there is a checkmark in front of “Create multiple partial invoices from a single estimate.
1. Select Lists and then click on Chart of Accounts.
2. Next, choose New from the Account option.
3. Click on Other Current Asset and then press Continue.
4. Input Work in Progress as the Account Name.
1. Go to the Task section, and select Add a task.
2. Enter the task name, then select the due date.
3. In the Assigned to ▼ dropdown, select the team member to whom you’ll assign the task.
4. Choose Add Details to add specific details.
5. Click on Save.
1. Go to the Sales tab.
2. Select Estimates from the options.
3. Open the estimate you want to link to an invoice.
4. Click on Create Invoice at the top right corner.
5. Choose the parts of the estimate you want to include in the invoice.
6. Save the invoice.
1. From the QuickBooks Home screen or the Customer menu, select Create Invoices.
2. On the Customer: Job drop-down, select a customer or customer job. The available Estimates window appears.
3. Choose the estimate you want to include in the invoice.
4. When the invoice appears, edit the information as needed.
5. Select Save & Close.
When you convert it to an invoice, the estimate and the invoice are linked, which keeps your books accurate. You also save time because you don’t have to enter the info twice. QuickBooks automatically fills in the invoice from the information on the estimate.
1. Go to the + New icon and select Bank Deposit.
2. Enter the payments under the Add funds to this deposit.
3. Select the name of the customer from the Received From section and select Accounts Receivable (A/R) for the posting account.
4. Enter additional details and link this to the invoice.
5. Then, select Save and Close.
1. Go to the Sales tab and select Invoices.
2. Click on Create Invoice.
3. Fill in the customer details and invoice items as usual.
4. Below the invoice total, click on More and then select Create Partial Invoice.
5. Enter the details for the partial invoice, including the amount to be invoiced.
6. Save the partial invoice.
To send progress invoices in QuickBooks Online, you need to turn on this feature first. It’s available in all QuickBooks Online plans: Simple Start, Essentials, Plus, and Advanced.
1. Click Settings. and select Account and Settings.
2. Select the Sales tab.
3. In the Progress Invoicing section, select Edit.
4. Turn on the Create multiple partial invoices from a single estimate switch.
5. In the Update your invoice template? window, select Update.
6. Select Save, then Done.
Progress invoicing lets you split an estimate into as many invoices as you need. Instead of asking for full payment at the beginning of a project, you can invoice customers for partial payments. As you complete work, add items from the initial estimate to progress invoices.
