
Setting up a 401(k) plan in QuickBooks Desktop and Online Payroll is a pivotal step for businesses that are looking to provide their employees with a valuable retirement savings option. A 401(k) plan not only helps attract and retain top talent but also allows employees to save for their future with tax advantages.
In this article, we will walk you through the essential steps to set up a 401(k) retirement plan in both QuickBooks Desktop and Online Payroll. From defining plan details to configuring employee contributions, we’ll cover the key aspects of the setup process, ensuring that you can effortlessly integrate a 401(k) plan into your respective payroll system.
What is 401(k) Plan in QuickBooks?
If you’re looking for an excellent retirement plan for your employees, the QuickBooks 401(k) plan is a popular choice. It’s a qualified plan that enables employees to have their employer contribute a portion of their salary that hasn’t been taxed yet to a retirement savings account. This account then invests your money in stocks, bonds, and mutual funds, often allowing you to make your own investment choices. Then the savings can be withdrawn at the time of retirement. When we use the term “qualified”, we mean that the plan complies with IRS regulations and qualifies for tax benefits.
The money you put into a 401(k) will be detailed on your W-2 Form, which is a document you receive as an employee. As an employer, it’s crucial to maintain accurate payroll records and reports to make sure that all contributions are properly reported for tax purposes. This helps ensure transparency and compliance with tax regulations.
Select which Retirement Plan to Setup
Before going ahead with setting up your retirement plan in QuickBooks choose the retirement plan that suits your needs the best from the options mentioned below:
To learn more about retirement plans, visit the IRS website
- QuickBooks 401(k) or 401(k) catch- up retirement plans that are supported
- Simple 401(k) or Simple 401(k)
- 403(b) or 403(b) (b) catch-up
- The SARSEP or SARSEP catch-up
- Simple IRA or Simple IRA catch-up
- After-tax Roth 401(k)
- After-tax Roth 403(b)
Note: Please be aware that after-tax Roth plans are calculated based on your employees’ total gross wages and are subject to all applicable taxes at the time of contribution, as mandated by IRS regulations.
Steps to Set up 401(k) in QuickBooks Desktop Payroll and QuickBooks Online Payroll
Follow the step-by-step process to set up the 401(k) Plan in QuickBooks Desktop Payroll and QuickBooks Online Payroll:
Step 1: Set up a company-match contribution item or a retirement plan deduction in QuickBooks.
Follow the steps mentioned below to set up a company-match contribution item or a retirement plan deduction in QuickBooks.
A. QuickBooks Online Payroll
- Start by clicking on the Payroll tab in QuickBooks Online.
- Select the Employees section within the Payroll tab.
- From the list of employee options, choose the specific employee for whom you want to make changes.
- Under Deductions & Contributions, either start a new deduction or edit an existing one by selecting Start or Edit.
- Click on + Add deduction/contribution.
- In the Deduction/Contribution Type drop-down menu, select Retirement Plans.
- Choose the appropriate retirement plan type from the options available.
- If it’s a company-only contribution without employee matching funds, select the Company-only plan.
- In the Description field, enter the name of the provider or plan (this will appear on the employee’s paycheck).
- Complete all the required information in the remaining fields.
- In case your company provides a match, go to the Company Contribution section and click on the dropdown menu. Choose your preferred method for calculating the amount. Fill in the new fields to input the specific amount or percentage per paycheck and the annual maximum.
- Once you’ve made all the necessary changes, click “Done” and “Save” to save the updated information.
B. QuickBooks Desktop Payroll
1: Setting up Retirement Plan Deduction:
- Access “Lists” and then select “Payroll Item List.”
- In the Payroll Item menu, click “New.”
- Opt for “Custom Setup” and proceed to the next page by clicking “Next.”
- Enter the name of the deduction or company matching item, and click “Next.”
- Click on the name of the retirement plan provider and input the account number from the drop-down menu. In the Liability account section select the account that tracks the deduction or contribution to be paid. Click “Next.”
- Choose the Expense account for tracking company match items and click “Next.”
- Select the relevant retirement plan in the Tax Tracking Type window and click “Next” twice.
- Select Neither under “Calculate based on quantity” and then select Next.
- Leave the Default Rate and Limit fields blank, as they can be added when the item is assigned to the employee profile.
- Click “Next” and then exit the screen.
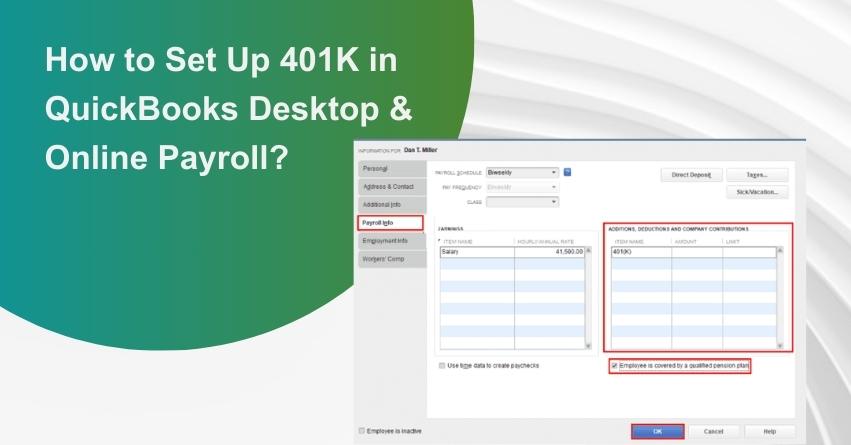
2: Adding Item to Employee Profile:
- Open the Employee Center from the Employees menu.
- Choose an employee.
- In the Payroll Info section add the retirement plan items in the Additions, Deductions, and Company Contributions section.
- Enter the limits and amount per period.
- Click “OK” to save the changes.
Step 2: Ensure that the deduction or contribution is accurately reflected in the employee’s paycheck
- It’s crucial to have information about the contributions from you or your employees for the retirement plan included in Form W-2.
- Double-check that these retirement contributions are reflected in your employees’ paychecks the next time you process their payments.
How to Modify or Eliminate a Retirement Plan Component?
Follow the points listed below to change the deduction or contribution item:
QuickBooks Online Payroll
- Open the QuickBooks Online Payroll.
- Go to the Employees section from the Payroll option.
- Choose the specific employee.
- Under Deductions & Contributions, select Start or Edit.
- Click Edit next to the deduction or contribution you wish to modify. To remove it, use the Trash Bin option.
- Once you’ve made the desired changes, click Save and then Done to complete the process.
QuickBooks Desktop Payroll
A. Modification of Payroll Item
- Access QuickBooks Desktop Payroll.
- Open the Lists menu and select Payroll Item List from the dropdown.
- Right-click on the item and choose the Edit Payroll Item option.
- Make the necessary modifications to the information.
- Click Finish and exit from the screen.
B. Removal of Payroll Item
- Select Employee Center from the Employees menu.
- Select your employee.
- Go to Payroll Info.
- In the Additions, Deductions, and Company Contributions section, click on the amount (if any) and the item name, then press the Delete key on your keyboard.
- Finally, click OK to complete the process
Setting up of 401(k) in QuickBooks Desktop Payroll through EZ Setup
1. QuickBooks Desktop Payroll Settings
In QuickBooks Desktop Payroll, users enjoy the flexibility to tailor 401(k) settings to their specific requirements. The software provides two options: an automatic setup using EZ Setup or a manual configuration. Opting for EZ Setup allows for an automated setup process. On the other hand, users can choose the manual approach by accessing the Payroll Item List tab and initiating Custom Setup.
A. EZ Setup Automatically
To automate the setup of a 401(k) in QuickBooks Desktop Payroll using the EZ Setup option, start by navigating to the Lists option. From there, choose the Payroll Item List feature and click on New when the Payroll Item is selected. Subsequently, select the specified setup option and click Next. Follow the prompts on the page to complete the setup process:
- Open your “QBDT Payroll” account.
- Click on the “Lists” button.
- From the menu, select “Payroll Item List.”
- Find the Payroll Item tab.
- Choose “New.”
- Click on the “EZ Setup” button.
- Select “Next.”
- Adhere to the instructions presented in the window.
- Your payroll item will be successfully created.
B. EZ Setup Manually
To manually configure a 401(k) plan in QuickBooks Desktop Payroll, users can utilize the Custom Setup option. Begin by launching the accounting program and locating the Lists option. Click on the Payroll Item List button, and in the ensuing Payroll Item tab, choose New. From the menu, opt for Custom Setup, and then proceed by clicking Next.
To manually set up a 401(k) in QuickBooks Desktop Payroll, follow these steps:
- Activate “QuickBooks Desktop Payroll.”
- Navigate to the “Lists” tab.
- Select “Payroll Item List.“
- Click “Payroll Item” once.
- Choose “New” from the menu.
- Opt for “Custom Setup” next.
- Click “Next.”
- Go to the “Deduction” button.
- Choose “Next.”
- Fill in the item’s name in the “Enter Name for Deduction” field.
- Click “Next.”
The manual setup of a 401(k) in QuickBooks Desktop is now complete. As this method relies on a manual process, feel free to modify it to suit your specific needs.
2. QuickBooks Online Roth Setting
To set up a Roth 401(k) plan in QuickBooks Online, utilize the Employees button. Access the Payroll option, then choose the employee’s name under Employees. Go to the Deductions & Contributions section and click the Edit tab. In the Benefits Deductions section, locate the option to Add a Deduction and proceed accordingly.
To set up a Roth 401(k) in QuickBooks Online, follow these steps:
- Select the “Payroll” tab in the “QBO” window.
- Click on “Employees.”
- Choose the employee for whom you want to set up the Roth 401(k).
- Navigate to the “Deductions & Contributions” tab and click on it.
- Click on the “Edit” button.
- In the “Deductions for Benefits” section, click “Add a Deduction.”
- From the available categories, select “Retirement Plans.”
- In the Type field, choose “After-tax Roth 401(k).”
- Describe this stage.
- Press “OK” when you’ve completed the setup.
Once the QuickBooks Online (QBO) software is configured with the Roth 401k plan, users can utilize the Edit option to make any required adjustments to the entered values or selections. This flexibility allows for easy modifications to ensure accurate and up-to-date information in the Roth 401k plan setup.
QuickBooks Desktop Company Match Setting
Setting up a 401(k) corporate match in QuickBooks Desktop, where the employer contributes a portion of an employee’s salary, is crucial for leveraging its benefits.
To initiate the setup, click on the Payroll Info button in QuickBooks Desktop. Locate the Employees option within the QBDT window and double-click on the desired employee’s name. Once in the employee profile, proceed to the Payroll Info tab. Navigate to the Additions, Deductions, and Company Contributions area to configure the 401K corporate match.
- Begin by opening the “QBDT” application.
- Navigate to the “Employees” section in the menu.
- Double-click on the name of the employee you wish to modify.
- Click on “Payroll Info” at this point.
- In the “Additions, Deductions, and Company Contributions” area, including the payroll for your 401(k).
- Specify the rate for the chosen employee in this stage.
- Once the 401(k) business match is set, click “OK” to save the changes.
Conclusion
Setting up a 401(k) plan in QuickBooks Desktop and Online Payroll is a crucial step toward fostering a secure and rewarding future for employers and employees. By following the detailed steps provided in this article, businesses can integrate retirement savings options into their payroll systems, offering employees the opportunity to contribute to their financial well-being.
As businesses prioritize the financial health of their workforce, the ability to set up a 401(k) plan in QuickBooks proves to be an invaluable asset in promoting employee satisfaction, retention, and long-term financial stability.
Hope this article resolved all your queries regarding what is 401(k) plan and how to set up 401(k) in QuickBooks Desktop & Online Payroll. If you still have any issues you can reach out to QuickBooks Payroll assistance from our experts at our toll-free number i.e. +1-888-245-6075 for personalized assistance.
Frequently Asked Questions
Every W-2 employee can join the 401(k) plan, provided they meet the age or service time criteria set by the company. This includes part-time, hourly, and interns who are W-2 employees.
Setting up a 401(k) plan with Guideline is straightforward – only one employee is required to initiate the process.
The guideline provides flexible pricing options for businesses looking to implement their 401(k) plans, starting at $49 per month plus an additional $8 per month for each active participant. With three available plans, businesses can select the option that best suits their needs.
A 401(k) is a tax-deferred retirement savings account provided by employers to their employees. Employees can contribute a portion of their salary to this account, enabling them to save for retirement with tax advantages.
If you opt to contribute to your plan, the chosen percentage will be automatically deducted from your paycheck every pay period. This pre-tax deduction means the money is taken out before taxes are applied, allowing more of your contribution to go towards your retirement rather than being taxed by the government.
