
If you’re in the business of importing goods or managing a complex supply chain, tracking just the supplier’s invoice isn’t enough. The real cost of bringing a product into your inventory goes far beyond the unit price. Think freight charges, customs duties, insurance, and even those smaller, often-overlooked handling fees, they all eat into your margins if left unaccounted. This is where the landed cost in QuickBooks Desktop Enterprise becomes more than just “nice to have.” It helps you calculate the true cost per item by allocating these additional expenses across your inventory.
With QB Enterprise, say no to guessing games or last-minute adjustments that mess with your financial clarity. Getting landed cost right isn’t just about accounting accuracy, it directly impacts how you price products, analyze profitability, and make smarter buying decisions. After all, how can you grow if you’re unknowingly selling at a loss?
In this blog, we’ll help you discover how to set up landed cost in QuickBooks Enterprise, calculate and allocate those costs accurately, and apply them to your bills and item receipts. Whether you’re operating from a single warehouse or managing multiple locations, tracking landed costs ensures greater financial transparency.
Let’s make sure every expense tied to getting your products in-house, from freight to customs, is accounted for clearly, automatically, and without added hassle.
Steps to Set Up Landed Cost in QuickBooks Desktop Enterprise
To accurately track the full cost of your inventory, it’s important to set up landed costs in QuickBooks Enterprise. This process allows you to include additional expenses, like shipping, duties, and insurance, into the overall cost of your products. Setting up the landed cost feature ensures these charges are automatically allocated to the right items, giving you a clearer view of your profit margins.
Let’s walk you through the steps of enabling and configuring landed costs in QuickBooks Desktop Enterprise, so that no expense goes unaccounted for.
Step 1: Set Up the Landed Cost Account
Using landed costs in QuickBooks Desktop Enterprise requires the advanced inventory feature (available in Platinum and Diamond editions). To track shipping and handling costs, you can either create a new account or link an existing one.
- Select Preferences from the Edit menu.
- Click Company Preferences under Items and Inventory.
- Select Advanced Inventory Settings.
- Select Set up landed cost account from the Landed Cost tab.
- Create a new account or use an existing Other Current Asset or Cost of Goods Sold account.
- To apply the settings, click Save & Continue.
QuickBooks allows you to track accurately all additional costs associated with your inventory.
Step 2: Map Shipping and Handling Items to the Landed Cost Account
Select the existing shipping and handling items, or add new items like shipping, customs, and labor.
- Choose Shipping & Handling items from the dropdown list.
- Select shipping and handling items to map.
- Hit Save & Close.
So, these are the two steps to set up landed costs in QuickBooks Enterprise. Now, let’s talk about how to create new shipping and handling items for landed cost.
How to Create New Shipping and Handling Items for the Landed Cost?
To accurately apply additional expenses like freight, customs, or handling fees to your inventory, you’ll first need to create specific items for these costs in QuickBooks. This step is essential when using the landed cost feature, as it allows you to categorize and allocate these charges correctly.
Here’s how you can create new shipping and handling items for the landed cost:
- Select Item List.
- Choose Item, then New.
- Choose Other Charge as the type.
- You can name this item something like Customs/Duties, if necessary.
- Check the This item is used in assemblies or is a reimbursable charge box:
- Use the Landed Cost account as the Expense Account and the Income Account as the Income Account.
- Uncheck the This item is used in assemblies or is a reimbursable charge box:
- Choose Landed Cost as the account.
In the preferences, you can also add the item to the landed cost account.
- Select Preferences from the Edit menu.
- Choose Items and Inventory, then select Company Preferences.
- Go to Advanced Inventory Settings.
- Choose Manage landed cost account from the Landed Costs tab.
- Click on Save & Continue.
- Choose Add Item, then choose the item to add.
- Enter Save & Close.
Also Read: How QuickBooks Enterprise Enhances Every Step of Order Management?
8 Benefits of Using Landed Cost in QuickBooks Desktop Enterprise
The QuickBooks landed cost feature in QuickBooks Desktop Enterprise offers businesses a smarter way to manage inventory expenses. Instead of relying solely on supplier prices, it allows you to factor in additional costs like freight, customs duties, insurance, and handling charges. This results in a more accurate inventory valuation and improved cost tracking. Here are the eight benefits of QuickBooks Enterprise landed cost:
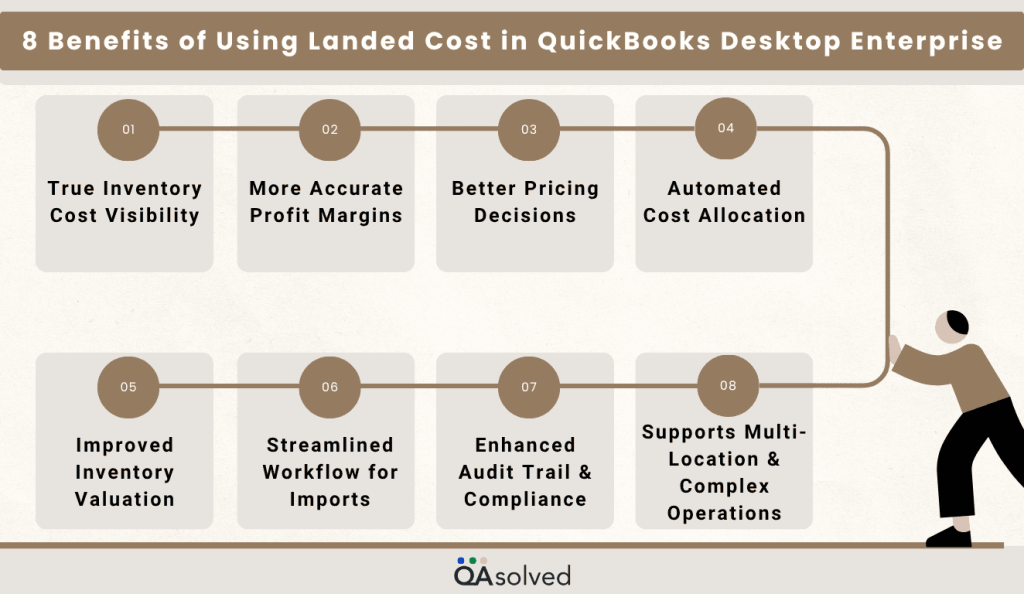
1. True Inventory Cost Visibility
You can track the actual cost of acquiring inventory by including extra expenses like shipping, customs, insurance, and handling. By doing this, you will gain a better understanding of the actual cost per item, not just the vendor’s price.
2. More Accurate Profit Margins
Profit margin calculations become more accurate when all related costs are added in. A more accurate picture of your business performance is gained when you avoid underpricing your products.
3. Better Pricing Decisions
Pricing your products strategically is easier when you know your exact costs. With landed costs, you can protect your margins without guesswork by using data-driven pricing.
4. Automated Cost Allocation
Using QuickBooks Desktop Enterprise, you can automatically allocate costs across items based on quantity, value, or weights, saving you time and reducing the chances of manually entering incorrect amounts.
5. Improved Inventory Valuation
Having accurate landed costs in the balance sheet will enable you to reflect the true value of your inventory assets in your balance sheet. The importance of this for financial reporting and planning cannot be overstated.
6. Streamlined Workflow for Imports
A business that imports goods benefits from the ability to consolidate all import-related costs into one simple process, eliminating the need to manually track and allocate expenses in order to reduce the overall costs associated with imports.
7. Enhanced Audit Trail and Compliance
The landed cost tracking provides a clear, transparent overview of how and why costs were adjusted for specific items, and this is very helpful during audits and internal control monitoring.
8. Supports Multi-Location and Complex Operations
Landed cost provides a scalable, accurate cost tracking feature that is ideal for businesses with multiple warehouses and vendors, or businesses with suppliers who are in other countries.
So, these are the benefits of setting up landed costs in QuickBooks Enterprise. No wonder why Construction, Retail, Non-Profits, Manufacturing, and Wholesale businesses are shifting from other QB versions like Pro/Premier to QuickBooks Enterprise.
Conclusion
Setting up landed costs in QuickBooks Desktop Enterprise is more than just a feature; it’s a financial strategy that can help you gain a deeper understanding of your inventory costs. You can no longer rely on incomplete data or rough estimates when you factor in freight, duties, insurance, and handling. Your business will benefit from having the tools it needs to price products accurately, maintain healthy profit margins, and make better purchasing decisions.
In case you’re facing any trouble while executing these steps, contact our QuickBooks Enterprise experts for immediate assistance at +1-888-245-6075.
Frequently Asked Questions
COGS (Cost of Goods Sold) is the direct expense of producing or purchasing products that are sold. COGS and other expenses such as shipping, customs duties, and insurance are included in the landed cost. The landed cost is the total cost of bringing inventory to your location, which helps you value inventory accurately. The COGS is the cost recognized when you sell the item.
1. Select Preferences from the Edit menu.
2. Click the Company Preferences tab under Items & Inventory on the left panel.
3. To enable inventory tracking, check the box for Inventory and purchase orders are active.
4. To save your settings, click OK.
5. Select New and choose Inventory Part to start adding inventory items.
1. Select Vendor Center from the Vendors menu.
2. Then click the New Vendor button and enter the details of the subcontractor, such as the name, address, and phone number.
3. In the Vendor Type field, select or create a category called Subcontractor for easy tracking.
4. Create a vendor profile and save it.
5. Ensure that payments are recorded under a vendor account when paying subcontractors.
With QuickBooks, financial data can be organized by departments, locations, or projects using class tracking. Detailed insights into income and expenses enable better profitability analysis and informed decision-making. Businesses can use this feature to simplify reporting and track performance across different segments efficiently.
