

“Time is the most valuable thing a man can spend.”
These words by Theophrastus, a Greek philosopher, resonate in today’s era of thoughtful entrepreneurship and business management.
For business owners, professional accountants, and even in-house bookkeepers, tracking time accurately is not about managing hours, it is about improving productivity, controlling costs, and ensuring compliance with legal obligations. This is where QuickBooks Time, formerly known as TSheets, steps in.
QuickBooks Time is a product that was acquired by Intuit in 2017 and integrated into their suite of services for unparalleled user experience. It offers a set of powerful yet simple solutions that not only allows businesses to streamline their financial process but keep an eye on the individuals’ performance and numbers for impeccable monitoring and security. If you’re a business owner juggling multiple roles or a CPA who is trying to keep clients on track, QuickBooks Time can create a real difference. Which brings to the point for which you’re here: How to Set Up QuickBooks Time in QuickBooks Online?
In this blog, we are going to help you understand the process and steps that can easily help you set up QuickBooks Time in QB Online and Payroll Online. So, let’s get started!
Set Up QuickBooks Time in QuickBooks Online or QuickBooks Online Payroll
Setting up QuickBooks Time within QuickBooks Online or Online Payroll is a straightforward process that connects your time tracking with your accounting and payroll systems to ensure accurate records, payroll runs, and better workflow management. Here are the 6 steps that can help you set up QuickBooks Time in QuickBooks Online:
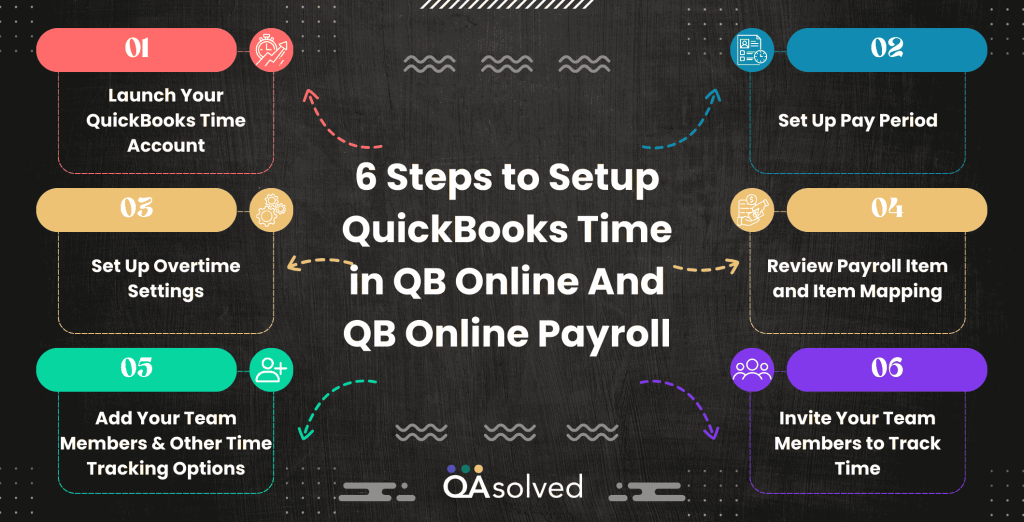
Step 1: Launch or Activate Your QuickBooks Time Account
- Navigate to the QuickBooks Time Tracking section and click on Find out more.
- Select either QuickBooks Time Premium or QuickBooks Time Elite, then choose to add it to your current subscription or begin a 30-day free trial.
Note: QuickBooks Payroll Premium and Elite does include QuickBooks Time.
In case you don’t have QuickBooks Time yet:
- In QuickBooks Online, head over to the Time section and click on Check out pricing.
- Pick between QuickBooks Time Premium or QuickBooks Time Elite, and either add it to your subscription right away or start with a 30-day free trial.
- To begin setup, go back to Time, open the Overview tab, and click on Go to classic QuickBooks Time.
Once you’re done with these steps, your QuickBooks Online data syncs automatically with your QuickBooks Time account, saving you time during setup. However, you might still have to enter a few details manually to complete the entire process.
Step 2: Set Up Pay Period
Setting up the pay period is the next step that a user needs to perform to make the best use of QuickBooks Time. Here are the steps:
- In QuickBooks Time, navigate to Company Settings.
- Click on Payroll & Overtime, then choose Pay Schedule.
- Set your Week Start day and choose the appropriate Pay Schedule.
Here’s how to Set Week Start Day and Payroll Periods in QuickBooks Time:
Change Your Week Start Day:
This particular setting can affect the Manual Time Card, the Schedule Add-on, and some Payroll Period settings as well. Here are the steps:
- Navigate to the Company Settings.
- Now, go to Payroll & Overtime, then select Pay Schedule
- Finally, change Week Start to the day you want and select Save.
Set the Payroll Period:
Follow the steps to set the payroll period easily:
- Go to Company Settings.
- Navigate to the Payroll and Overtime.
- Now, select Pay Schedule
- At last, select the desired Pay Schedule and click on Save.
- Here are the options of Payroll Period:
- Weekly: Runs every week, starting from your most recent payroll closing date.
- Every 2 weeks: Runs biweekly, based on the last closing date you select.
- Twice a month: Runs on two specific dates each month (like the 1st and 15th).
- Every 4 weeks: Runs every 28 days, calculated from the recent closing date.
- Monthly: Processes once a month on a chosen calendar date.
- Custom: Lets you create a schedule with at least two manually selected pay period end dates.
- Pick a recent payroll closing date, then click Save to apply the changes.
Step 3: Set Up Overtime Settings
Let’s take a look at the five easy steps to set up overtime settings!
- Open QuickBooks Time.
- Now, navigate to the Company Settings.
- Here, select Payroll & Overtime.
- Click on Overtime.
- Make your selections then click on Save.
Note: Make sure that overtime pay is correctly set up in each employee’s payroll profile. If not, any overtime hours worked will be recorded as regular pay, rather than being calculated at the overtime rate.
Also, if your financial needs are diverse just as your business organization, then it would be ideal to update your company settings for QuickBooks Time.
Step 4: Review Payroll Item and Item Mapping
You can only review the payroll item and time mapping if you have an active payroll subscription. Payroll items from QuickBooks are automatically linked to the corresponding time types in QuickBooks Time, ensuring accurate tracking and payroll processing without manual mapping. Here are the steps:
- In QuickBooks Time, go to QuickBooks Payroll and click on Preferences.
- Choose the Payroll Item Mapping Tool.
- Under the Map Employees tab, select the name of an employee.
- For each time type listed, choose a corresponding pay type from QuickBooks. Your selections will be saved automatically.
Review the mapping carefully and make any necessary adjustments to ensure that each time entry transfers to payroll with the correct pay rates. This helps maintain accurate payroll processing and prevents payment errors.
Step 5: Add Your Team Members and Other Time Tracking Options
Here’s how you can:
Add Your Team Members to Track Time:
- The first step is to navigate to Time and select Time Team.
- Now, to add employee, select Add Employee
- Enter employee details in the required fields and click on Add Employee.
- To add a Contractor, select Add Contractor
- Go to the Expenses page and click on Add your first contractor or add a contractor.
- Enter the required details in the form, then select Add contractor to save.
Note: Whenever you add new employees or contractors in QuickBooks Online, they’re automatically synced to the My Team section in QuickBooks Time, making team management seamless and saving you setup time.
Now,
Add other Time Tracking Options in QuickBooks Time:
QuickBooks Online allows you to set up and manage breaks, making it easy for your team to log their break times. You can also add time off timesheets whenever necessary, helping you keep accurate records of non-working hours.
Any options that are imported from QuickBooks Online or QuickBooks Online Payroll, such as employees and vendors, customers, payroll items, service items, billable items, classes, and locations, must be managed directly within those platforms.
Changes made in QuickBooks Time won’t sync back to QuickBooks Online, so it’s important to keep the source data updated there.
Follow the below mentioned steps if you need your team to track time against service items, billable items, or classes:
- Go to QuickBooks Time
- Click on QuickBooks Menu and select Preferences
- Now, make your selections:
- Customers & Sub-customers: A customer must be selected on the timesheets, but you can assign them later. Changes made in QuickBooks Online or QuickBooks Time will sync across both platforms.
- Service Items: A service item must be selected on timesheets, but you can assign it later.
- Billable Option: Mark timesheets as billable or non-billable. Billable entries can be used for invoicing in QuickBooks.
- Require Billable Yes/No Option: The billable status must be selected before clocking out.
- Class: A class must be selected on timesheets.
- Selections are saved automatically. Based on your choices, the corresponding items will be imported from QuickBooks Online to QuickBooks Time.
Step 6: Invite Your Team Members to Track Time
Follow the steps to effectively set up QuickBooks Time in QuickBooks Online:
- Go to Time, then Time Team.
- Click on Invite team members.
- Choose the team members you want to invite and select whether to invite them via text or email.
- Finally, click on Invite (#) Team members or Send invitations.
Now, ensure that your employee sees the invite!
- Watch for a text message with the invitation.
- Accept the invite.
- Create a user ID and password (if you haven’t done so already).
- Then, download the QuickBooks Workforce app.
So, these are the six most effective and correct steps that can help you set up QuickBooks Time in QuickBooks Online. Now, let’s take a look at the benefits of setting up QB Time in QB Online and QB Online Payroll.
Benefits of Setting Up QuickBooks Time in QuickBooks Online and Online Payroll
Setting up QuickBooks Time in QB Online and QB Online Payroll brings a host of benefits for businesses looking to streamline their operations. It not only creates a seamless connection between time tracking and payroll but also saves a lot of valuable time and other resources. Whether you’re a small business owner or a growing organization, QB Time can give you more control over your workforce management. Here are some benefits of setting up QuickBooks Time for QB Online and Online Payroll users:
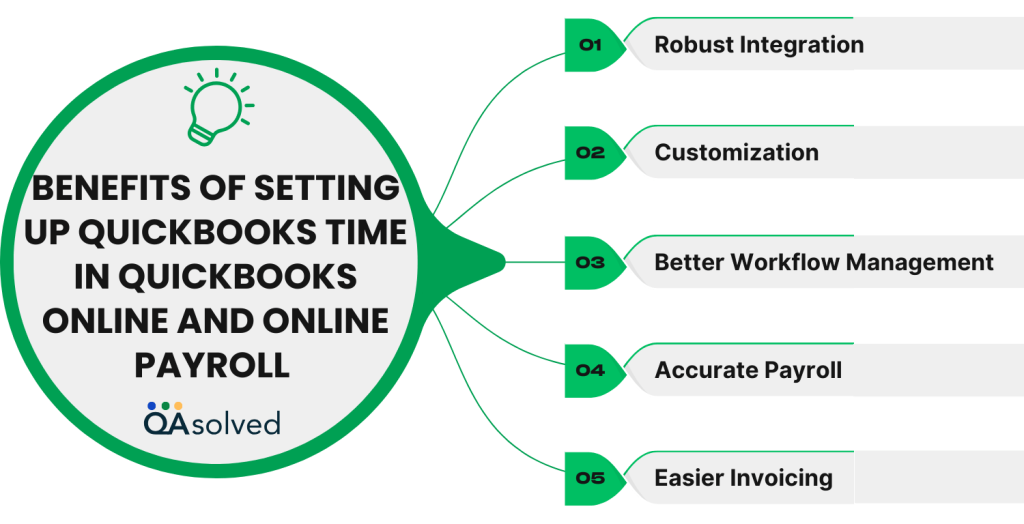
1. Robust Integration
QuickBooks Time automatically syncs with QuickBooks Online to ensure accurate tracking of employee hours, payroll, and billing, without needing to transfer data manually.
2. Customization
Another benefit of setting QB Time for Online and Payroll users is customization capabilities. Here, you can set up different pay schedules, service items, and billable rates, specifically tailored to fit your business needs.
3. Better Workflow Management
With the ability to track billable hours, time and even service items, businesses and CPAs can better manage their labor costs. This ultimately enhances the project tracking capabilities and ensures legal compliance with labor laws.
4. Accurate Payroll
Give us the name of a business owner who doesn’t want to master the art of payroll processing; we will wait. With QuickBooks Time, payroll calculations are more precise. This minimizes the scope of human errors and saves time on manual processes.
5. Easier Invoicing
Another benefit that industry experts often forget to address is enhanced invoicing. If you track time against billable items or customers, QuickBooks Time integrates with QuickBooks Online, making it easy to create accurate invoices.
So, these are some of the benefits of setting up QuickBooks Time in QuickBooks Online and QuickBooks Online Payroll. In case you’re having any trouble while setting up QuickBooks Time, then our QuickBooks Online experts are available for immediate assistance.
Conclusion
In a nutshell, setting up QuickBooks Time within QuickBooks Online and QuickBooks Online Payroll is truly a great step towards financial excellence for businesses of all sizes and verticals. It’s not just about tracking hours, it’s more about creating an efficient, accurate, and organized workflow that saves time and reduces errors. Whether you’re managing a small team or running payroll for multiple employees, this integration gives you the tools to stay on top of everything with ease.
So, if you’re ready to take your time tracking and payroll processes to the next level, then QuickBooks Time could be just the solution you’ve been looking for. Set up QuickBooks Time in QuickBooks Online today and achieve financial excellence.
Frequently Asked Questions
As a user, you can easily access QuickBooks Time in your QuickBooks Online Payroll Premium and Elite subscription without paying any additional costs.
Yes, you can connect with our Certified ProAdvisors and seasoned experts today and get started with QuickBooks Time. This will eventually allow you to pull employee data for payroll and invoicing, keep track of employee tasks, and automatically remind employees to clock in or out.
Yes, it is possible for an admin to integrate QuickBooks Time with QB Desktop. Here are the steps:
1. Open and Prepare QuickBooks Desktop: Log in as the admin, open your company file, and switch to Single-User Mode.
2. Access QuickBooks Time: Go to Enter Time > Activate QuickBooks Time from the Home, Customers, or Employees menu.
3. Start Integration: Click Try QuickBooks Time for Free, sign in with your Intuit credentials, and select Try it free now.
4. Sync and Set Up: Wait for the initial sync to complete. QuickBooks Time will open in a browser window within Desktop.
5. Customize Settings: Adjust QuickBooks Time settings as needed for your business to ensure smooth syncing.
Yes, it is true. QuickBooks Online Payroll payment terms are given below:
Each employee incurs an additional fee of:
– $6/month for the Core plan
– $9/month for the Premium plan
– $11/month for the Elite plan.
Similarly, contractor payments via direct deposit cost
– $6/month under Core
– $9/month under Premium
– $11/month under Elite
All plans include:
– One free admin
– Scheduling
– Expert Support
Here are some QuickBooks Time instructions for employees:
1. Download the App: Install the QuickBooks Workforce app from your app store.
2. Sign In: Log in using your company’s credentials.
3. Track Time:
– Use Time Clock to clock in/out.
– Use Switch to change jobs/customers.
– Add notes about your work.
4. Manual Time Entry: Use Timesheets to enter hours manually and add notes.
5. Use Other Features: Request time off, view schedules, paychecks, and tax forms.
