
The transition from Quicken to QuickBooks is like moving from a small notebook to a high-tech planner. Your old laptop was handy and reliable, but now you need something more advanced to handle larger and more complex projects. Compared to Quicken, QuickBooks offers a range of top-notch features that allow users to streamline their operations conveniently. Considering the benefits of using this robust software, many small businesses are converting their Quicken data and files to Quickbooks to achieve financial excellence.
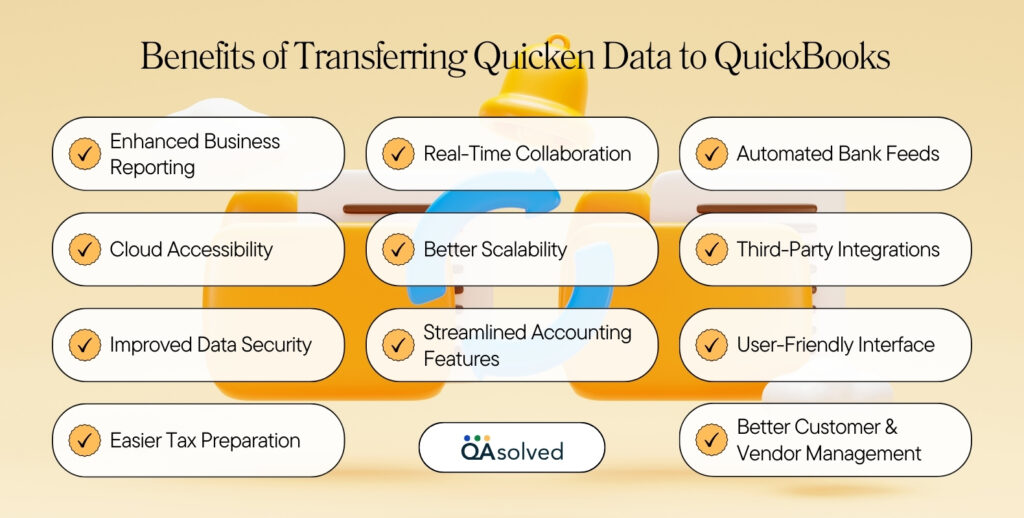
QuickBooks and Quicken target different sets of audiences, but they both are powerful tools. Quicken is a great platform for personal finances and small-scale budgeting whereas QuickBooks offers real-time collaboration and cloud-based access. If you’re planning to convert your Quicken Data to QuickBooks Desktop or Online, then this blog will help you to ensure a smooth conversion without data loss or errors. But before that, let us highlight a few things to consider before transferring data from Quicken to QuickBooks.
| Quicken | QuickBooks | |
| Who is it for | For personal use | For small and mid-sized businesses |
| Supports rental property | Yes | No |
| Free to use | Yes | No (Subscription-based) |
| Cloud Supported | No | Yes |
5 Things to Keep in Mind for a Smooth Quicken to QuickBooks Data Conversion
It is true that by importing Quicken data to QuickBooks, solopreneurs, and individual hustlers can take advantage of more advanced financial management tools. This transition is a one-way process and there are a few things to keep in mind before converting your Quicken data to QuickBooks Desktop, such as:
- The data cannot be reopened in Quicken after being converted to QuickBooks.
- Always create a backup of your Quicken data before starting the conversion process to avoid data loss or corruption.
- Starting fresh with a new QuickBooks file may be a simpler option given the challenges of conversion.
- You cannot convert QuickBooks data to Quicken, conversion only works from Quicken to QuickBooks.
- Ensure that your versions of Quicken and QuickBooks are compatible with each other for a successful data transfer.
3 Simple Steps to Convert Your Quicken Data to QuickBooks Online
Coming back to the focal point of the blog, let us walk you through the steps to move your Quicken data to QuickBooks Online. By following these instructions, you’ll ensure a smooth and efficient transition of your financial records to the cloud-based platform, QuickBooks Online.
Step 1: Export Your Quicken Data to a .CSV File
- Start by exporting the Quicken data to a .csv file.
- Once the data is exported to this format, it can be easily imported into QuickBooks.
Step 2: Import the File into QuickBooks
After saving your crucial Quicken data in the .csv file format, follow these steps to import it into QuickBooks:
- Sign in to your QuickBooks account.
- Click on Settings and then select the Import Data option.
- Choose the specific list type you intend to import.
- Click Browse. Open the .csv file you found.
- Note: A sample template can be downloaded and used.
- Hit Next. Map data appears on the page. Each field that QuickBooks recognizes has a green checkmark. If not, you’ll see No Match.
- To map the fields, use the dropdown menus. Then click Next.
- Make sure all the entries you plan to import are reviewed.
- Select Import.
Step 3: Connect Your Bank Account
Once you’ve successfully imported your data into QB, you can connect your bank account easily. Organize your transactions by setting up bank rules, so they automatically go into the right accounts.
So, these are the three simple steps to transfer your data from Quicken to QuickBooks. Moving ahead, let’s discuss the steps for Quicken to QuickBooks data conversion so that you can switch smoothly to QuickBooks Desktop.
Steps to Convert Quicken Data to QuickBooks Desktop
There are two ways to convert your Quicken data to QuickBooks Desktop. You can either convert directly to QB Desktop or you can use the QuickBooks converter to first upgrade your files.
A. Convert Quicken Data to QuickBooks via Quicken Converter
To use this tool effectively, you need to ensure that you don’t have another version installed. If you have, you need to uninstall it from your system and download the one given below.
1. Select and download the one that corresponds to the year version of QuickBooks Desktop:
- Quicken 2024 Converter
- Quicken 2023 Converter
- Quicken 2022 Converter
- Quicken 2021 Converter
- Quicken 2020 Converter
2. Install and transfer your data
- Open Quicken Converter and select Next.
- Select I accept the terms in the license agreement.
- Select Next and click on Install.
- Select Launch Quicken Converter and click on Finish.
- Choose I am transferring data from Quicken for Windows and click on Get Started.
- Select Open a data file located on this computer and then Select File.
- Browse and Choose Quicken File (.QDF) and then click on OK.
- Select Convert it and click on OK.
- Save the Quicken Data File (.QDF) and exit Quicken.
Once your file is upgraded to a compatible Quicken version, you can then begin the converting process by using the Conversion Utility in QuickBooks.
Important: The tool creates two files: a . QFX and a . QDF. You need to use the.QDF file to transfer Quicken data to QuickBooks Desktop. It will be located in the same folder as your original Quicken file, within the QXXFiles folder, where XX represents the version to which the file was upgraded.
B. Use the Conversion Utility
Follow these steps to transfer your Quicken file using the Conversion Utility in QuickBooks Desktop:
- Go to File, select Utilities, then Convert.
- Choose From Quicken.
- To move a Quicken file (.QDF), select it from the list.
- Follow the instructions in the Conversion Utility.
- Press F1 in QuickBooks Desktop to open the Help window and search for “Convert from Quicken.”
Let’s now, manually convert Quicken data to QuickBooks Desktop.
3 Steps to Convert Quicken Data to QuickBooks Desktop Manually
If you encounter difficulties with the Quicken converter or the conversion tool, manually converting your Quicken data to QuickBooks Desktop data is a viable alternative. Utilize Quicken’s export feature to export your financial data in Excel format. Subsequently, you can complete the conversion process by importing the Excel file into QuickBooks Desktop.
This method can be used to:
- From Quicken to QuickBooks Convert Transaction Data.
- From Quicken to QuickBooks Convert Sales Tax Data.
- From Quicken to QuickBooks Convert Inventory Items (categories) and Tax
Step 1: Export Quicken Transactions to Excel
- Access your Quicken File.
- Next, Log in to your Quicken account.
- Locate and click on the Actions Gear icon.
- Select “Export to Excel Workbook” from the options.
- Fill in a valid name for the file in the File Name field, then click “Save.”
- Open Excel and select “Open Other Workbooks” from the menu.
- Before importing the data into QuickBooks Desktop, ensure to make any necessary adjustments to the exported file for a smooth transition.
Step 2: Export Report Data from Quicken to Excel
- Create the required report within Quicken.
- Next, click on the ‘Export Data’ option.
- Select ‘Export to Excel Workbook‘ from the available choices. Provide a suitable name for the export file, and then click ‘Save‘ to proceed.
- Use Excel or an alternative spreadsheet application to access the exported file.
Step 3: Import All Exported Data from Quicken to QuickBooks Desktop
- Log in to your QuickBooks Company File.
- Click on the File tab
- Choose Utilities from the dropdown menu.
- Click on Import from the list of options that appear.
- Select Excel Files from the available import options.
- Choose the relevant option in the Add/Edit Multiple List Entries window based on the type of data you want to import.
- Follow the on-screen instructions provided by QuickBooks to complete the import process and bring the data from the Excel file into QuickBooks Desktop.
For better management and an easy transition from Quicken to QuickBooks, import Quicken data into QuickBooks.
Conclusion
Importing Quicken data into QuickBooks does more than just transfer your data because it also helps you improve your financial management. When you integrate your Quicken data into QuickBooks, it becomes a valuable resource equipped with QuickBooks’ advanced tools and features. With this transition, you bridge the gap between your past financial records and a modern, powerful platform that allows you to manage and analyze them effectively.
If you are also looking for a seamless way to import Quicken data to QuickBooks Online and Desktop, then we are here to assist you with that in the best possible manner. Contact us for QuickBooks Data Conversion services today.
Frequently Asked Questions
Yes, you can convert from Quicken to QBO (QuickBooks Online). There are tools and methods available to facilitate this process, allowing you to transfer your data from Quicken to QuickBooks Online.
1. Open your QuickBooks software.
2. Click on the ‘File’ option in the menu bar.
3. From the drop-down menu, select ‘Utilities’.
4. Then choose ‘Import’.
5. Select ‘Web Connect Files’ from the available options.
6. Locate and select a sample QBO file that you want to import.
7. A form titled ‘Select Bank Account’ will appear, allowing you to choose the specific account to import the data into your QuickBooks account.
When a customer retrieves their account data, the request is encoded in OFX and seamlessly transmitted over the Internet to an OFX Web server. The server then accesses the customer’s account data and sends it back to Quicken or QuickBooks in the OFX format.
QFX is employed in Intuit’s “Web Connect” and “Direct Connect” functionalities for the transmission and reception of financial data over the Internet. A QFX file essentially comprises a standard OFX file with supplementary fields that facilitate the payment of a licensing fee by institutions to Intuit. Conversely, the standard OFX format is an open and free standard.
1. Please download your bank’s QFX file.
2. Save it where you can find it easily.
3. In Windows, make sure that the extension is displayed as (activity. qfx).
4. Rename the file to (acc activity.qbo)
5. Finally, import the bank feed.
Below are the steps to follow:
1. Select File, Utilities, then Convert.
2. Choose Quicken from the list.
3. To move a Quicken file (.QDF), select it.
4. As you proceed through the conversion process, the Conversion Utility will guide you.
