
Do you know how to create an invoice in QuickBooks Online and Desktop? Are you aware of the crucial steps that are directly linked to this? If not, then you have landed on the right page because QAsolved is here to assist you in the best possible manner.
Effective financial management is the backbone of a business. Creating invoices and keeping a check on them is like planting trees and nurturing them to get fruitful results. Whether you’re a freelancer, small retail company, or mid-sized organization, managing complex contracts and getting your invoices right is crucial for the overall success of the business. Many players in the market use different bookkeeping and accounting platforms to manage their finances effectively and Intuit’s QuickBooks is one such platform that allows them to create invoices effortlessly.
There are several crucial steps to create invoices in both QuickBooks Online and Desktop and in this blog, we are going to reveal the same to help you unlock the true potential of this software and your business as well. But before that, let’s understand the true meaning of an invoice and its significance for businesses.
Invoice: Meaning and Significance
An invoice is a document that a seller provides to a buyer, detailing the products or services rendered, their quantities, and the agreed-upon prices. It serves as a formal request for payment and typically includes:
- Invoice Number
- Date
- Seller’s Information
- Buyer’s Information
- Description of Goods and Services
- Subtotal
- Taxes
- Total Amount Due
- Payment Terms
So, these are some of the items that are typically included in an invoice. In the context of accounting and bookkeeping software, creating an invoice in QuickBooks or any other platform holds severe importance.
3 Steps to Create Invoices in QuickBooks Online
Being a cloud-based accounting software, QuickBooks Online helps businesses manage their financial operations effectively. When it comes to creating an invoice in QuickBooks Online, there are three steps to be followed.
Step 1: Create, Save, and Share Invoice
The first step to creating an invoice in QuickBooks Online is classified into two categories:
- If you’re using the new layout
- If you’re using the old layout
Let’s start with the new layout first. Follow the given steps if you’re using the new layout.
A. Steps to Create a New Invoice from Scratch in QuickBooks Online
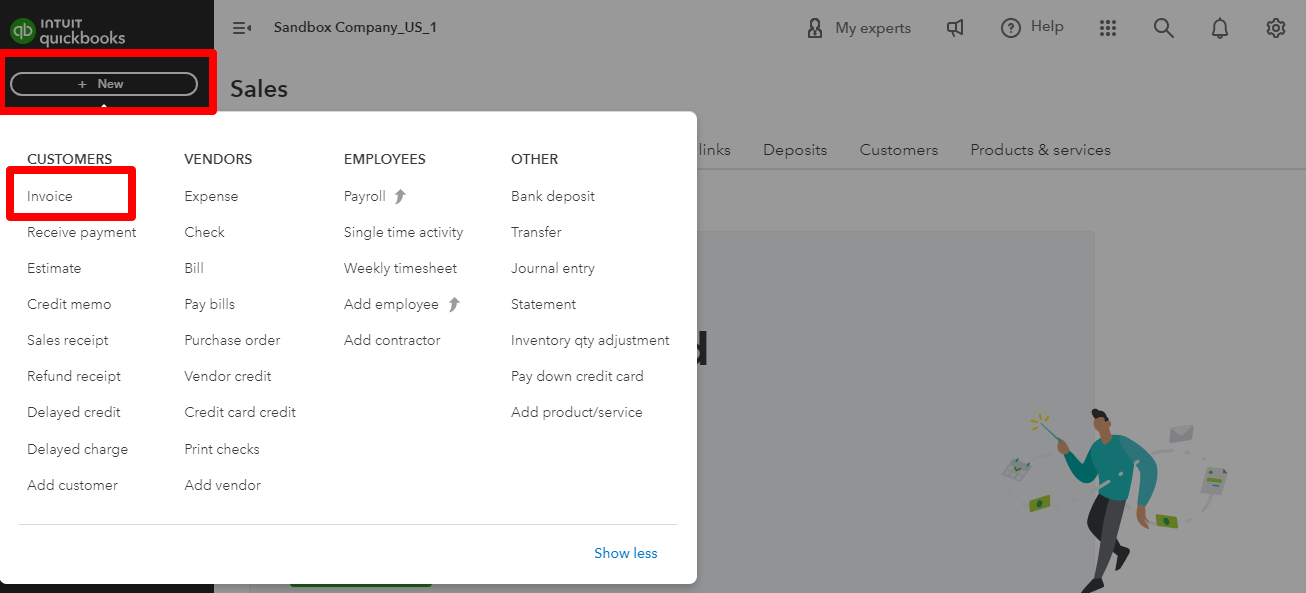
- Select “+New” from the main menu.
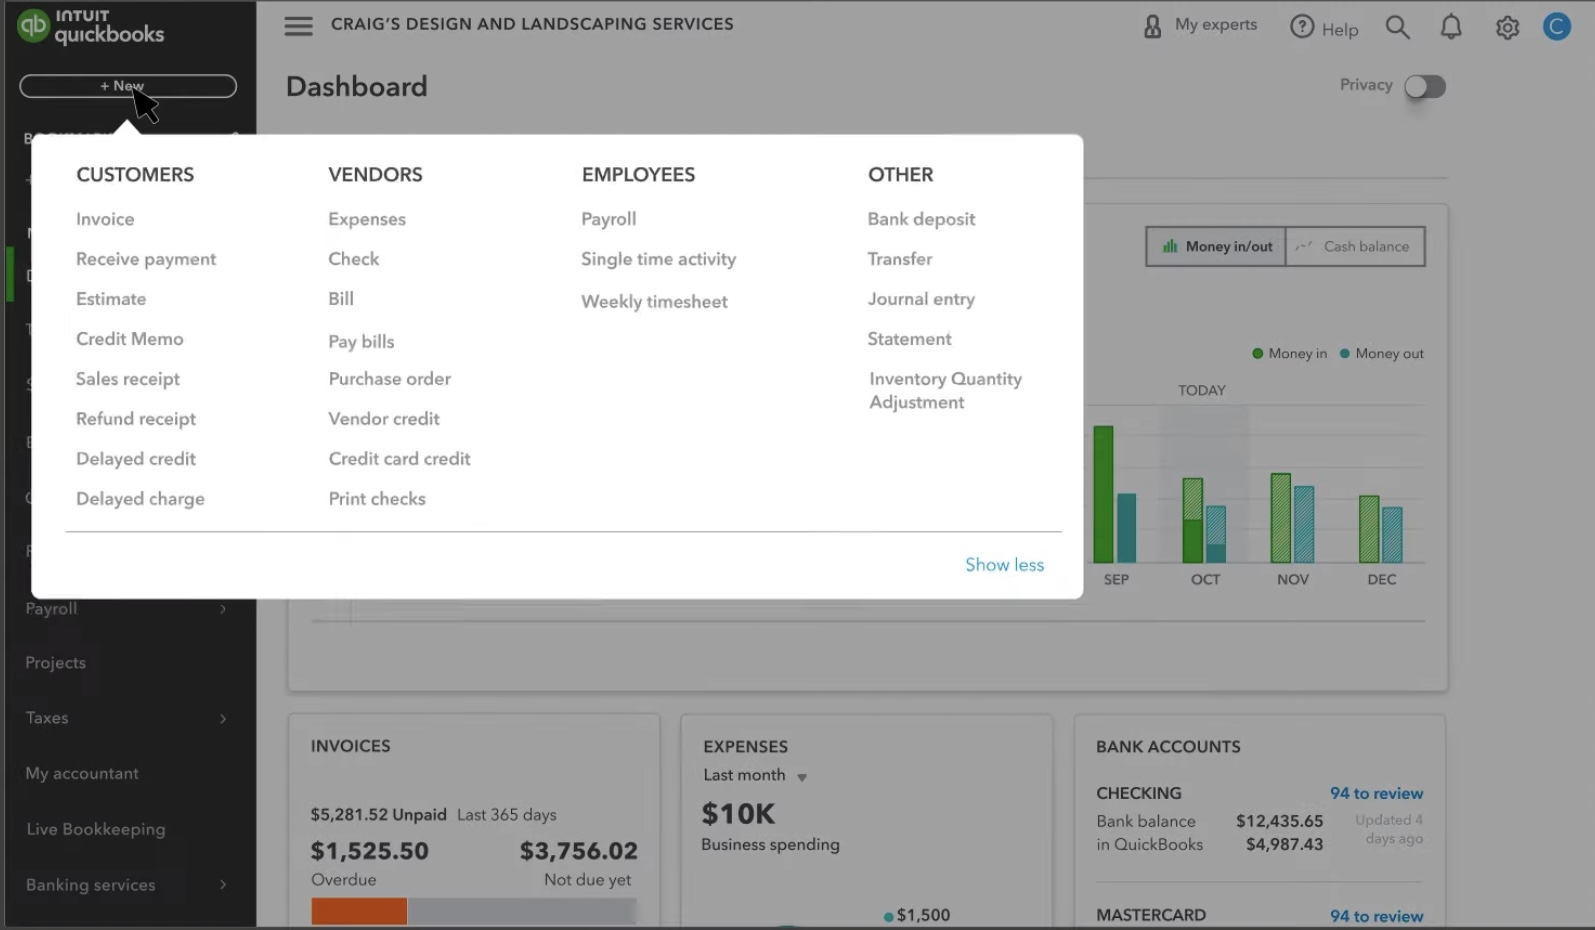
- Click on “Invoice.”
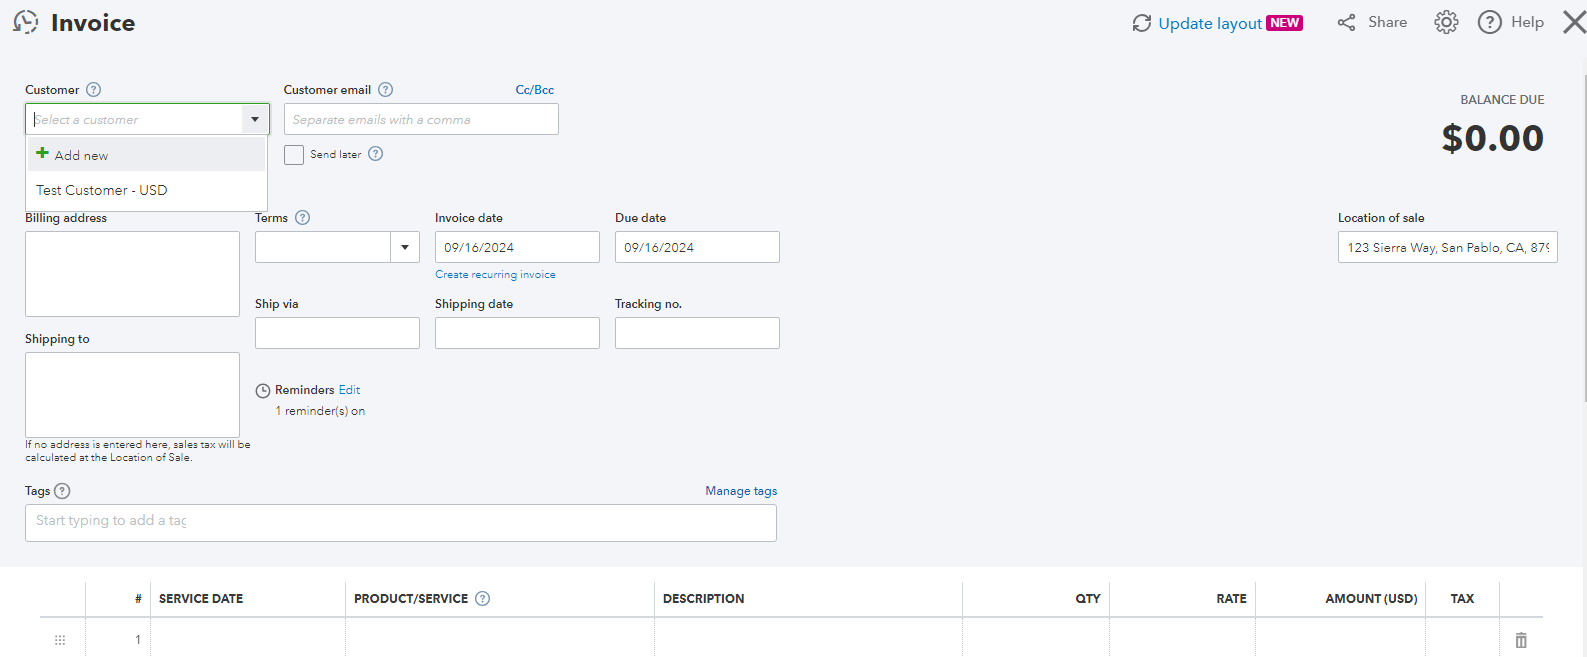
- Click on “Add Customer” and select a customer from the dropdown menu.
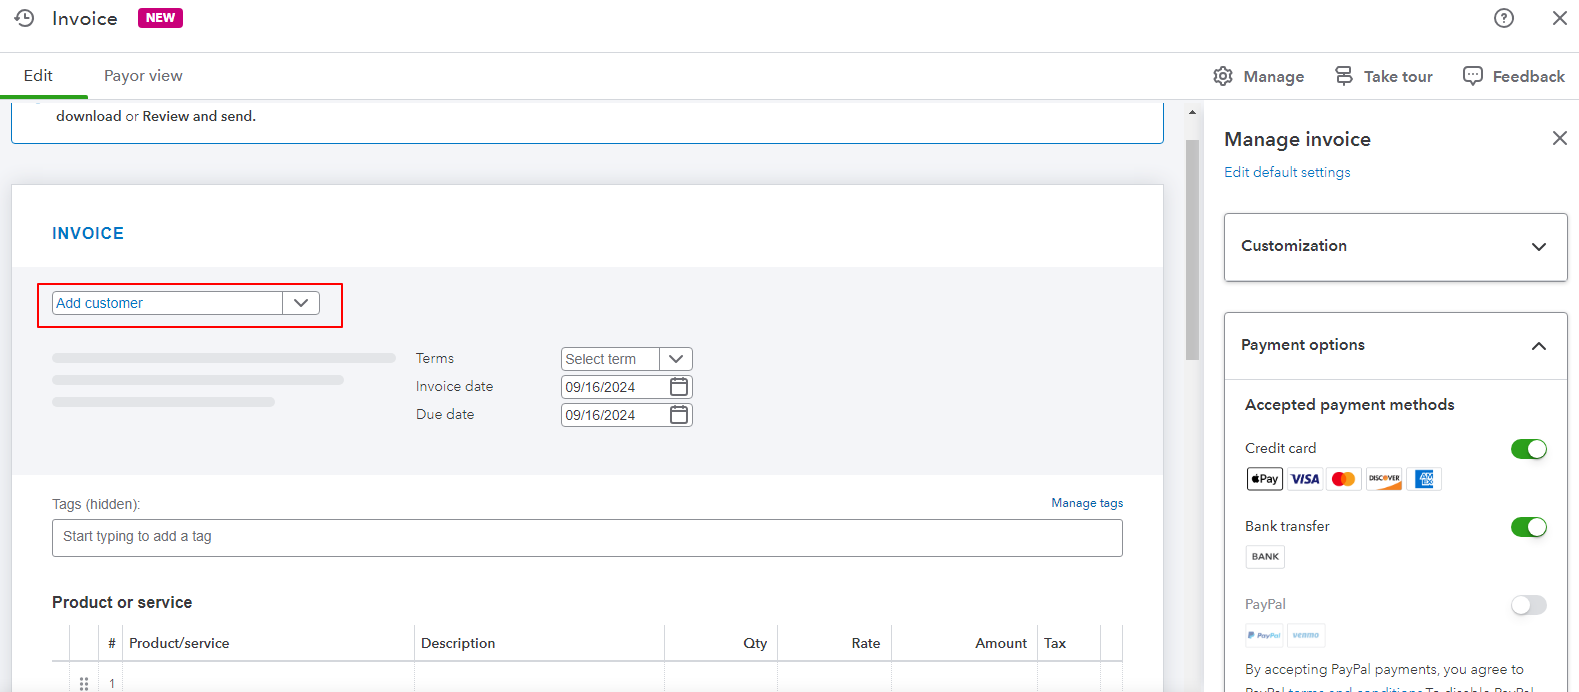
- Tip: Ensure that all customer information, especially their email address, is accurate.
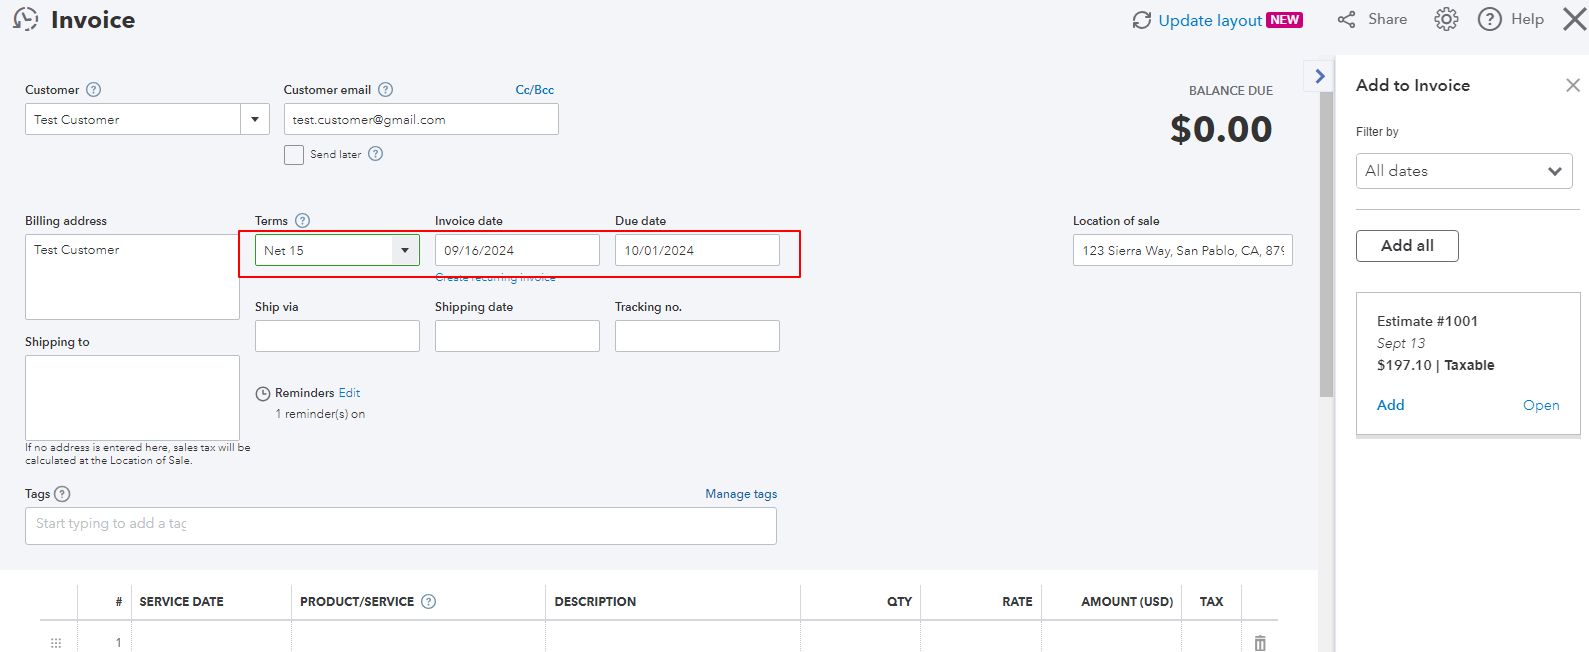
- Review and adjust the Invoice Date, Due Date, and Terms as needed.
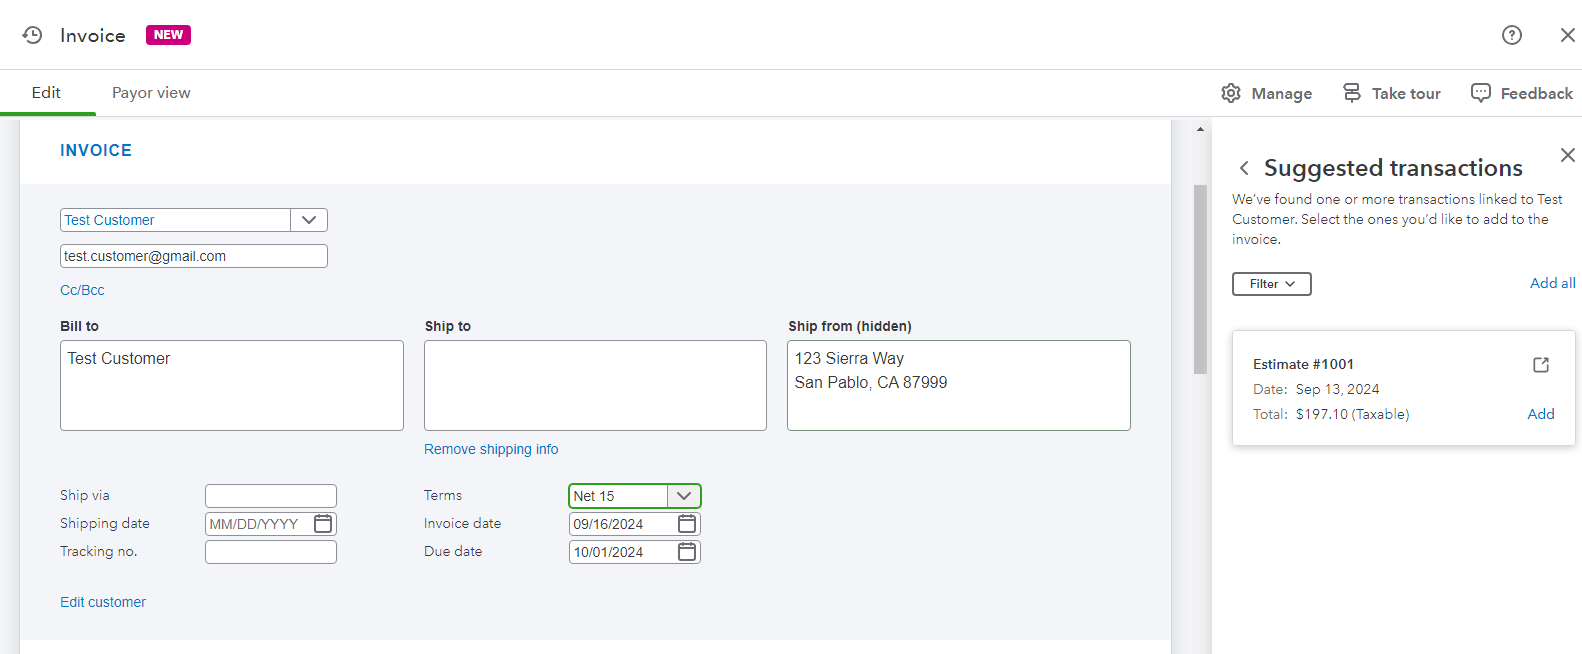
- Note: The “Net” in the Terms field refers to the days until the payment is due.
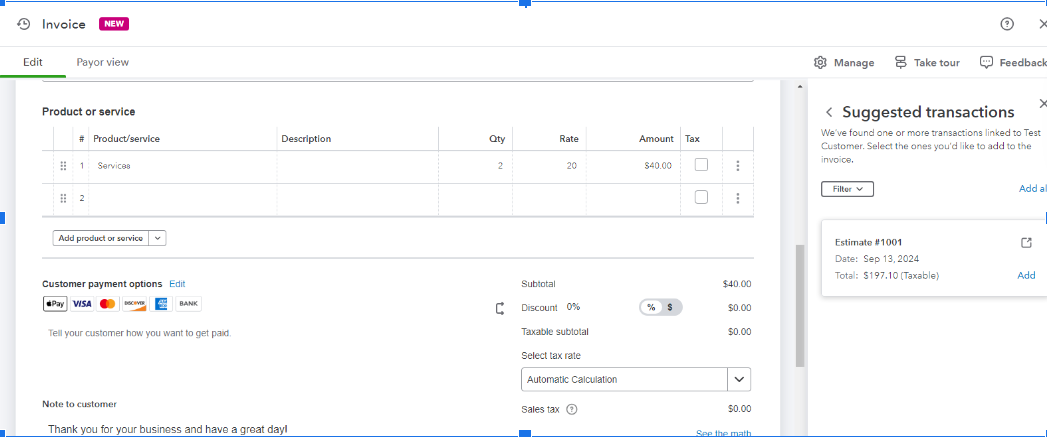
- Select “Add Product or Service” and choose a product or service from the dropdown menu.

- Note: When adding a new product or service, you can specify how to calculate the charge amount- whether it’s a flat rate, by item, or by hour.
- Choose how to calculate the charge amount by unit or by hour. Enter the quantity and rate if necessary.
.
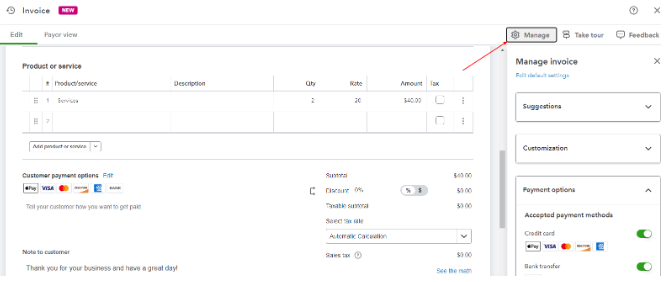
- If you want to customize the information or design of your invoices, select the “Gear Icon” and click on “Manage.” From the side panel, choose the desired options. QuickBooks will remember your choices and apply them to all existing and future invoices.
- Once you’ve completed creating the invoice, you have various options for saving or sharing it:
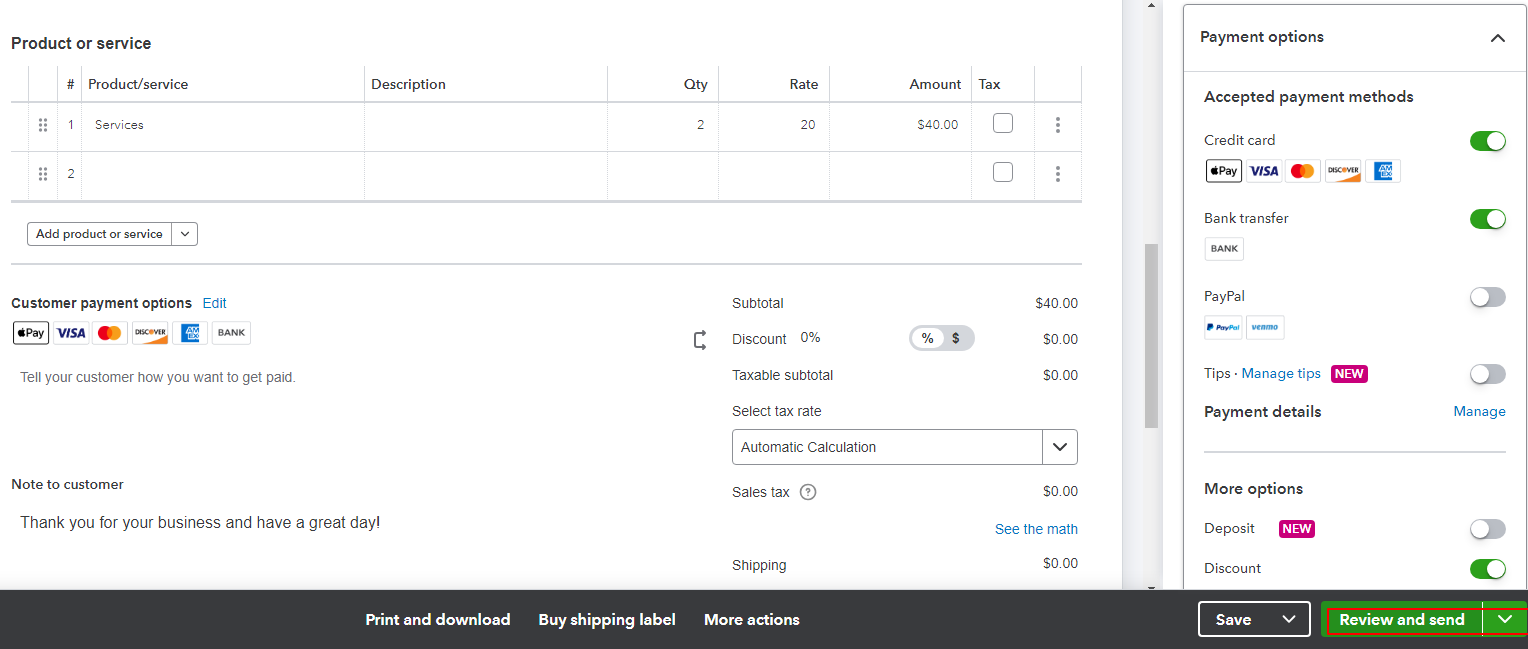
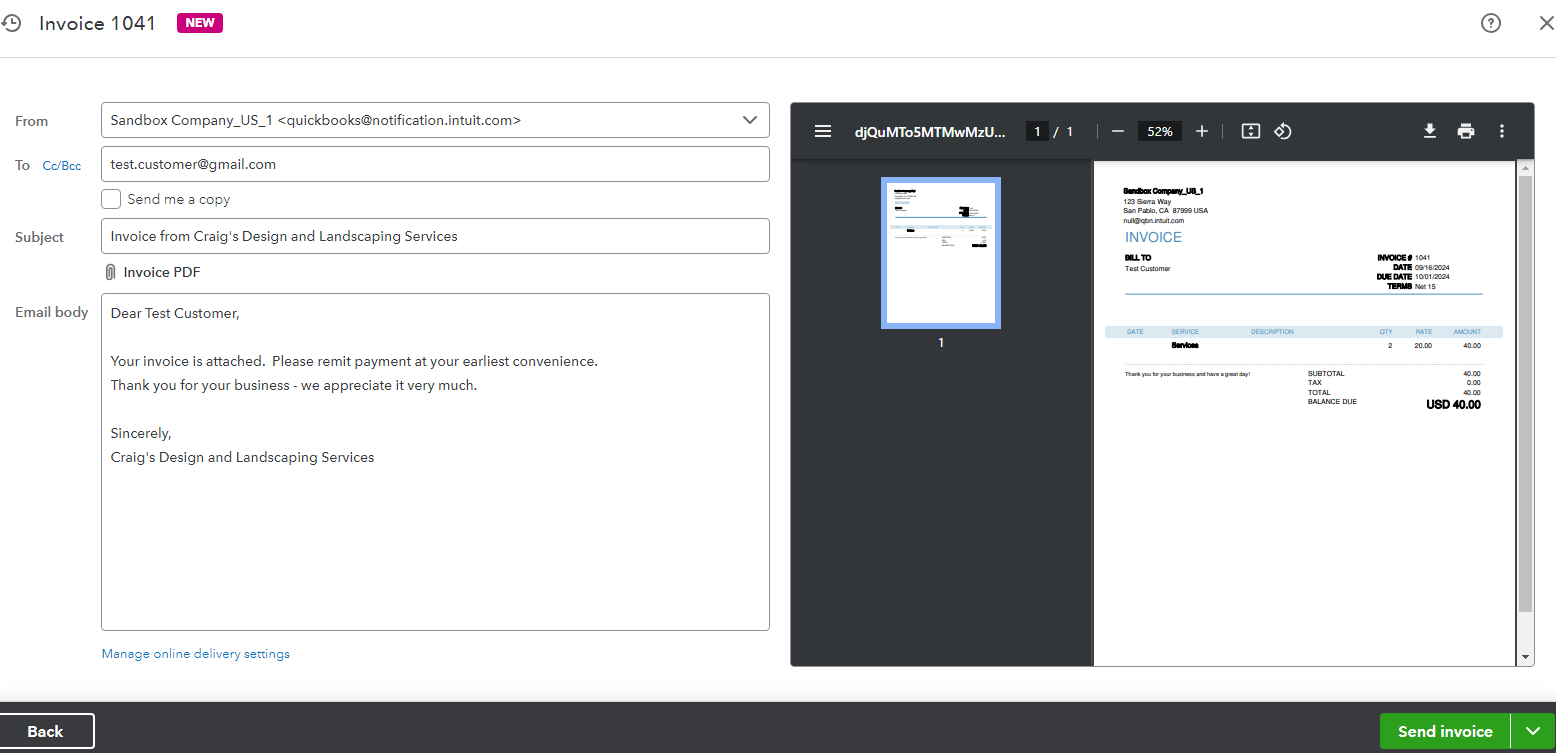
- If you’re ready to send the invoice, select “Review and Send” to email the invoice to your customer. Make any necessary adjustments to the email, then hit “Send invoice.”
- If you prefer to send the invoice later, choose “Save and close.”
- To generate a paper invoice for printing, select “Print and download.”
- If you’ve already received payment from the customer, opt for “Receive Payment.”
- For sharing the invoice link via text message, select “Share link” to provide your customer with quick access.
So, these are the required steps to Create, Save, and Share an Invoice in QuickBooks Online if you’re using the latest or new layout. Now, let’s discuss the same for the users, working on the old layout.
B. Follow the given steps If you’re using the Old Layout
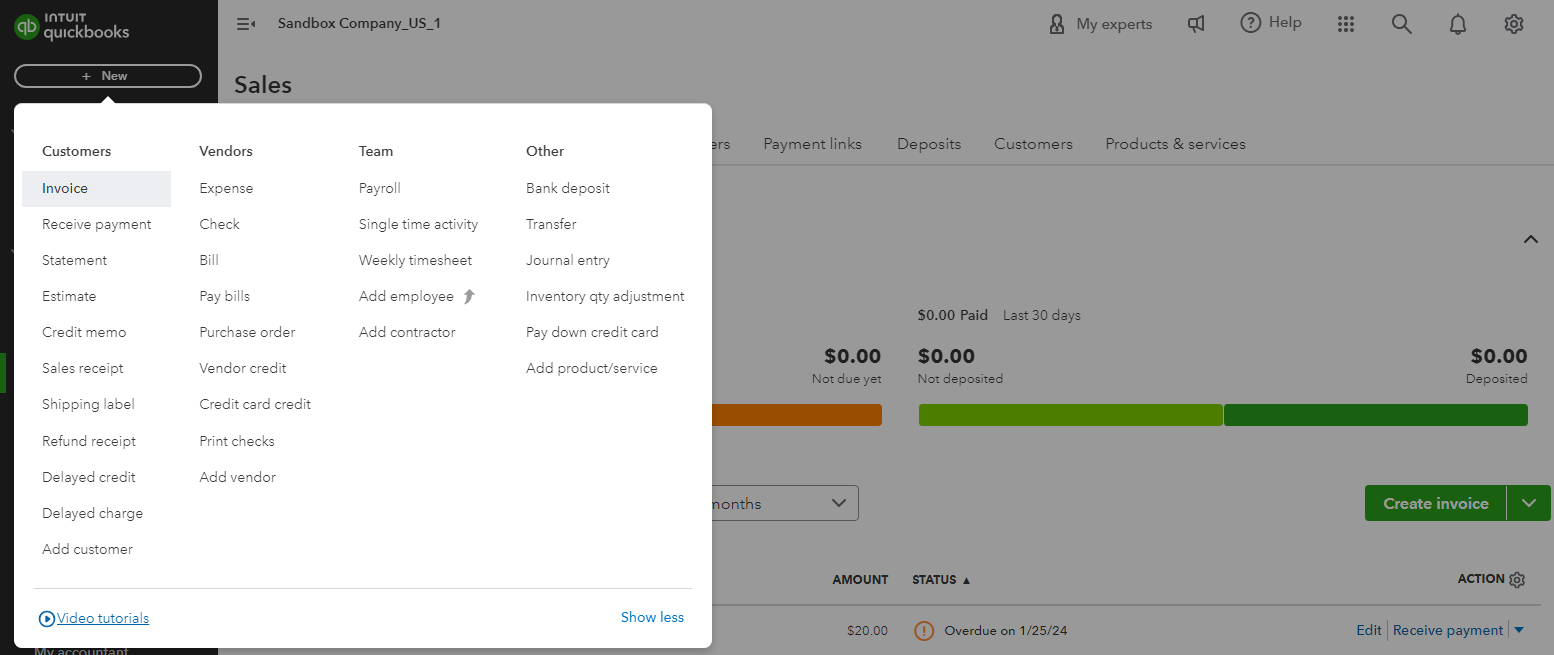
- Click on “+ New.” and then select Invoice.
- From the Customer dropdown, choose a customer, ensuring all their details, especially the email address, are accurate.
- Review the Invoice date. Then, from the Terms dropdown, select the due date. Note that “Net” refers to the days until payment is due, with the default being 30 days. Adjust the due date if necessary.
- In the Product/Service section, pick an existing product or service from the list.
- Enter Quantity, Rate, and Change Amount, if required.
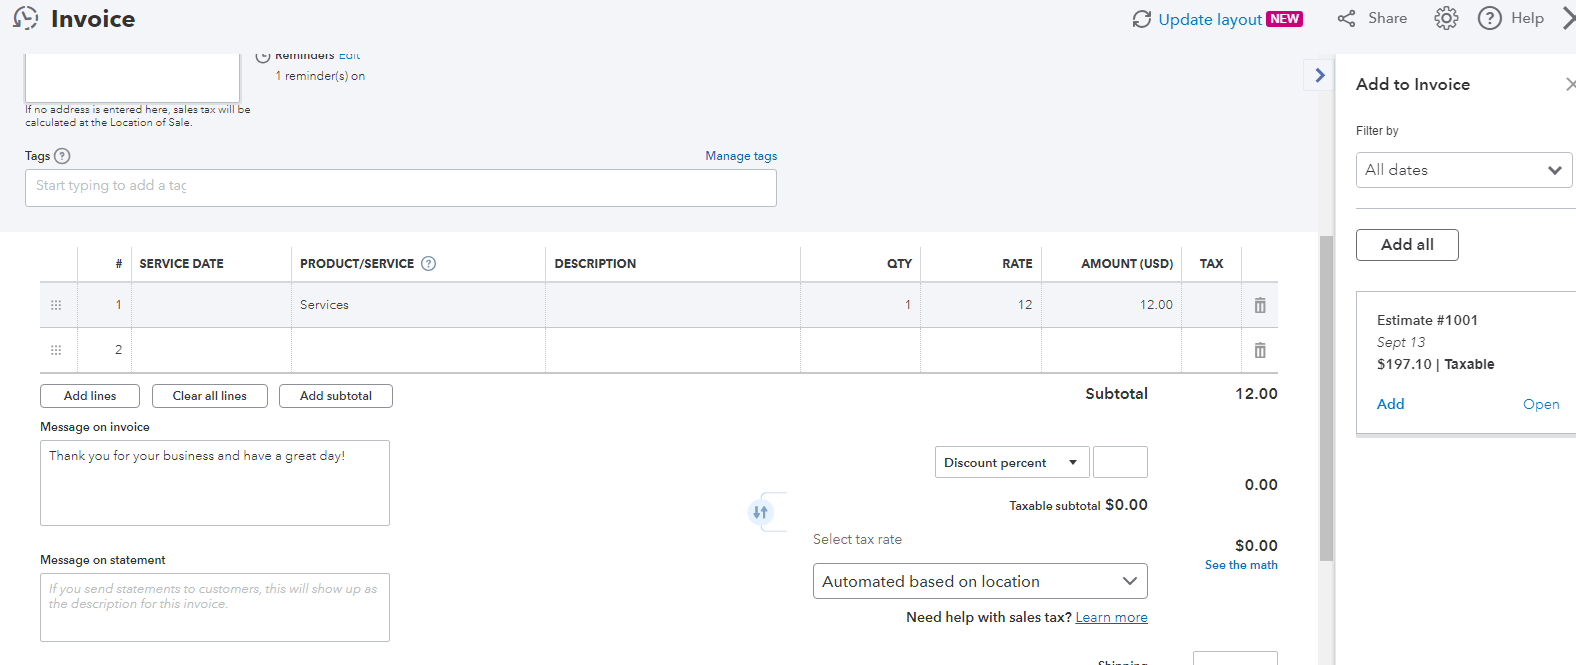
- If you need to charge sales tax, make sure to check the Tax checkbox.
- Once you’ve completed the invoice, you have various options for saving or sharing it:
- If you’re ready to send the invoice immediately, choose “Save and send” to email it to your customer. Adjust the email if necessary, then select “Send and close.”
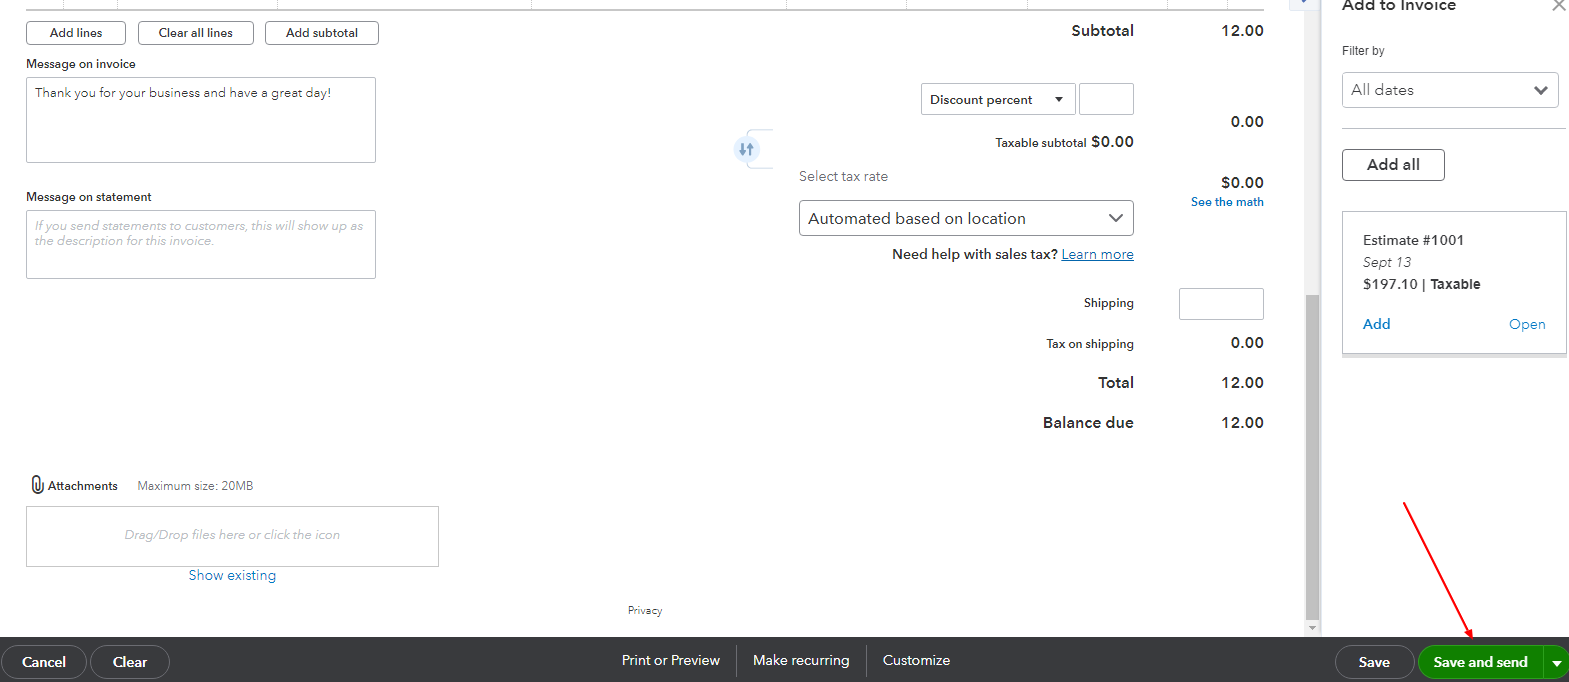
- If you prefer to send the invoice at a later time, click on “Save and close.”
- For a paper invoice, select “Save” and then choose “Print or Preview.”
- If you want to share the invoice link with your customer through text message, opt for the “Save and Share link.”
- Note: If you’re using QuickBooks Simple Start, choose “Send.”
- If you’re ready to send the invoice immediately, choose “Save and send” to email it to your customer. Adjust the email if necessary, then select “Send and close.”
Step one concludes here for users working on both new and old layouts. Let us now head towards the second step which is all about reviewing the open invoices.
Also Read: Create an Estimate & Convert it to an Invoice in QuickBooks Online
Step 2: Reviewing Open Invoices
QuickBooks automatically categorizes unpaid invoices under your accounts receivable account, which you can find in your Balance Sheet and other financial reports. To check your invoices, go to Sales and select Invoices. Look at the Status column to understand where your invoices are in the sales process.
Some common statuses are mentioned below:
- Due in [days]: Indicates that you haven’t emailed the invoice yet.
- Due in [days] Sent: Shows that you’ve emailed the invoice to the customer.
- Due in [days] Viewed: Indicates that your customer has opened and viewed the invoice.
- Deposited: Confirms that your customer has paid the invoice.
- Overdue [days]: Highlights that the invoice is past due and remains unpaid.
- Overdue [days] Viewed: Indicates that your customer opened the past due invoice but didn’t pay.
- Delivery issue: Suggests that there was an issue delivering the invoice. Check the email address and resend if needed.
- Voided: Confirms that the invoice was voided in QuickBooks.
Step 3: Receive Payments for Invoices
If you use QuickBooks Payments, customers have the convenience of paying their invoices directly through credit cards, PayPal, Venmo, or ACH transfers. QuickBooks manages the entire payment process for you, ensuring transactions and accurate accounting. Once payments are received, QuickBooks automatically categorizes and records the transactions in the appropriate accounts.
Having created invoices in QuickBooks Online, you may be wondering how to create invoices in QuickBooks Desktop. Let us now proceed ahead and help you through the process.
Create invoices in QuickBooks Desktop
Invoicing is simplified with QuickBooks Desktop, which allows you to create, customize, and manage invoices conveniently. If your business doesn’t require generating sales orders or estimates, your Accounts Receivable (A/R) process begins with creating invoices. To get started, follow these steps:
Step 1: Create an Invoice from Scratch
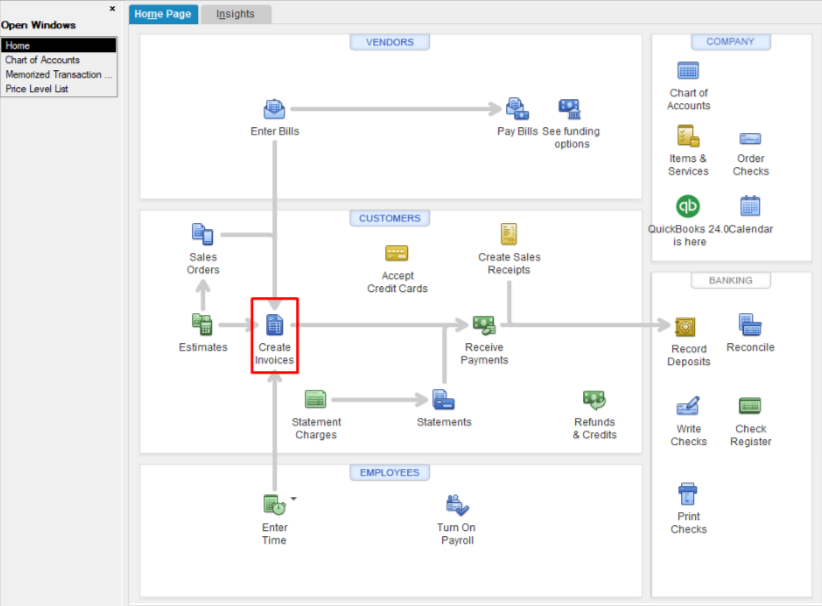
- Go to the Home screen or the Customers menu and choose “Create Invoices.”
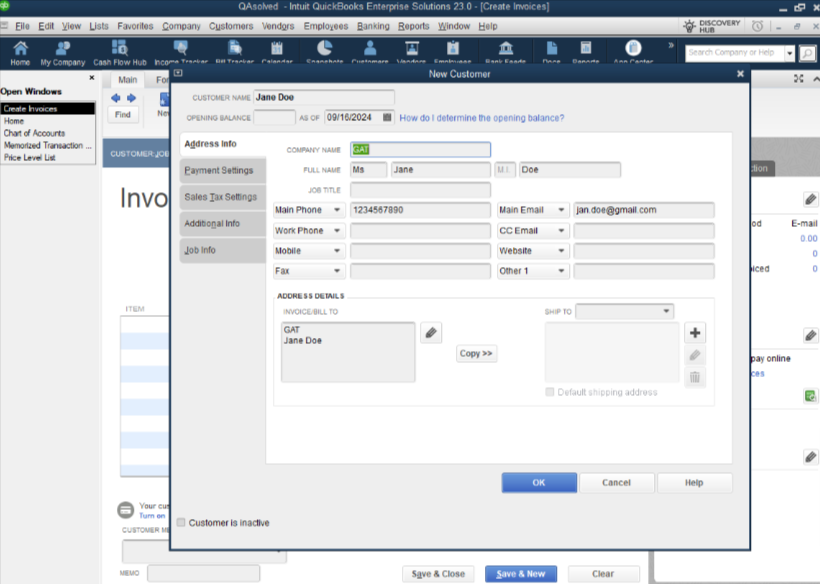
- From the Customer: Job drop-down, pick an existing customer or customer job. If the customer or job is not listed, you can choose “Add New.”
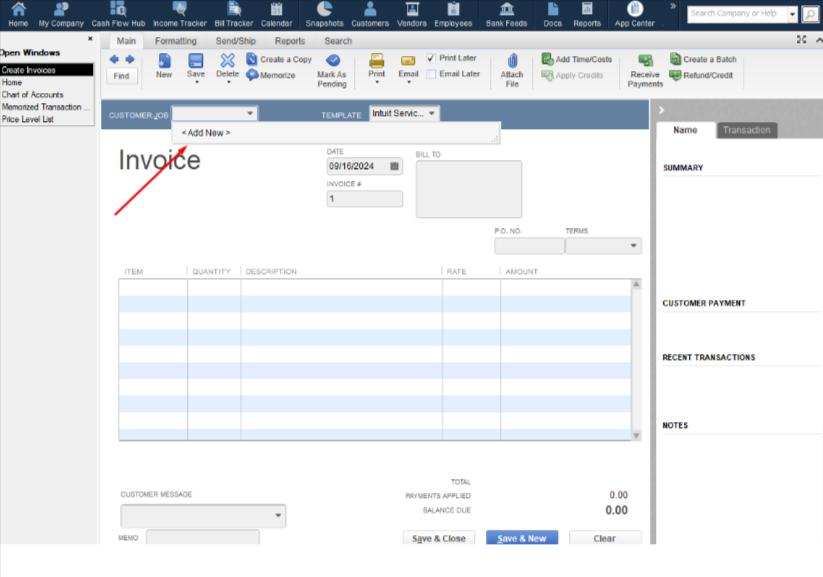
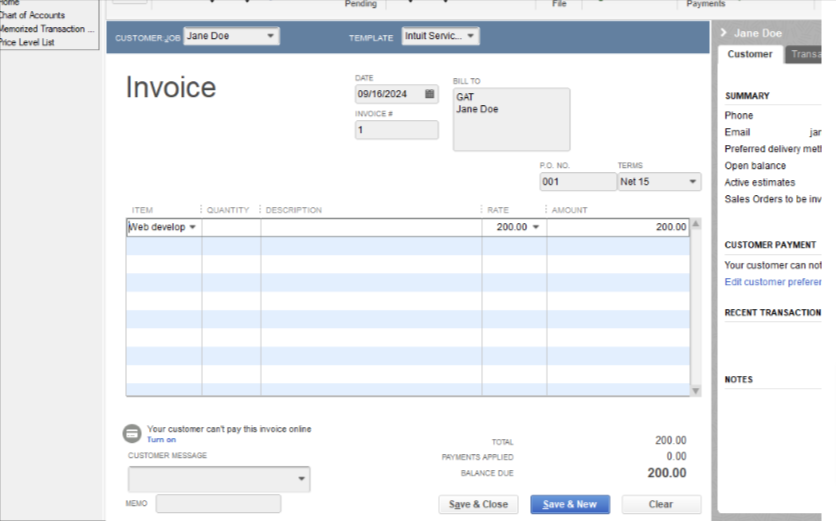
- Complete the essential details at the top of the form, which includes the Date Invoice, Bill to/Sold to information, and the specified Terms.
- In the details section, pick the items. The description and amount are filled in automatically using preset details, but you can change or remove them as necessary while creating the invoice.
- Optionally, if you wish to apply a discount, follow these steps to create a discount item:
- Go to the Home screen and select the Lists menu.
- Choose the Item List.
- Right-click anywhere and select New.
- In the Type drop-down, opt for Discount.
- Input an Item Name/Number and a short Description.
- In the Amount or % field, input the discount amount or percentage. Alternatively, leave the field blank and enter the amount directly on sales forms if your discount amounts vary.
- From the Account drop-down, select the income account to track the given customer discounts.
- Choose an appropriate Tax Code for the item.
- Click OK, then Save & Close.
Step 2: Create an invoice for a Sales Order
After making a sales order and delivering the goods or services, it’s time to generate an invoice. Follow these steps to create an invoice:
A. From the Sales Orders Window:
- Go to the Sales Orders main tab.
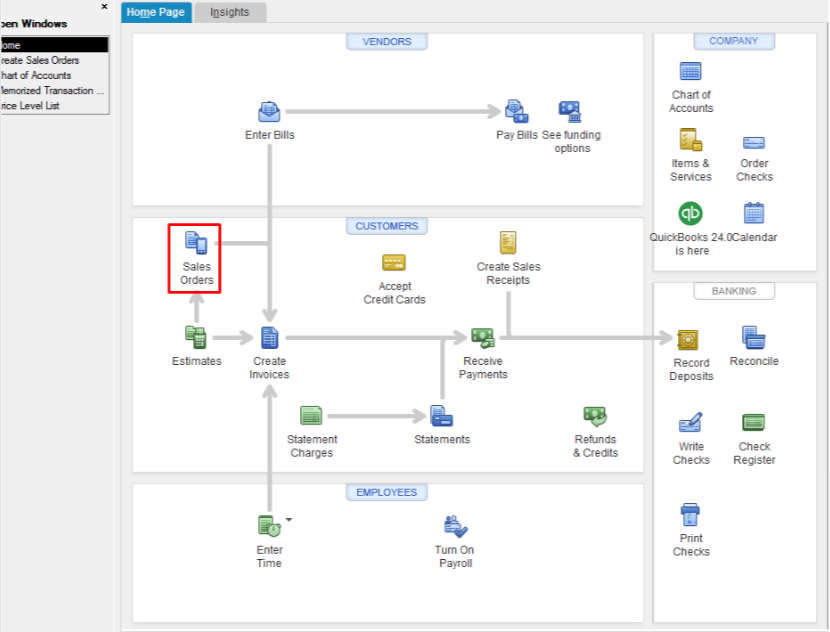
- Click on the Create Invoice button.
- A prompt will appear, providing two options:
- Choose “Create invoice for all of the sales order(s)” to include all items from the sales order in the invoice.
- Select “Create invoice for selected items” if you only want specific items on the invoice.
- Make necessary adjustments to the invoice. In the list of items, input the quantity in the To Invoice (Or Invoiced) column for each item. If there are items you don’t want to invoice, enter 0 (zero) as the quantity.
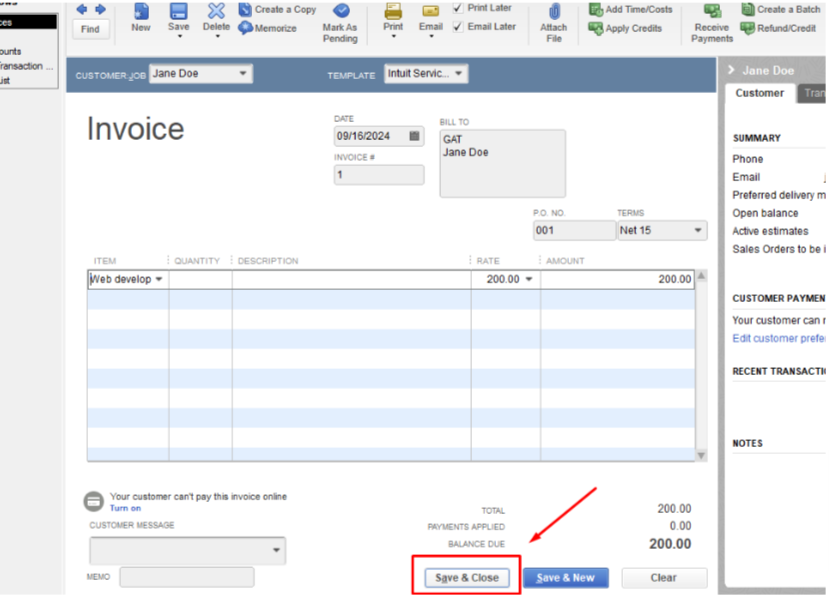
- Click on Save & Close to complete the process.
B. From the Invoice Window
- In the QuickBooks Home screen or Customer menu, choose “Create Invoices.”
- Select a customer or customer job from the Customer: Job drop-down menu.
- The Sales Order window will be displayed, presenting available sales orders.
- Pick one or more sales orders containing the items you want on the invoice.
- Make necessary adjustments to the invoice. In the list of items, specify the quantity in the To Invoice (Or Invoiced) column for each item. If there are items you don’t want to invoice, input 0 (zero) as the quantity.
- Click on Save & Close to complete the process.
Step 3: Create an Invoice for an Estimate
When your customer agrees to a fixed payment amount based on your estimate, you can easily convert the entire estimate into an invoice. Here’s how you can do it:
A. From the Estimate Window
- Access the right estimate.
- Click on “Create Invoice” at the top of the Estimate form.
- If progress invoicing is enabled, you might be prompted to specify which items and quantities should be included on the invoice.
- Once the invoice appears, make any necessary changes to the information.
- Click on “Save & Close.”
B. From the Invoice Window
- Pick “Create Invoices” from the QuickBooks Home screen or Customer menu.
- Choose a customer or customer job from the Customer: Job drop-down menu.
- The available Estimates window will be displayed.
- Select the estimate you want to include in the invoice. You can only select one estimate to invoice.
- If progress invoicing is enabled, you might be prompted to specify what to include on the invoice.
- Once the invoice appears, edit any necessary information.
- Click on “Save & Close.”
Creating an invoice is seamless regardless of whether you use QuickBooks Online or the desktop version. In just a few clicks, you can create your invoices by entering customer details and adding items or services!
Also Read: Set up and Send Progress Invoices in QB Online & Desktop
Conclusion
Creating and handling invoices is crucial for any business. With the help of this blog, we have provided clear steps for creating invoices in both QuickBooks Online and QuickBooks Desktop. By following these simple instructions, you can easily make invoices that accurately record your sales. QuickBooks offers flexibility in tailoring your invoices to fit your business needs, making it easy to create, save, and share them.
With QuickBooks Online, you can create flexible, cloud-based invoices that you can access from anywhere. With QuickBooks Desktop, you can customize your invoices so you can meet your specific needs. The right version allows you to manage invoicing, monitor payments, and keep organized records.
If you need any help with your invoices, you can reach out to us via our toll-free number +1-888-245-6075, or can write to us at [email protected].
Frequently Asked Questions
Importing Excel files into QuickBooks offers various options, and if you prefer the Standard import method, here’s a simple guide:
1. Go to the File menu and choose Utilities.
2. Select Import and then click on Excel Files.
3. If the Add/Edit Multiple List Entries window appears, click No.
4. Follow the steps provided by the wizard for importing files.
5. Choose the type of data you are importing.
6. QuickBooks will open a formatted Excel spreadsheet. Enter your information, save the file, and close it.
7. After closing the file, you’ll be prompted to Add My Data Now.
8. Review the results and check the Data in QuickBooks.
9. When you are finished, select Close.
Creating an invoice in QuickBooks offers different approaches. If you’ve sent an estimate and it gets approved by the customer, you can easily convert that estimate into an invoice. Alternatively, you can start a new invoice from scratch. Just select + New.
Go to the Invoicing section on your Dashboard and click on “Send your first invoice.” From there:
1. Choose the customer you are invoicing.
2. Select the payment terms.
3. Input details about what you sold.
4. Email the invoice to your customer.
5. Preview the invoice to ensure accuracy.
6. Customize the invoice according to your preferences.
7. Add your logo for a professional touch.
8. Adjust the invoice template as needed.
9. Set up online payments if required.
10. Finally, send the customized invoice along with a personalized email to your customer.
No, QuickBooks Online and QuickBooks Desktop are two separate versions of QuickBooks, and they operate independently. They are designed for different user preferences and business needs.
