
In the dynamic realm of financial management, the art of closing entries in QuickBooks stands as a cornerstone for precision and clarity. Whether you’re a seasoned accountant or a business owner navigating the intricacies of fiscal responsibility, understanding the nuances of QuickBooks closing entries is paramount.
Unlike rigid monthly or year-end procedures, QuickBooks calls for a comprehensive approach to closing entries, ensuring a meticulous wrap-up at the culmination of each fiscal year. This guide is your compass through the complexities, providing a roadmap to navigate the process with confidence and accuracy.
In this article, we’ll demystify the essential role of closing entries in financial management. From preserving historical data to facilitating seamless transitions between accounts, QuickBooks closing entries are the ritingpin of a well-orchestrated financial close. Join us on this journey as we break down the intricacies and empower you with the knowledge needed to master QuickBooks closing entries. Let’s embark on a path towards financial precision and clarity.
What are QuickBooks Closing Entries?
To ensure effective account management, the closure of entries in QuickBooks after the fiscal year is crucial. Unlike fixed monthly or year-end closings in QuickBooks, it is imperative to execute a seamless closing entry after each financial year.
QuickBooks retains all your data for an extended period and does not delete it unless condensed. Additionally, if closing entries are not accurately performed or omitted, the software generates notifications prompting users to update or edit them.
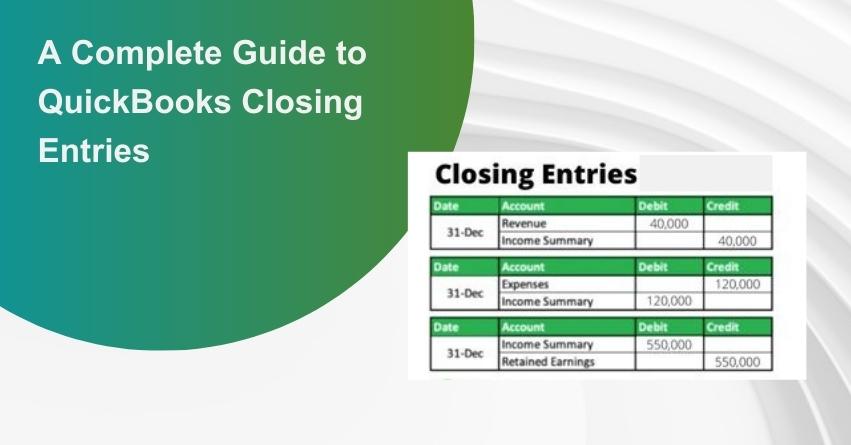
A QuickBooks Closing Entry is recorded at the fiscal year’s end, facilitating the transfer of balances from income and expense accounts to Retained Earnings. This step is an integral part of the accounting cycle, enabling businesses to generate accurate financial statements and effectively file monthly and yearly tax returns. This blog aims to elucidate the entire procedure for zeroing out income and closing entries in QuickBooks.
What is the Purpose of QuickBooks Closing Entries?
In essence, QuickBooks Closing Entries serve the crucial function of reconciling a company’s accounts. These entries, in accounting terms, mark the transition to a new accounting period when the opportune moment arrives. Businesses must open and close their temporary accounts at the commencement and conclusion of each period to accurately record and monitor financial information for reporting purposes. Through this process, the balance of funds is shifted, ultimately leading to a closing balance of zero.
Closing entries play a pivotal role in evaluating the company’s financial performance by assessing whether the retained earnings account reflects an increase in revenues from the previous year and indicates reduced dividend payments and expenses. Retained earnings, in this context, represent earnings that are not distributed among shareholders as dividends but are retained for future investments.
Key Points on QuickBooks Closing Entries
1. Purpose of Closing Entries:
- Closing entries are executed at the close of each fiscal year.
- The primary goal is to transfer balances from Income and Expense accounts to Retained Earnings.
- This process aims to zero out the Income and Expense accounts and incorporate the net income for the fiscal year into Retained Earnings.
2. Timing of Closing Entries:
- Closing entries are made after recording all adjusting entries.
- Once the books are officially closed, no additional entries for the fiscal year can be input.
3. Restrictions After Closure:
- QuickBooks Desktop imposes limitations on entering transactions affecting the closed fiscal year’s balance.
- The program advises against such entries or requests a closing date password if one is established.
4. Automated Calculation in QuickBooks Desktop:
- QuickBooks Desktop does not automatically generate an exact transaction for closing entries.
- Reports like the Quick Report of Retained Earnings trigger the program to compute necessary adjustments.
5. Limitations in Quick Zoom Feature:
- Transactions related to closing entries cannot be Quick Zoomed, in contrast to manually recorded adjustments.
- For QuickBooks Desktop for Mac, accessing the report and selecting Company & Financial reveals the retained earnings account in the Equity section of the Balance Sheet Standard.
QuickBooks’ Automated Year-End Adjustments
QuickBooks initiates specific year-end adjustments tailored to your fiscal year. The process unfolds as follows:
1. Zeroing Income and Expense Accounts:
- At the close of each year, QuickBooks automatically adjusts your income and expense accounts to zero.
- This facilitates commencing the new fiscal year with a clean slate and a net income balance of zero.
2. Automated Adjusting Entries for Net Income:
- QuickBooks applies adjusting entries to your net income. For instance, if your net income for the year was $12,000, the equity section of your balance sheet reflects a line item for net income amounting to $12,000 on the final day of the fiscal year.
3. Maximizing Retained Earnings at the New Fiscal Year’s Onset:
- At the commencement of the new fiscal year, QuickBooks enhances your Retained Earnings equity account by the net income from the previous year (e.g., $12,000 in the example).
- Simultaneously, it deducts the net income by the same amount, resulting in a net income balance of zero at the start of every new fiscal year.
Important Considerations Before Closing Your QuickBooks
Advantages of Closing Your Books:
1. Data Security:
- Closing your books allows you to restrict access to data from a specific accounting period, including transaction details.
- Implementing a closing date password adds an extra layer of security. To edit or delete transactions in a closed period, knowledge of the closing date password and appropriate permissions is essential.
2. Reporting Accuracy:
- Any modifications made to transactions before or after the closing date are reflected in the Closing Date Exception Report.
- Access this report through the Reports Menu by selecting Accountant & Taxes, then choosing the Closing Date Exception Report.
3. Closing Date History:
- The user responsible for setting the closing date is documented in the Closing Date History, along with details of the current or previous closing dates.
- This feature provides transparency and accountability regarding the management of closing dates in QuickBooks.
Advantages of Keeping Your Books Open
1. Data Accessibility:
- By not closing your books, you maintain convenient access to the previous year’s data, encompassing comprehensive transaction information.
- This unrestricted access ensures ease of reference and analysis when needed.
2. Comparative Reporting:
- Keeping your books open enables the creation of comparative reports, facilitating aside-by-side analysis between the current year and the preceding year.
- This comparative insight can be valuable for trend analysis and informed decision-making based on historical financial data.
Which Accounts Require Opening and Closing?
Throughout the reporting cycles, various temporary accounts are established for accounting purposes. These temporary accounts, integral to the accounting ledger—specifically the general ledger—need to be opened and closed. The general ledger serves as the repository for recording all transactions throughout the designated accounting period, culminating in the creation of the Trial Balance, a comprehensive list of general ledger accounts with their respective balances.
It is essential to distinguish between temporary and permanent accounts, as only the former undergo the opening and closing process.
1. Temporary Accounts:
- Sales Discounts
- Miscellaneous Expenses
- Earned Interest
- Utilities
- Dividend Account
- Rent
2. Permanent Accounts:
- Accounts Payable
- Owner’s Equity
- Inventory
- Accounts Receivable
- Shareholder’s Equity
- Retained Earnings
All accounts associated with the revenue and expenses of the business fall under the category of temporary accounts, necessitating inclusion in the opening and closing procedures. For incorporated businesses, dividend accounts—detailing how profits are distributed among shareholders—mandate periodic opening and closing in alignment with the company’s integration periods.
Resolving Closing Date Errors in QuickBooks: A Step-by-Step Guide!
The precision of QuickBooks accounting hinges on the accurate input of transaction dates. Any discrepancies in these dates can lead to inaccuracies in the accounting records. To address and rectify such issues, follow the step-by-step instructions below for QuickBooks year-end closing.
1. Set Closing Date and Password:
- Begin by establishing the closing date and password within the company preferences section.
- Upon entering the password, you gain access to the information from the previous year.
2. Execution Steps:
- After logging in, proceed with the following steps:
- Click on “Edit.”
- Navigate to “Preferences” to locate the closing date option.
- Within the Accounting Preferences tab, select “Company Preferences.”
3. Finalize the Process:
- To complete the procedure, enter the selected date and password.
Effortless Procedures for Closing Entries in QuickBooks Online
When gearing up to conclude the year, closing your books in QuickBooks Online becomes a vital step to safeguard your financial data and prevent unintended alterations before tax filing. This process effectively seals your books, ensuring that your accounting data remains intact and unmodifiable post the designated closing date.
Step 1: Verify Your Accounts
1. Log in to QuickBooks Online as a primary or company admin.
2. Review all accounts to ensure accuracy.
3. Address any outstanding invoices, expenses, and payments.
4. Reconcile accounts up to the closing date.
5. Double-check inventory quantities.
Step 2: Close Your Books
1. Navigate to Settings and select Accounts and Settings.
2. Access the Advanced tab.
3. Under the Accounting section, click Edit.
4. Activate the “Close the Books” switch.
5. Specify a closing date, providing a comfortable deadline. No transaction edits are allowed before this date, marking the commencement of new bookkeeping activities.
6. Optionally, set a password for modifications to closed books by choosing the “Allow changes after seeing a warning and entering a password” option from the drop-down menu.
7. The drop-down menu allows password creation for closing your books.
8. Conclude the process by pressing Save and then Done.
How to Eliminate QuickBooks Closing Entries?
This section outlines the steps involved in removing closing entries in QuickBooks Online:
Step 1: Transfer the Credit Balance to the Income Summary Account
1. Locate Revenue Accounts under the Trial Balance, encompassing revenue and capital accounts in your company’s ledger.
2. Identify Credit Balances and perform Debit Entries for each revenue account to zero out the balances.
3. The credit balance automatically shifts to the Income Summary Account.
Step 2: Change Expense Account Total to Zero
1. In the Trial Balance, identify Expense Accounts displaying a debit balance.
2. Execute a Credit Entry for each Expense Account under the specific Income Summary Account, nullifying the Expense Account total.
Step 3: Credit Entry Amount Surpassing the Debit Amount
If the Income Summary Account shows a credit balance exceeding the debit amount, it signifies Net Income. Conversely, if the debit balance surpasses the credits, it indicates a Net Loss.
Step 4: Close the Dividend Account
Conclude the process by closing the Dividend Account in QuickBooks concerning retained earnings. The Dividend Account, with its usual debit balance, adjusts the retained earnings to reflect the initial Net Income amount.
Conclusion
We trust the information provided above proves valuable to you. However, should you encounter any challenges with your software and require expert assistance in areas such as accounting, bookkeeping, and accounting software-related issues, please do not hesitate to reach out to us. You can contact us at our Toll-Free number: +1-888-245-6075.
Frequently Asked Questions (FAQs)
QuickBooks Closing Entries play a crucial role in the financial management cycle. They are essential for transferring balances from income and expense accounts to Retained Earnings, ensuring accurate financial reporting.
QuickBooks Closing Entries should be executed at the end of each fiscal year. This process ensures a clean start for the new accounting period and an accurate representation of financial data.
Inaccurate QuickBooks Closing Entries can lead to discrepancies in financial statements. The software may generate notifications prompting users to update or edit entries to maintain accuracy.
QuickBooks Desktop does not have an automatic transaction for generating Closing Entries. Instead, reports like the Quick Report of Retained Earnings trigger the program to calculate necessary adjustments.
Before initiating QuickBooks Closing Entries, it’s essential to verify the accuracy of accounts, reconcile transactions, and ensure that all necessary adjustments have been made to avoid errors in the closing process.
