

Reconciling your Accounts Payable (AP) and Accounts Receivable (AR) in QuickBooks is a vital part of maintaining accurate and reliable financial records. As your business grows and transactions increase, it’s common for discrepancies to appear. These can result from missed or incorrect entries, duplicate transactions, unrecorded payments, or timing differences between when an invoice or bill is entered into the system and when the actual payment is made or received.
While most people think of reconciliation as something you do with bank or credit card accounts, it’s just as important to regularly review your AP and AR. This helps you stay on top of who owes you money and who you need to pay. It also makes it easier to spot outstanding balances or errors before they turn into bigger issues.
By reconciling these accounts regularly, you improve cash flow management, maintain transparency, and ensure your reports are accurate when tax season or audits roll around. Whether you’re using QuickBooks Online or Desktop, this blog will walk you through how to reconcile your payables and receivables step by step. By the end, you’ll have a clearer picture of your business’s financial health and feel more confident making key decisions.
What is Meant by Reconciliation in QuickBooks?
Reconciliation in QuickBooks refers to matching transactions in your QuickBooks account with financial records outside your company, such as bank statements and credit card statements. To ensure your QuickBooks books are accurate, complete, and up-to-date, it’s important that all transactions reflect actual events in your accounts.
Reconciliation helps you to:
- Check for errors, such as duplicates, omissions, or incorrect entries
- Identify unauthorized or fraudulent transactions
- Ensure your balances match your bank or credit card statements
- Prepare for taxes or audits with confidence
Regular reconciliation of your accounts is recommended, typically once a month after receiving your statement. QuickBooks helps you maintain clean financial records and stay on top of your business’s cash flow with built-in tools.
Benefits of Reconciling Accounts Payable and Receivable in QuickBooks
Reconciling Accounts Payable (AP) and Accounts Receivable (AR) within QuickBooks is a critical step to maintain accurate financial records. If you’re managing vendor bills or tracking customer invoices, this process helps keep your books up-to-date. We’ll walk you through how to reconcile both AP and AR in QuickBooks so you can stay on top of your cash flow.
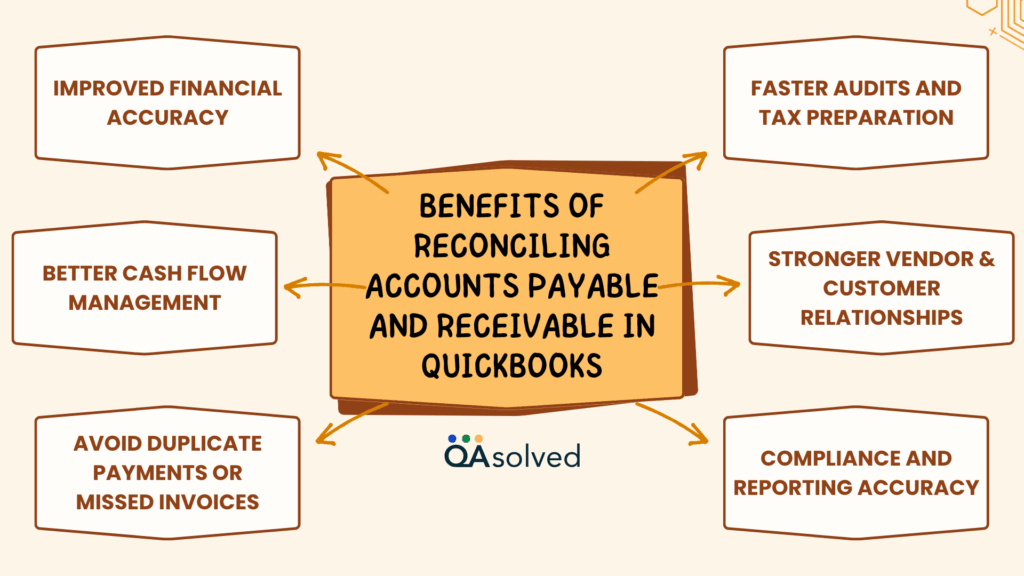
Here are the key benefits of reconciling Accounts Payable and Receivable in QuickBooks:
- Improved Financial Accuracy: Reconciliation helps reduce discrepancies and avoid costly accounting errors by ensuring QuickBooks records match actual transactions.
- Better Cash Flow Management: When you reconcile your receivables and payables, you gain clear visibility into how much you owe and how much you owe to others.
- Avoid Duplicate Payments or Missed Invoices: Account reconciliation ensures that you do not overpay vendors or miss out on payments from customers.
- Faster Audits and Tax Preparation: When records are accurate and up-to-date, audits and tax preparation are faster and easier.
- Stronger Vendor and Customer Relationships: Keeping track of dues and owings is essential to building trust with vendors and customers.
- Compliance and Reporting Accuracy: Correct reconciliation improves financial reporting accuracy and compliance with accounting standards.
In short, business owners can keep their finances organized, reduce risks, and make better decisions by reconciling accounts payable in QuickBooks regularly. Now, let’s take a look at the steps that can help you reconcile accounts payable and receivable in QuickBooks.
Also Read: How to Reconcile Bank and Credit Card Accounts in QuickBooks Desktop?
How to Reconcile Accounts Receivable on QuickBooks?
Reconciling accounts receivable in QuickBooks involves reviewing and verifying all incoming payments against your recorded invoices to ensure everything matches up correctly. It’s a way to confirm that your customers have been billed accurately and that their payments have been properly recorded in your system.
This process helps identify any discrepancies, such as unpaid invoices, duplicate entries, or posting errors, so you can address them before they impact your financial reporting. Here are the steps to reconcile accounts receivable in QuickBooks.
Step 1: Create Customers
- Log in to your QuickBooks Online account and go to the homepage.
- Click “Sales” from the left-hand sidebar menu.
- Select “Customers” from the options that appear.
- Fill in the necessary customer information in the required fields.
- Click “Save” to add the customer to your records.
Step 2: Create Sales Receipt
- After adding a new customer, the next step is to create a sales receipt.
- Click on “Sales” in the left-hand menu to open more options.
- Select “Invoices”, then click “New Transaction” and choose “Sales Receipt” from the dropdown.
- Enter all the required details in the appropriate fields.
- When you’re done, click “Save and Close” at the bottom right of the screen
Step 3: Create the Invoice and Reconciliation
- Access the Sales section in QuickBooks and create invoices for all customers.
- Make sure you have records or statements for every sale you make.
- Pay attention to the bank statements you receive from your customers to identify the payments.
- Match and mark the paid invoices accordingly.
- Reconcile these payments within QuickBooks.
- Determine whether any outstanding invoices have not been cleared by customers.
- Reconciliation of Accounts Receivable is now complete.
Regularly reconciling your accounts receivable ensures your books are accurate, as well as monitoring cash flow and keeping track of outstanding balances. One of the best things about QuickBooks is that users also get the liberty to reconcile their bank accounts while using the Online version of the software.
How to Reconcile Accounts Payable on QuickBooks?
Accounts payable reconciliation in QuickBooks is important for maintaining accurate financial records and staying on top of what your business owes to vendors. It involves matching your recorded expenses and bills with actual vendor statements or bank transactions.
A regular reconciliation of accounts payable can help you avoid duplicate payments, detect errors early, and eliminate the need to fix negative accounts payable in QuickBooks. Here’s how to get started with QuickBooks. Follow the steps given below to reconcile accounts payable in QuickBooks:
Step 1: Set Up a New Vendor Profile
- Select the “Expenses” tab from the left-hand sidebar.
- Click on “Vendors.”
- Select “New Vendor.”
- Enter the required details such as name, address, and contact information.
- Click “Save” to add the vendor to your list.
Step 2: Create a Bill
- Click the “+ New” button from the top-left sidebar menu.
- Under the Vendor section, select “Bill.”
- Enter all the necessary details, such as vendor name, bill date, due date, amount, and category.
- To create the bill, click “Save and Close” or “Save and New”.
Step 3: Monitor Upcoming Vendor Payments
You can track all pending vendor payments through the Accounts Payable Aging Summary after setting payment dates for each bill. Using this report, you can avoid late fees or disruptions by knowing which bills are due.
Step 4: Process Bill Payments
- Click the Create (+ New) menu in QuickBooks.
- Under the Vendors section, select Pay Bills.
- On the Pay Bills page, choose your preferred Payment Account from the dropdown menu.
- Check the box next to each bill you wish to pay.
- Enter the required payment details and complete the process using your preferred payment method.
Following these steps will help you monitor, manage, and reconcile your outstanding payables in QuickBooks. Reconciling accounts payable regularly helps prevent late fees and maintain healthy business relationships by ensuring vendor payments are accurate and up to date. Your financial records remain reliable and audit-ready when you have a clear picture of your obligations.
Steps to Reverse Reconciliation in QuickBooks Online
Mistakes can sometimes occur during the reconciliation process, and you may find yourself needing to undo or reverse a reconciliation in QuickBooks Online. Here’s how you can do it:
- Click on the Reconcile section under the Accounting tab, then select the Reconciliation History link.
- Select the account for which you want to undo the reconciliation.
- In the Reconciliation History list, find the period you want to undo and click the Undo option. QuickBooks will prompt you to confirm the action, and once confirmed, it will reverse the reconciliation for that selected period.
Keep in mind that undoing a reconciliation can affect your financial statements, so it’s important to do this carefully and only when necessary.
Conclusion
In a nutshell, reconciling accounts payable and receivable in QuickBooks not only improves the accuracy of your financial statements, but also gives you a clearer picture of your business’s overall health. Maintaining a consistent review and matching of your records with real-time bank transactions reduces the risk of duplicate entries, late payments, and unpaid customer balances going unnoticed. In QuickBooks, reconciliation is a built-in control system that helps business owners detect fraud, catch mistakes in data entry, and ensure that every dollar leaves and enters the company.
Hence, regularly reconciling your accounts payable and receivable in QuickBooks is not just a best practice, it’s a critical step toward maintaining accurate records, ensuring financial stability, and supporting smarter business decisions.
Frequently Asked Questions
1. Check Unpaid Invoices:
– View the Accounts Receivable Aging Summary in Reports.
2. Record Payments:
– Click + New > Receive Payment.
– Add payment details, select the invoice, and select the customer.
3. Apply Credits or Write Off
– Use a Credit Memo or Journal Entry to clear the invoice if it won’t be paid.
– For bad debts, record a Credit Memo using a “Bad Debt” account.
4. Confirm It’s Cleared
– Recheck the A/R report to make sure the balance is updated.
1. Create a Customer:
– Go to Sales > Customers.
– Click New Customer, fill in the details, and click Save.
2. Create an Invoice:
– Click on + New > Invoice.
– Add the products/services, set the due date and amount, then select the customer.
– Hit Save and Send or Save and Close.
3. Track Receivables:
– Go to Reports > Accounts Receivable Aging Summary to monitor unpaid invoices.
4. Record Payment When Received:
– Click + New > Receive Payment.
– Select the customer, link the payment to the invoice, and choose the deposit account.
Here are some reports you can use:
– Accounts Receivable Aging Summary
– Accounts Payable Aging Summary
– Open Invoices Report
– Unpaid Bills Report
Overdue transactions and outstanding amounts can be identified with these reports.
Check for:
– Missing or duplicate entries
– Payments applied to the wrong invoices or bills
– Incorrect customer or vendor data
Fix these through journal entries or by editing transactions. For complex issues, consult a professional.
