
When it comes to tracking ownership earnings and maintaining accurate financial records, understanding how to record K-1 income in QuickBooks is essential. Whether you’re managing an S corporation or a multi-member LLC, Schedule K-1 plays a crucial role in reporting each partner’s or shareholder’s share of income, deductions, and credits. However, many business owners and bookkeepers often struggle with entering this information correctly into their QuickBooks accounts. The key is recognizing that K-1 income is not a business expense, it represents an owner’s share of profits and must be tracked through equity accounts, not as regular payments or payroll.
Form K-1 is used with IRS Form 1065 for partnerships or Form 1120S for S corporations, and it applies only to individuals who received a share of the business’s profits. Therefore, recording this income properly ensures that your financial statements match your ownership structure and align with your tax filings. Improper handling can lead to discrepancies in equity reporting, tax confusion, and even potential penalties.
In this blog, we’ll walk you through the steps to correctly record K-1 income in both QuickBooks Desktop and QuickBooks Online. We’ll also explain the key benefits of recording K-1 Income in QuickBooks along with a guide to avoid common mistakes while recording K-1 income in both QuickBooks Online and QuickBooks Desktop.
Key Benefits of Recording K-1 Income in QuickBooks
The accuracy of K-1 income recording in QuickBooks has several benefits for companies that are structured as partnerships or S corporations. You should understand how to record K-1 Income in QuickBooks, whether you’re a business owner, accountant, or bookkeeper. The key advantages are as follows:
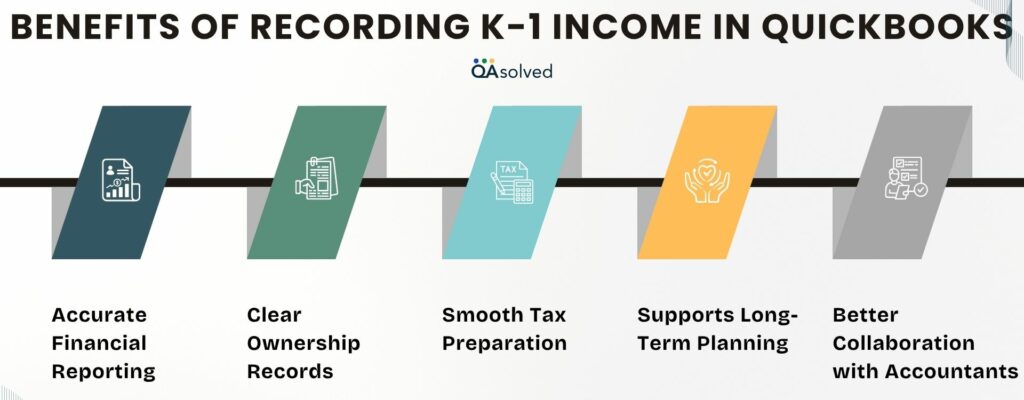
1. Accurate Financial Reporting
You can accurately reflect each partner’s or shareholder’s share of the business’s net income by recording K-1 income properly. As a result, profit and loss statements are clean, and equity balances are current.
2. Clear Ownership Records
A business’s K-1 income is directly related to its ownership. QuickBooks will allow you to see exactly how much each owner or partner has earned, received, or retained, allowing you to make informed financial decisions and resolve disputes.
3. Smooth Tax Preparation
Logging K-1 income properly reduces confusion and errors during tax season. The purpose of this is to ensure that your business’s books are in line with what the IRS has on file, which is crucial for compliance and audit preparation.
4. Supports Long-Term Planning
The tracking of K-1 allocations helps owners understand their actual income from the business over time. Personal financial management, reinvestment decisions, and long-term planning can all be aided by this information.
5. Better Collaboration with Accountants
Your accountant will be able to verify figures, prepare returns, and provide insights more easily if your K-1 income is accurately recorded. Your financial operations will be more efficient with fewer back-and-forth exchanges.
So, these are the key benefits of recording K-1 income in both QuickBooks Online and Desktop. To keep your business organized, compliant, and ready for growth, it’s important to record K-1 income accurately.
Understanding QuickBooks K-1 income
K-1 income refers to the share of profits, losses, deductions, and credits that a business allocates to its owners or partners. In QuickBooks, properly recording this income ensures that the equity section of your financial statements accurately reflects each owner’s contribution and earnings. Since K-1 income isn’t a business expense, it should be tracked through owner’s equity accounts rather than as payroll or vendor payments.
This approach helps maintain accurate financial reporting and simplifies tax filing. Regardless of the platform, recording K-1 income properly is essential for maintaining compliance with IRS requirements and reflecting true financial health.
Three Types of K-1 Forms
1. Form 1065 (Partnerships):
Used for businesses classified as partnerships. This form reports each partner’s share of the partnership’s income, deductions, and credits. It must be filed along with IRS Form 1065.
2. Form 1120S (S Corporations):
Filed by S corporations to report each shareholder’s portion of the company’s income and other tax-related information. It accompanies the corporate return (Form 1120S).
3. Form 1041 (Estates and Trusts):
Used to report income distributed to beneficiaries from estates or trusts. Each beneficiary receives a K-1 form detailing their share of the entity’s income and deductions.
Steps to Record K-1 Income in QuickBooks Desktop
It is essential to enter K-1 income into QuickBooks Desktop in order to be able to accurately report financial and tax information, especially for S corporations and partnerships. In this section, you will learn how to properly set up accounts, enter income, and track expenses. By following these steps, you will be able to keep your records organized and in compliance with IRS regulations.
Step 1: Create a Separate Account Specifically for K-1 Income
- Navigate to the Chart of Accounts.
- Now, go to the Lists.
- Placed at the bottom, click the Account button.
- Now, click on New.
- Select Income or Other Income.
- Name the account (for e.g., K-1 Income Account) and add a description, just in case.
- Finally, Save the New Account.
Step 2: Record K-1 Income as a Deposit
- Navigate to the Bank Account.
- Select Make Deposits from the Banking menu.
- Choose the new K-1 income account from the Account dropdown.
- Now, enter income details received as listed on the K-1 form.
- Add momos or references for clarity.
- Once you’re done with entering the details, click Save & Close.
- Finally, ensure your partnership agreements and tax laws aligned to ensure on-point record-keeping.
Step 3: Classify K-1 Income
- Review your K-1 form to identify the types of income listed on the form, such as dividends, interest, or capital gains.
- Match income with the right account to assign each type of income in QuickBooks to the correct category (like interest income or dividend income).
- Categorize and enter each income type under the appropriate category when recording the deposit or transaction on your K-1.
- Use “Income” or “Other Income” Accounts. If you have a unique income type, consider creating a sub-account under “Other Income” to improve organization.
Tip: QuickBooks includes tools that help you categorize and track capital gains or losses properly.
Step 4: Record Related Expenses
- Track business expenses by accessing Vendors > Enter Bills or Write Checks to record any expenses connected to your K-1 income.
- Assign proper categories to the correct account, such as travel, office supplies, or professional services.
- Link to K-1 income to maintain accurate deductions and associate expenses with your account whenever possible.
- Keep a dedicated documentation for every expense accompanied by a receipt to maintain clear and organized records.
Step 5: Match and Reconcile the K-1 Income Account
- Navigate to the Banking menu and choose Reconcile.
- Choose the K-1 income account you previously created.
- Verify that QuickBooks entries match your bank statement to ensure all amounts are accurate.
- If you identify any discrepancies, go back and review your records carefully to correct any mistakes, such as omitted income or overlooked expenses.
- Confirm that all transactions match before completing the reconciliation process.
Tip: Double-check your numbers against the Schedule K-1 form to ensure accuracy and compliance.
Important: QuickBooks Online currently doesn’t support direct Schedule K-1 processing. You can download the IRS form from the IRS website, then run a financial report in QuickBooks and fill out the form manually.
Steps to Record K-1 Income in QuickBooks Online
Keeping your financial records accurate and tax-ready requires correctly recording K-1 income in QuickBooks Online.When you enter this income, you ensure everything aligns with your Schedule K-1, whether you are a partner in a business or managing multiple investments. Here are the steps you need to follow to record K-1 income in QuickBooks Online accurately.
Step 1: Create an Income Account
- In QuickBooks, go to Accounting > Chart of Accounts.
- Click the New button to add a new account.
- Choose Income as the account type.
- Enter a name like “K-1 Income”, fill in any additional details, then click Save and Close.
Step 2: Add K-1 Income to Your Records
- Go to the Bank Account and click on + New and select Bank Deposit.
- Choose the account where the K-1 income was deposited.
- Under Add funds to this deposit, select the K-1 Income account you created.
- Enter the income amount and any other relevant details.
- Click Save and Close to complete.
Step 3: Categorize the K-1 Income
- Examine the K-1 Form: Ensure you understand the types of income reported on your K-1 form, such as dividends and interest.
- Categorize Income Properly: Match each income type listed in QuickBooks Online with a matching income category. To ensure accurate tracking, assign K-1 income transactions to the appropriate categories.
Step 4: Track your Expenses
- Record business expenses to ensure that QuickBooks Online is updated with all expenses associated with your K-1 income.
- Keep Proper Documentation to maintain clear and organized financial records. Make sure each expense is accurately categorized and matched with the appropriate K-1 income.
Step 5: Validate the Recorded Entry
- Run a Profit and Loss report to verify the accuracy of your records
- Make sure the K-1 income account balance is correctly listed under the designated account.
So, these are the steps to record K-1 Income in QuickBooks Online. In case you’re having trouble while executing the above-mentioned steps, then it would be ideal to contact our certified QuickBooks experts at toll-free number +1-888-245-6075.
Mistakes to Watch Out for When Recording K-1 Income in QuickBooks
To ensure tax compliance and financial reporting, K-1 income must be recorded accurately in QuickBooks. The following are some common errors users should watch out for:
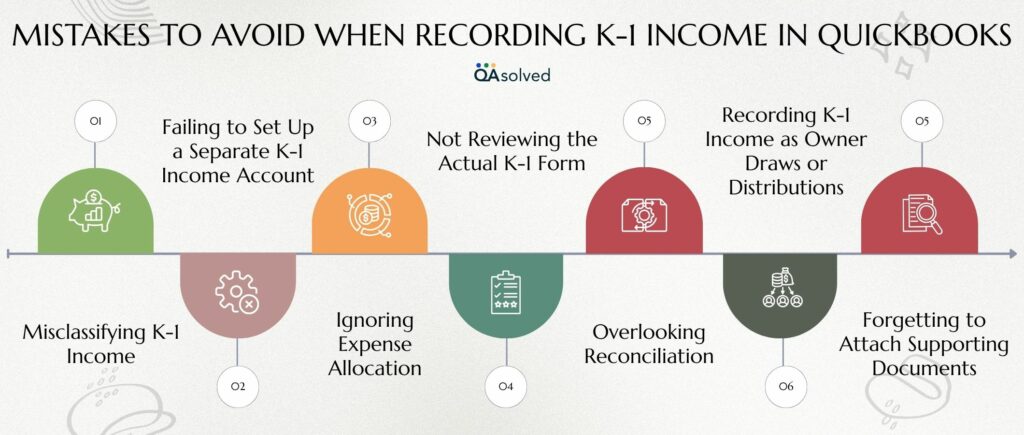
1. Misclassifying K-1 Income
In addition to interest and dividends, K-1 income may also include capital gains and rental income. QuickBooks can generate incorrect financial statements and tax returns if it is assigned to the wrong income category (e.g., regular sales income).
2. Failing to Set Up a Separate K-1 Income Account
Tracking and reporting K-1 income can be difficult without a dedicated account. Under the “Other Income” or “Income” category, always create a clearly labelled income account for K-1 income.
3. Ignoring Expense Allocation
It is important to record and categorize partnership expenses connected to K-1 income (such as travel and legal fees). Underreporting deductions can result from overlooking this.
4. Not Reviewing the Actual K-1 Form
Instead of using the actual Schedule K-1, some users enter estimated values. You should always wait until the finalized K-1 form is available before entering the correct figures.
5. Overlooking Reconciliation
If you fail to reconcile K-1 income entries with bank deposits or investment reports, you may experience discrepancies in your books. Verify entries monthly and reconcile monthly.
6. Recording K-1 Income as Owner Draws or Distributions
K-1 income is taxable income, not a direct cash payment. Your profit and loss statement may be distorted if you confuse it with distributions or equity draws.
7. Forgetting to Attach Supporting Documents
The absence of a copy of the Schedule K-1 or relevant memos in QuickBooks can cause confusion during audits or tax season. Backup documentation should always be attached or stored.
Maintaining accurate financial records and filing taxes smoothly can be achieved by carefully avoiding common errors and following best practices. Regardless of whether you are managing investments or partnership income, taking the time to properly record K-1 revenue in QuickBooks ensures compliance and supports sound financial decisions.
Conclusion
Recording K-1 income accurately in QuickBooks Desktop and QuickBooks Online is essential for maintaining clear financial records, ensuring IRS compliance, and supporting long-term business planning. Whether you’re managing an S corporation, partnership, or investment income, treating K-1 allocations with the care they require allows your financial statements to reflect true ownership earnings and responsibilities.
By setting up proper income accounts, categorizing income types correctly, tracking related expenses, and avoiding common mistakes, you can maintain clean books and simplify your tax preparation process. It not only helps you stay organized but also enables your accountant or tax preparer to work more efficiently with accurate, up-to-date data. QuickBooks doesn’t directly process K-1 forms, but with the right setup and attention to detail, you can easily track K-1 income within the platform.
So, whether you’re a business owner or a bookkeeper, taking the time to record K-1 income properly can make all the difference in staying compliant and financially informed.
Frequently Asked Questions
No, K-1 income and distributions are not the same. The K-1 form reports your share of the business’s profits, which must be included on your personal tax return. While distributions may be related to the income reported on the K-1, the form itself reflects your allocated share of the business’s earnings—not the actual cash or assets you’ve received.
Yes, K-1 trust distributions are considered taxable income. If you receive a Schedule K-1 from a trust or estate, the amounts reported must be included on your personal income tax return. Failing to report this income can lead to IRS penalties, which may be significant.
Distributions to shareholders of an S corporation are typically reported on Schedule K-1, Line 16 with code “D” for distributions. Dividend distributions are separately reported on Form 1099-DIV and may appear on Schedule K, Line 17c. If the distribution is a loan repayment, it will be listed on Schedule K, Line 16e, and also reflected on each shareholder’s Schedule K-1, Line 16, using code “E” as the reference.
Step 1: Create an Income Account for Investment Income
1. Access Settings> Chart of Accounts.
2. Hit New.
3. Choose Income as the account type.
4. Pick Other Income or Interest Income.
5. Name it (e.g., “Investment Income”), then click Save and Close.
Step 2: Record the Income
1. Go to + New > Bank Deposit.
2. Choose the account where the investment income was deposited.
3. Enter the payer in the Received From column (e.g., brokerage firm).
4. Choose the “Investment Income” account in the Account column.
5. If required, enter the amount, the date, and a memo.
6. Enter Save and Close.
Yes, even if there is no income or loss reported on the K-1, it must still be filed with the IRS and provided to the partner or shareholder. The entity is required to issue a K-1 regardless of profitability, and recipients should still include it with their tax return to maintain compliance and ensure proper documentation.
