
A few years ago, juggling business payments and bookkeeping felt like a full-time job that never seemed to end. Then came QuickBooks Checking, a built-in business account that completely transformed the way small business owners manage their finances. Setting it up through the QuickBooks dashboard takes only a few minutes, and once it’s ready, every transaction, bill payment, and deposit appears instantly in your books. Everything stays perfectly organized and synced without you having to lift a finger.
With a QuickBooks Business Checking account, you can now move your business funds effortlessly, make free ACH transfers, and even earn interest on your balance. You also get a handy debit card that simplifies daily expenses while keeping your financial records neat and accurate. It’s not just another banking tool; it’s a smarter, more efficient way to manage cash flow, save valuable time, and stay completely in control of your business finances every single day.
If you’re ready to get the most out of your QuickBooks Checking account, then you’re probably in the right place. In this blog, we’ll take you through the essential steps to connect your bank account to QuickBooks Checking, transfer funds, and pay bills effortlessly. By the end, you’ll know exactly how to manage your business finances smoothly, keep your books accurate, and save valuable time every single day.
So, let’s begin with it.
What Is QuickBooks Checking and How It Powers Financial Management for Businesses?
A QuickBooks Checking account, also known as a fee-free checking account, is an online business banking solution that is built directly into QuickBooks. It allows small business owners, freelancers, and entrepreneurs to manage their money and bookkeeping all in one place. With QB Checking, you can deposit funds, pay bills, send and receive payments, and transfer money between accounts, without ever leaving your QuickBooks dashboard. In short, QuickBooks Checking brings your business banking and accounting together under one roof, helping you save time, reduce manual work, and maintain accurate financial records effortlessly.
But there’s more power packed into it than you might think!
7 Key Features of a QuickBooks Checking Account
From seamless money movement to built-in savings options, each feature is built to help you stay organized, save time, and make the most of your business finances. Here are some of the most exciting features of a QB Checking account that captivates small businesses, CPAs, and other accounting professionals.
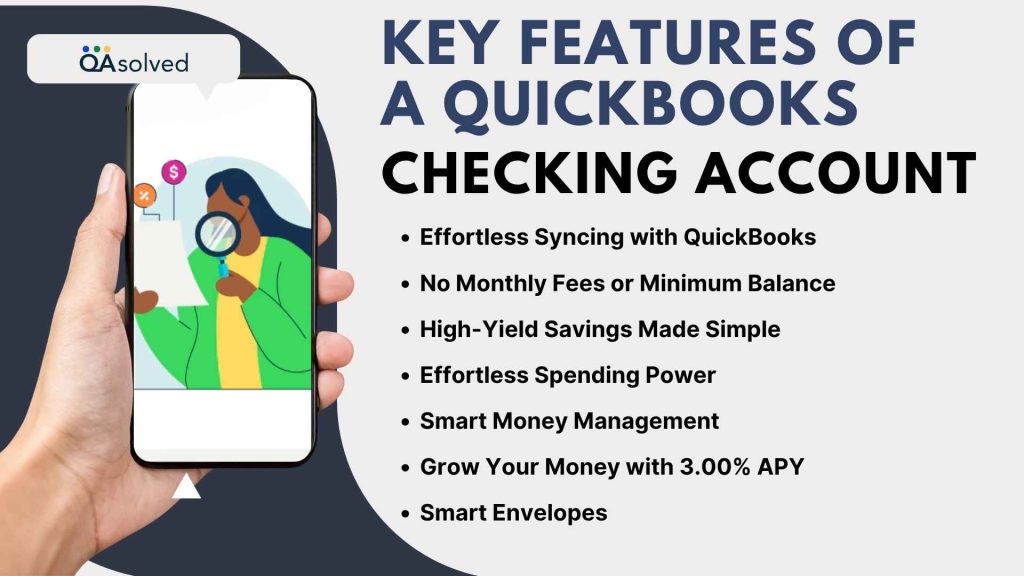
1. Effortless Syncing with QuickBooks
Every transaction, whether it’s a deposit, payment, or transfer, automatically syncs with your QuickBooks account. This ensures your financial records are always accurate, up to date, and ready for review without the hassle of manual reconciliation.
2. No Monthly Fees or Minimum Balance
With QuickBooks Checking, you can manage your money freely without worrying about maintenance charges or minimum balance limits. It is an ideal banking solution for freelancers, startups, and seasonal businesses looking for flexibility and affordability.
3. High-Yield Savings Made Simple
Put your money to work with QuickBooks Checking’s high-yield savings envelopes that earn up to 3.00% APY (Annual Percentage Yield). It is an effortless way to grow your funds while keeping your business cash neatly organized and easily accessible whenever needed.
4. Effortless Spending Power
Need Cash? Withdraw it easily from over 19,000 fee-free AllPoint ATMs. Now you can access your funds instantly with your QuickBooks Debit Card right after deposits. You can also make secure, hassle-free payments using Apple Pay or Google Pay, giving you convenience wherever you go.
5. Smart Money Management
Let QuickBooks handle the hard work by automatically transferring your sales tax into a separate envelope, so you’re always ready when tax season arrives. And if you’re using QuickBooks Payroll, it gets even better. QuickBooks can automatically set aside payroll funds and apply them when it’s time to pay your team.
6. Grow Your Money with 3.00% APY
Earn more on your savings with a 3.00% Annual Percentage Yield, over 40 times the U.S. average. Whether you are building an emergency fund or setting aside extra cash, your money keeps growing safely while you focus on your business.
7. Smart Envelopes
Stay organized by creating up to 9 envelopes within your main QuickBooks Checking account. Easily separate funds for taxes, payroll, savings, or upcoming expenses, so every dollar has a purpose, and your finances stay effortlessly structured.
These are just a few of the features that make a QuickBooks Checking account a smart and convenient option for modern businesses. Now, let’s get into the exciting part as we explore how you can connect, use, and manage your QuickBooks Checking Account with ease.
Note: With QuickBooks Checking, you won’t be charged the 1.75% fee for instant deposits, though standard transaction fees may still apply.
A Complete Walkthrough to Using QuickBooks Checking Account
Getting started with your QuickBooks Checking account is easier than you might think. In fact, you can learn more about QuickBooks Checking bank accounts if you’re using QuickBooks Payments. In this section, we’ll guide you through everything you need to know to start using your QuickBooks Checking account with ease.
From setting it up and connecting your bank to managing transfers, payments, and deposits, this walkthrough will help you make the most of every feature. Let’s take a look.
A. Get Yourself a QuickBooks Checking Account
To begin using your QuickBooks Checking Business account, first sign up for QuickBooks Payments. Once your application is approved, a QuickBooks Checking account will be automatically created for you. You’ll also receive your physical QuickBooks debit card by mail within 7–10 business days, giving you quick access to your funds for everyday business transactions.
B. Sync Your Bank Account to QuickBooks Checking
Once your QuickBooks Checking account is set up, the next step is to connect it with your existing bank account.
- Log in to QuickBooks Online.
- From the Dashboard, go to QuickBooks Checking under Lending & Banking.
- Select Transfer, then click Transfer Money.
- Choose Add a Bank to begin linking your external account.
- Enter your bank name, select the account type (checking or savings), and provide your account number and routing number.
- When everything looks correct, click Next to proceed.
Note: QuickBooks will send two small test deposits to your linked account within three business days. - Once you see these deposits, return to QuickBooks.
- Now, go to the Lending & Banking section and click on QuickBooks Checking to select Verify Bank.
Note: Some banks don’t require verification. In that case, you can simply select Add to connect your bank instantly. - Enter the two deposit amounts (order doesn’t matter), then select Confirm to complete the verification.
Note: If your QuickBooks Checking account doesn’t appear under the Banking section, select Link Account to connect it manually.
Once your bank account is successfully linked to your QuickBooks Checking account, you can seamlessly transfer funds, make withdrawals, and pay bills. Here’s how you can do it.
C. Add and Withdraw Money from Your QuickBooks Checking Account
Easily move funds in or out of your QuickBooks Checking account to manage your cash flow. You can transfer money, make deposits, or withdraw funds whenever needed. Here’s how you can:
1. Steps to Transfer Money from Your QuickBooks Checking Account
Follow these quick steps to move funds from your QuickBooks Checking account to another connected bank account.
- First, open your QuickBooks Online.
- Then, navigate to QuickBooks Checking from your Dashboard.
- Select Transfer, then click Transfer Money.
- Enter the amount you’d like to move.
- From the ‘From’ dropdown, choose your QuickBooks Checking account.
- In the ‘To’ dropdown, select your connected bank account.
- Click Next to review the transfer details.
- Once confirmed, click on Finish Transfer.
2. Send Money into Your QuickBooks Checking Account
Follow the steps given below to sign in to QuickBooks Online.
- Sign in to QuickBooks Online.
- From the Dashboard, go to QuickBooks Checking.
- Select Transfer, then click Transfer Money.
- Enter the amount you want to move into your QuickBooks Checking account.
- Then, in the ‘From’ dropdown, choose your connected bank account.
- From the ‘To’ dropdown menu, choose your QuickBooks Checking account as the destination for the transfer.
- Click Next to review the details.
- When everything looks correct, select Finish Transfer to complete the process.
So, move your business funds effortlessly and take a step toward making smarter, long-term financial decisions. But there’s a limit to how much you can transfer via QuickBooks Checking account. Continue reading if you want to know the same.
3. Transfer Limits for Your QuickBooks Checking Account
When moving funds to or from your QuickBooks Checking account, there are specific limits based on the type of transfer and platform used. Understanding these limits helps you plan your business transactions efficiently and avoid payment delays.
a. ACH Transfers Initiated from External Banks
If you initiate an ACH transfer from your external bank, here’s what you need to know:
- Inbound to QuickBooks Checking: Up to $500,000 per day
- Outbound from QuickBooks Checking: Up to $100,000 per transaction
b. Transfers via QuickBooks Online or Mobile App (ACH)
When transferring money directly through QuickBooks Online or the QuickBooks Mobile app:
- Inbound Transfers: Up to $20,000 per day and $40,000 per week
- Outbound Transfers: Up to $50,000 per day, with a minimum of $1 per transaction
c. Instant Transfers (If Eligible)
Instant transfers are perfect when you need quick access to funds. However, they come with their own set of limits:
- Up to $5,000 per day
- Maximum of $10,000 or 5 transfers within 7 days
- Maximum $5,000 per transaction
d. Money Transfers Using QuickBooks Money
For businesses using QuickBooks Money to manage transactions:
- Inbound Transfers: Up to $2,000 per day and $5,000 within 7 days
- Outbound Transfers: Up to $50,000 per day, with a minimum of $1 per transaction
D. Pay Vendors and Expenses Effortlessly through QuickBooks Checking
A QuickBooks Checking account also helps you manage payments on time and maintain accurate financial records without switching between tools. You can now pay vendors, suppliers, and recurring expenses directly from your account, all within QuickBooks. Here’s how.
- Open QuickBooks and go to the Expenses or Vendors menu.
- Select the vendor you want to pay or click Create Bill Payment.
- Choose your QuickBooks Business Checking account as the payment source.
- Enter the payment amount, date, and any necessary details.
- Choose your payment method: either Paper Check or ACH transfer.
- Follow the prompts to schedule and confirm your payment.
So, these are the six easy steps that can help you pay your vendors and clear your expenses via Checking account in QuickBooks.
E. Monitor Your QuickBooks Checking Account Transactions
Keep track of your QuickBooks Checking account activity to stay updated on all deposits, withdrawals, and transfer transactions easily. Follow these steps:
- Sign in to your QuickBooks account.
- Go to Lending & Banking, then select QuickBooks Checking.
- In the Recent Activity section, choose View All to see the complete list of transactions.
- Use filters like All, Money In, or Money Out to narrow down your view.
- To see detailed information, simply select any specific transaction from the list.
F. Check Monthly Statements in Your QuickBooks Checking
Checking your monthly statements allows you to track your income, expenses, and overall cash flow for better financial management. Here are the steps to take a look at your statements in QuickBooks Checking account.
- Sign in to your QuickBooks Online account.
- Navigate to the Lending & Banking section and click on QuickBooks Checking.
- From these, choose View Account to open your checking details.
- Click Manage to access additional options.
- Finally, select Monthly Statements to review your account activity and download statements if needed.
And for Accountants: - First, navigate to the Accounting menu and click Reconcile.
- From the account list, choose QuickBooks Checking and click View statements.
- Pick the statement period you want and select Download to save it to your device.
How to Get Assistance for Your QuickBooks Debit Card Queries?
At times, users face issues or have questions related to their QuickBooks debit card, such as lost cards, transaction disputes, or activation problems. In such cases, you can easily reach out to QuickBooks support or follow these steps:
- Open QuickBooks and navigate to the QuickBooks Checking section.
- Select View account to access your account details.
- Choose Manage to view card management options.
- Now, click on Replace card if your debit card is lost, stolen, or damaged.
- Finally, choose Reset PIN if you need to change or recover your card PIN to get assistance with your debit card.
Tip: For any disputes or assistance, you can find the customer support number on the back of your QuickBooks Debit Card.
With the end of this section, you now have a clear understanding of how to start using your QB Checking account effectively. But wait, have you heard about QuickBooks Checking account not updating error 9999? If not, then we’re here to prepare you in advance and walk you through the steps that can help you fix it if it ever shows up.
How to Fix QuickBooks Checking Account Not Updating Error 9999?
As we said, QuickBooks Error 9999 usually occurs when your Checking account fails to update or connect properly. Here’s how you can apply simple troubleshooting steps to fix it.
- Sign in to your QuickBooks Online account.
- From your dashboard, navigate to the Banking tab.
- Find the bank account displaying Error 9999.
- Click on Update to refresh your bank feed connection.
- Clear your browser cache and remove any Intuit-related cookies, then try updating the account again.
If the problem continues, disconnect and reconnect your bank account. In some cases, the error may automatically fix itself within 24–48 hours after performing these steps.
Conclusion
In a nutshell, managing your business finances becomes much smoother with a QuickBooks Checking account. From transferring funds and paying bills to keeping track of transactions, QuickBooks Checking simplifies every financial task. It gives you real-time access to your money, helping you make faster and smarter financial decisions. With features like instant transfers, free incoming wires, and seamless syncing with QuickBooks Online, it ensures your cash flow stays consistent and transparent.
Whether you’re a small business owner or managing multiple accounts, QuickBooks Checking provides the convenience and reliability you need to handle your finances efficiently. QuickBooks Checking isn’t just a bank account; it’s a powerful tool that helps you streamline financial management, improve organization, and focus more on growing your business with confidence.
Frequently Asked Questions
Yes, your accountants and other authorized team members can view the account if they have the required access credentials. However, their access is limited to read-only mode. Only the primary admin has full control to use and manage the QuickBooks Checking account.
It’s possible to get approved for QuickBooks Payments but not for QuickBooks Checking. Since QuickBooks Checking is a business bank account, you need to verify your business details and identity to ensure they meet our Acceptable Use Policy. If your application isn’t approved, review your information carefully and try applying again.
Yes, your QuickBooks Checking account is FDIC-insured for up to $5 million. This means your deposits are protected by the Federal Deposit Insurance Corporation up to that limit.
The process is mostly the same, but you’ll need to answer a few additional questions. To comply with regulations, QuickBooks must collect details about beneficial owners. This includes anyone who owns 25% or more of the business or has significant control (excluding sole proprietorships).
You can provide this information during the sign-up process or later from the QuickBooks Checking menu. Just make sure to complete it within 30 days, or your account may be closed.
QuickBooks Checking doesn’t charge monthly fees or minimum balance fees. However, standard fees may apply for certain transactions, like instant transfers.
As for transfer times:
1. From an external bank to QuickBooks Checking: Usually takes up to 3 business days.
2. From QuickBooks Checking to an external bank: Typically takes 3–5 business days.
3. Instant transfer (if eligible): Funds are transferred within 30 minutes.
Yes, QuickBooks Checking allows you to receive domestic wire transfers without any fees. You can accept up to $1,000,000 per wire transaction. However, international wire transfers, whether incoming or outgoing, are not currently supported.
To receive a wire transfer in your QuickBooks Checking account, you’ll need to share specific details with the sender. Provide your account holder name (either individual or business), routing number, account number, and the bank’s name and address.
These details ensure the funds are correctly directed to your QuickBooks Checking account without delays.
You can easily find your Routing Number by following these four easy steps.
1. Login to your QuickBooks Online account.
2. Navigate to the Landing & Banking section.
3. Now, click on QuickBooks Checking.
4. Finally, select Manage and there you will find your Routing Number.
No, QuickBooks Checking doesn’t offer overdraft protection. If you try to spend or withdraw more funds than available in your account, the transaction will be declined automatically.
To close your QuickBooks Checking account, follow these steps:
1. Sign in to your QuickBooks Online account.
2. From the left-hand menu, go to Lending & Banking.
3. Select QuickBooks Checking from the list of accounts.
4. Click Manage to open your account settings.
5. Choose Close Account or Request Account closure.
6. Make sure your account balance is $0 and all transactions are cleared.
7. Confirm your request to close the account.
If you encounter any issues, you can contact QuickBooks Support for help with completing the closure process.
