
If you’re tired of switching between multiple platforms just to handle your shipping tasks, you’re not alone. For businesses that regularly ship products to customers, managing order details, tracking packages, and creating labels can become a time-consuming headache. That’s where QuickBooks Shipping Manager comes in.
The shipping manager in QuickBooks Desktop is designed to streamline your entire shipping workflow by integrating directly with popular carriers like UPS, FedEx, and USPS. From printing labels and calculating shipping rates in real time to scheduling pickups and updating tracking info, everything can be handled within QuickBooks itself.
Whether you manage a small operation or handle high-volume orders, this built-in tool helps you save time, cut down on manual errors, and boost customer satisfaction. In this blog, we’ll walk you through how to set up and use the shipping manager in QuickBooks Desktop, so you can simplify fulfillment and start shipping smarter.
Steps to Set up and Use New Shipping Manager in QuickBooks Desktop
With the latest version of QuickBooks shipping manager, handling your shipping tasks has never been easier. Thanks to improved integration, expanded carrier support, and a more user-friendly setup, you can now manage your entire shipping workflow directly within QuickBooks Desktop.
Here are the steps to set up shipping manager in QuickBooks Desktop:
Step 1: Set Up Shipping Manager
QuickBooks Desktop provides several ways to access the shipping manager:
- File: Choose File > Shipping Manager.
- Invoice: Select Shipping Manager from any invoice.
- Sale Receipt: Choose Shipping Manager from any sales receipt.
- Sales Order Fulfillment Worksheet:
- Click on the Customers tab and select the Sales Order Fulfillment Worksheet.
- Select Shipping Manager under Action on any sales order.
Note: Click Get Started to begin the setup process.
Here are the set up steps:
- Access the company file using your Intuit account credentials as Master Admin (MMA).
- Review and accept the ShipEngine Terms of Service.
- Enter your “Ship From” address.
- Identify your credit card.
- To complete the setup, click Confirm.
Using the Intuit-ShipEngine partnership, a new USPS account will be created, giving you access to exclusive discounted shipping rates.
Step 2: Add Funds to Your Shipping Wallet
USPS shipping labels can only be purchased if you have sufficient funds in your shipping wallet. The QuickBooks Admin is the only person who can add funds. Here’s how to add funds:
- Go to File > Shipping Manager.
- Click on Add Funds.
- To add money, enter the amount and click Add Now.
Enable Auto-Funding (Optional):
Ensure your wallet never runs out of funds by setting up auto-funding:
- When balance falls below: Set a minimum balance for auto-refills.
- Add the following amount: You need to specify the amount each time.
- Maximum times per day: Limit the number of times your wallet can auto-refill each day.
- To activate auto-funding, click Save Rules.
Note: ShipEngine manages the shipping wallet, which is exclusively used for USPS shipments.
Step 3: Integrate External Carriers
FedEx and UPS accounts can be integrated with QuickBooks Desktop shipping manager to streamline your shipping operations. External carrier accounts can only be added by QuickBooks Admins.
A. Add Carrier Accounts
- Go to File > Shipping Manager.
- Click Manage Carriers, then click Additional Carrier.
B. Add a FedEx Account
- Choose FedEx from the list of Connect Carriers.
Note: You’ll be prompted to review FedEx’s Terms and Conditions. Take the time to read them carefully. - Enter the details of your FedEx account after clicking Continue.
- Connect with FedEx to link your QuickBooks account.
C. Add a UPS Account
- Select UPS from the Connect Carriers menu.
- Identify your UPS account by entering your username and password.
- Once the integration has been completed, click Authenticate Account.
Step 4:. Create and Purchase a Shipping Label
QuickBooks Desktop offers two methods for creating shipping labels: Separate and Direct. Here are the steps to execute both methods:
A. Separate Method
- Choose File > Shipping Manager.
- Click on Purchase Shipping Label.
B. Direct Method (Linked to Transactions)
Shipping labels can be generated directly from the following transaction types:
a. Invoice
- Select Shipping Manager from an invoice.
- Choose Purchase Shipping Label.
b. Sales Receipt
- Click Shipping Manager on the sales receipt.
- Choose Purchase Shipping Label.
c. Sales Order
- Fill out the Sales Order Fulfillment Worksheet.
- Choose the sales order you wish to ship.
- Click Ship with Shipping Manager, then select Purchase Shipping Label from the Action column.
d. Enter Shipping Details
- Input the package weight and dimensions.
- Calculate Rates to view shipping options from your connected carriers.
- Choose your preferred carrier and service level.
- Click Purchase Now to generate the label.
- Shipping Wallet will be debited if you use USPS.
- Charges for FedEx and UPS will be charged to your carrier account.
e. Finalize and Send
- To print the label, click Print.
- Send your customer’s shipping details via email.
Note: The shipping details and tracking number can also be pasted into the associated invoice, sales receipt, or sales order. The shipping window will automatically close once pasted.
Step 5: View Shipping History
Access your full shipment history by following these steps:
- Select Shipping Manager from File.
Note: Past shipments are listed with creation dates, transaction references, tracking IDs, and carrier services. - Select the three-dot ፧ icon for more details, void shipments, or print labels.
Step 6: Void Purchased Labels
QuickBooks Desktop Shipping Manager allows you to void a purchased shipping label that hasn’t been scanned and is within the carrier’s void period. Follow the steps:
- Choose File, then Shipping Manager.
- Choose the shipment you wish to void.
- Select the three-dot ፧ icon in the shipment, then select Void Label.
- Select Confirm void after reviewing the voiding terms.
- Hit Done.
Note: USPS refunds go to your wallet, others go to your payment method. You should check each carrier’s policy regarding processing times.
Step 7: Add Multiple Shipping Locations
Multiple warehouse addresses can be managed and stored within the Shipping Manager settings if your business ships from more than one location.
To Add and Manage Ship-From Addresses:
- Go to File & select Shipping Manager.
- Now, click on Settings and then select Ship From Locations.
- Then click Add New Address and enter all the details for each warehouse or shipping location.
Note: When purchasing labels, you can choose your saved addresses or set a default Ship From address.
Step 8: Print Labels
Printing a shipping label from your shipping history is easy if you need to do it later.
- Choose File & Shipping Manager.
- Print the label for the shipment you want.
- Click the three-dot menu (፧) next to the shipment, then select Print Label.
Step 9: Set Up Label Layout and Package Unit
Customize the print layout and adjust the weights and packages’ units of measurement on your shipping labels.
- Select Shipping Manager from File.
- Click on Settings.
- To change the default layout of a print job:
- Choose Your Shipping Label Format
- Pick the Label Style That Best Fits Your Needs
- To change the default package and dimension units, choose the unit of measurement.
- To change the default layout of a print job:
Now that you know how to simplify and optimize your shipping process directly within QuickBooks Desktop, you’re ready to get started.
7 Benefits of Setting Up and Using Shipping Manager in QuickBooks Desktop
Shipping can be a time-consuming and complex part of your business, especially if you manage orders manually or use multiple platforms. Setting up and using the Shipping Manager in QuickBooks Desktop simplifies the entire process. Using this software, you can generate labels, track deliveries, and more all within your accounting system. Here are the benefits of setting up and using QuickBooks shipping manager:
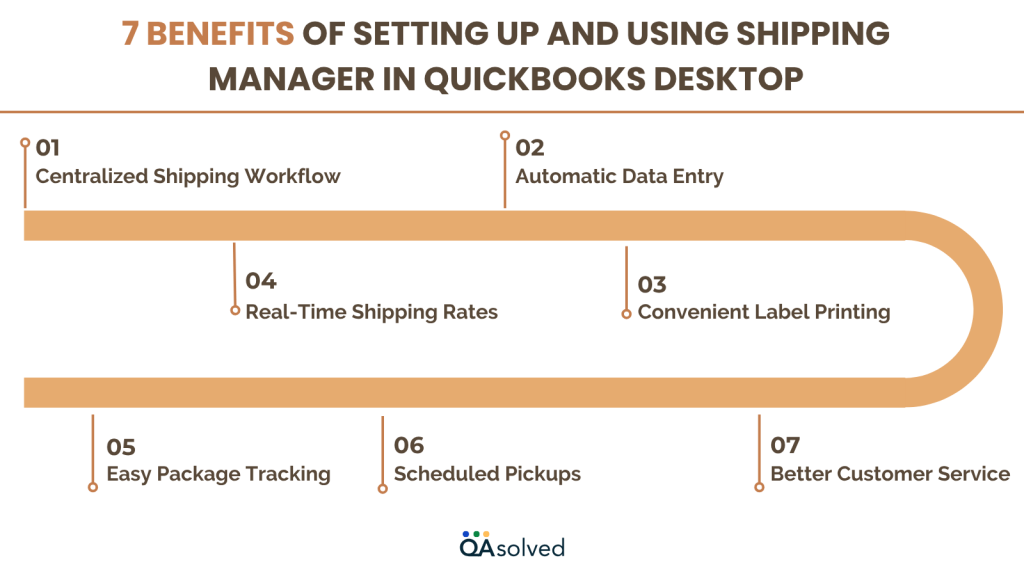
1. Centralized Shipping Workflow
You no longer have to switch between systems. With Shipping Manager, you can handle shipping directly within QuickBooks, keeping your order management and financial records in sync.
2. Automatic Data Entry
Shipment details, including addresses and item information, are pulled directly from your sales forms, reducing the risk of error.
3. Real-Time Shipping Rates
The latest shipping rates from major carriers like UPS, FedEx, and USPS can be found right inside QuickBooks, helping you choose the most cost-effective option for every order.
4. Convenient Label Printing
Make and print professional shipping labels quickly and easily without having to sign in to external carrier websites.
5. Easy Package Tracking
Tracking numbers are automatically updated in your invoices and sales receipts, making it easy for you and your customers to keep track of shipments.
6. Scheduled Pickups
QuickBooks allows you to schedule carrier pickups directly from the program, saving you time and reducing trips to the post office.
7. Better Customer Service
Customers are happier when shipping is faster and more accurate. Keeping everything in one place also makes it easier to respond quickly to order and delivery inquiries.
By using Intuit shipping manager in QB Desktop, you can improve your day-to-day operations and customer satisfaction by becoming more efficient, accurate, and stress-free. In case your QuickBooks shipping manager is not working, then it would be ideal to contact QuickBooks Desktop Customer Support.
Conclusion
In a nutshell, by setting up and using the Shipping Manager in QuickBooks Desktop, you can streamline your order fulfillment process and manage shipments more efficiently. As you configure carrier accounts, enter warehouse locations, purchase labels, and print them, you eliminate manual work and reduce shipping errors. Integrating major carriers like USPS, FedEx, and UPS, the shipping manager further allows you to compare rates, choose the best service option, and track shipments without ever leaving QuickBooks.
So, start using QuickBooks shipping manager today and take the hassle out of your shipping process.
Frequently Asked Questions
If QuickBooks Shipping Manager fails to open or respond, it could be due to outdated software, a corrupted installation, internet connectivity issues, or firewalls or antivirus programs. Update QuickBooks Desktop, restart your computer, and run QuickBooks as an administrator to fix the problem. Ensure that your internet connection is stable and that your security settings aren’t blocking the app.
The QuickBooks Online Shipping Manager does not exist natively, but you can integrate shipping apps that sync with the data in QuickBooks Online. You can use these apps to generate shipping labels, calculate rates, and print labels for USPS, UPS, and FedEx.
1. Enable Class Tracking
– Go to Edit > Preferences.
– Go to Accounting> Company Preferences.
– Click OK to use class tracking.
2. Add Classes
– Select Lists > Class List.
– Then select Class > New and name the class.
3. Use Classes in Transactions
– Enter invoices, bills, or checks according to a class.
4. View Class Reports
– Click Reports > Profit & Loss by Class to view class-based data.
Yes, you can import data into QuickBooks Desktop. Excel or CSV files can be used to import lists like customers, vendors, items, and transactions. Under the File menu, use the Import Wizard to map your data correctly and ensure a smooth import process.
You can organize your QuickBooks financial data by different segments such as departments, locations, or projects using class tracking. Detailed reporting and better insight into profitability make it easier to track income and expenses across various parts of your business for informed decisions.
