The world of business accounting and bookkeeping transformed with the emergence of tools like Quicken and QuickBooks. As small and medium sized businesses struggled to systematically record their day-to-day transactions, Intuit stepped in as a game-changer, empowering businesses to manage their accounting and bookkeeping processes with ease. However, as with any technology, QuickBooks isn’t without its challenges. Users may encounter various issues that can disrupt their workflow. One common issue is QuickBooks Error 350, which typically occurs when there’s a problem connecting to bank feeds.
The QuickBooks 350 Error affects your workflow when there is a problem with the connection between QuickBooks and your bank, usually due to expired credentials or bank updates. It can hinder the automatic update of transactions, causing inconvenience and delays in tracking finances. Understanding how to identify and resolve such errors is essential for maintaining a seamless accounting experience. In this blog, we are going to highlight the common causes that provoke Error Code 350 in QuickBooks along with the steps and solutions that can fix this error in both Online and Desktop versions. So, let’s begin with this.
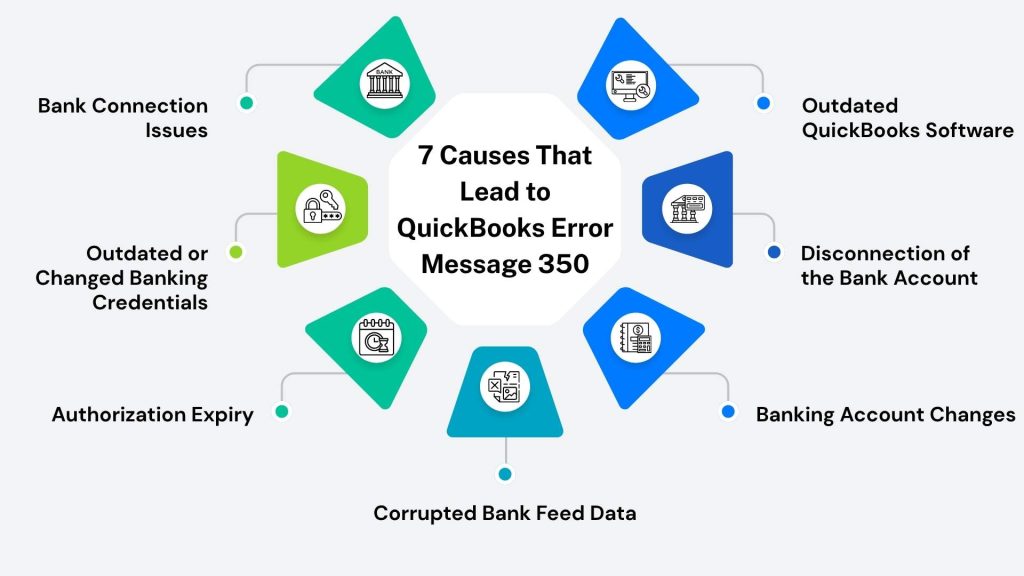
7 Causes That Lead to QuickBooks Error Message 350
A QuickBooks Error Message 350 can disrupt the connection between your bank and QuickBooks Online, leaving transactions in limbo. An expired bank login credential, connection issues on the bank’s end, or outdated QuickBooks settings may cause this error. Inactive bank accounts in QuickBooks, incorrect account linking, and temporary server downtime can also cause this problem. Here is a breakdown of each cause that leads to QuickBooks Error Message 350 and how they can be resolved.

- Bank Connection Issues: Temporary glitches or downtime at your bank can cause QuickBooks to encounter Error 350.
- Outdated or Changed Banking Credentials: When you update your bank login credentials without updating them, QuickBooks may fail to sync.
- Authorization Expiry: Some banks require users to reauthorize their QuickBooks connections after a certain period. Expired authorizations may result in error code 350.
- Corrupted Bank Feed Data: Incomplete or corrupt bank feed data can interfere with syncing.
- Banking Account Changes: QuickBooks may fail to connect if it still tries to connect to outdated data after changing account numbers or closing old accounts.
- Disconnection of the Bank Account: If the bank account is disconnected or no longer linked with QuickBooks, transactions may not be fetched.
- Outdated QuickBooks Software: An outdated version of QuickBooks may cause problems with your bank’s data transmission.
So, these are some common causes that lead users to encounter QuickBooks Error Code 350. By fixing this error promptly, users can achieve accounting and bookkeeping excellence. But do you know what the possible signs of Error Code 350 in QuickBooks Desktop are? Let’s begin with it.
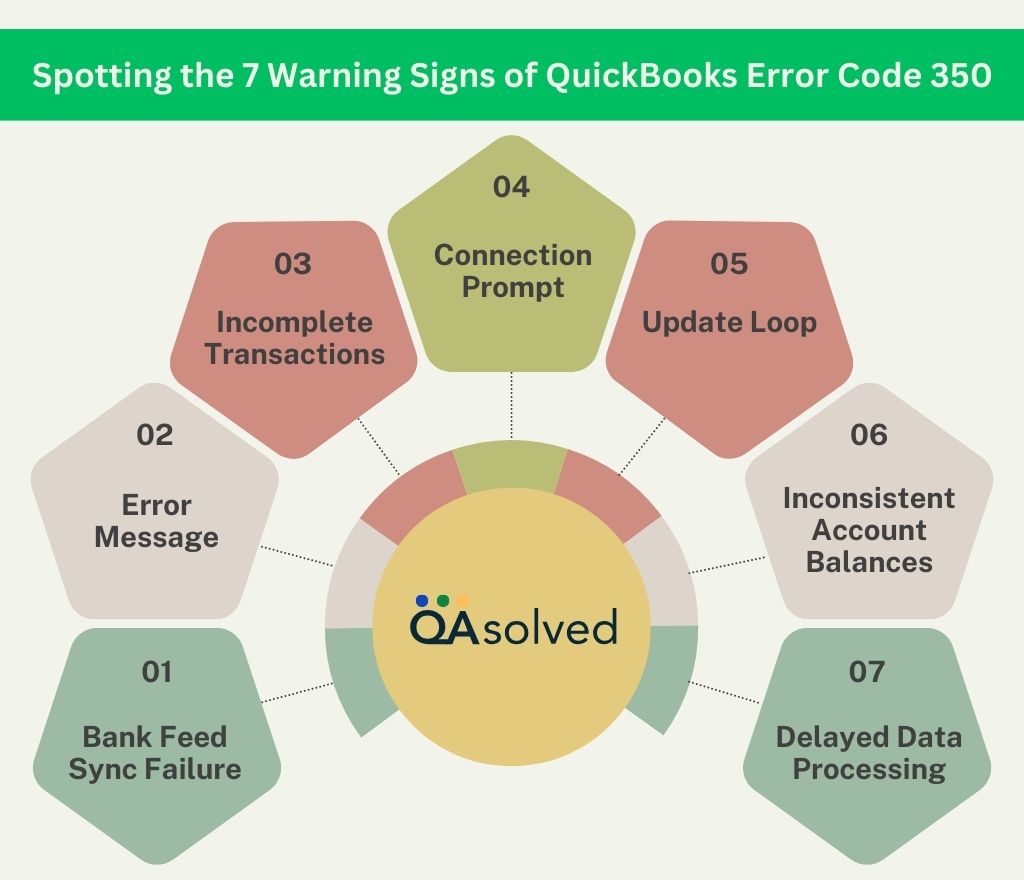
7 Signs of QuickBooks Error Code 350
The warning signs of QuickBooks Error Code 350 can help you prevent workflow disruptions. Failed bank connections, missing transactions, repeated login prompts, and syncing delays are common indicators. There are also other symptoms that may point to this issue, such as error pop-ups and outdated account information. Identifying these signs early facilitates faster troubleshooting and ensures uninterrupted financial data access.

So, these are the seven red flags that lead to QuickBooks Error Code 350. If you can address these issues promptly, you can prevent disruptions in your accounting workflow and maintain seamless connectivity with your financial data. Let’s now head towards the most exciting and valuable part of this blog and help you get rid of the Error Code 350 in QuickBooks.
2 Solutions to Fix Error 350 in QuickBooks Online
The following are two effective solutions for resolving Error 350 in QuickBooks Online, ensuring smooth and secure bank connections. By connecting your bank and credit card accounts, QuickBooks automatically downloads your recent transactions, keeping your records up-to-date.
Note: Some banks require reconnection every 90 days, while others may only require it every 18 months, depending on their security protocols. By taking these steps, future connection errors can be prevented and QuickBooks data syncing can be maintained seamlessly.
Reconnect Your Bank or Credit Card Account
- Access Transactions and select Bank Transactions.
- Use your bank account or credit card.
- Pick the Edit sign-in info from the Edit icon.
- Verify your login information on your bank’s website. Re-enter your bank information if necessary.
- Enter Save and connect.
- Note: Successful reconnection will show “Connection Complete and transactions updated!”
- Hit Close.
Consider using an incognito or private browser if the problem persists, or explore other browser troubleshooting options.
Connect Your Bank or Credit Card Account in QuickBooks Solopreneur
- Log in to QuickBooks Online.
- Select Transactions from the menu.
- Click the Link account ▼ dropdown and choose Manage Connections.
- Select Edit sign-in info from More options for the bank account you want to reconnect.
- Verify your user ID and password and re-enter them if necessary.
- Then click Save and Connect.
- Note: You will receive a message stating “Connection complete and transactions updated!” after successfully reconnecting.
- Then click on Close.
We’ve covered steps to fix Error 350 in QuickBooks Online. As we move forward, let’s look at how to resolve this issue in QuickBooks Desktop.
5 Solutions to Fix Error 350 in QuickBooks Desktop
Error 350 shows the message: “Verify ToC: Verify has failed due to an error under Transfer of Credits related to transactions.” Transactions usually involve an invoice, a general journal entry, and a payment. When the transactions are not linked correctly, this issue occurs. To fix it, follow these steps:
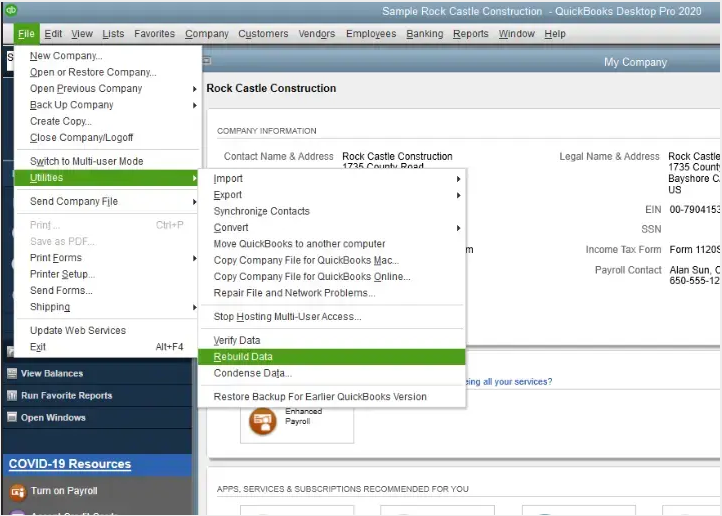
1. Verify and rebuild your Company File

- Verify and rebuild data in QuickBooks Desktop for PC.
- Verify and rebuild data in QuickBooks Desktop for Mac.
2. Delete and re-create transactions
- Go to Edit, then select Find.
- Choose Invoice from the dropdown menu under the Simple tab.
- In the Invoice No. field, enter the invoice number from the error message or log file. From the search results, select the Invoice.
- Note: In the absence of an invoice number, use the GJE or receipt number. Then repeat steps 2-3, but replace the Invoice with a Sales Receipt or Journal. Select the relevant transaction from the Edit menu.
- Click Create a Copy on the invoice.
- Note: Verify the invoice date matches the original.
- Enter Save & Close. Return to the Customer Payment page.
- Select Transaction History under Edit.
- Next, click Delete on the original invoice.
- Select Transaction History from Edit, then select the payment.
- Tick the box next to the new invoice transaction line. Make sure all related transactions are linked properly.
- Note: Recreate the payment if you can’t find the new invoice in the payment details. Replace invoice with payment, repeating steps 4-7. The invoice details will be included in this new payment. To link an invoice line, mark it. For GJEs, repeat the process.
- Finally, Verify and Rebuild your data.
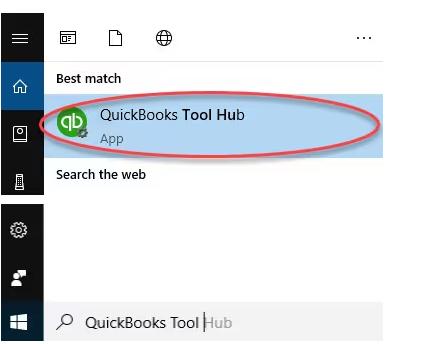
3. Use the Tool Hub

For QuickBooks Desktop for Windows, download and install QuickBooks Tool Hub.
4. Run Quick Fix
- Select Company File Issues from the Tool Hub.
- Choose Quick Fix My File.
- Once the process is complete, click OK.
5. Run QuickBooks File Doctor
- Access Company File Issues in the Tool Hub.
- Select Run QuickBooks File Doctor from the menu.
- Choose your company file from the dropdown list or click Browse.
- Hit Continue, then select Check your file.
- When prompted, login and click Continue.
So, these are the possible causes that lead to QuickBooks Error Code 350. It doesn’t matter if you’re aware of the causes unless you’re fully aware of the signs and potential solutions to fix this. With the steps outlined above, you will be able to resolve QuickBooks Error Code 350 in both QuickBooks Online and Desktop. With these, you will get back to managing your finances smoothly and restore your bank connection.
Conclusion
In conclusion, QuickBooks Error Code 350 can disrupt your financial management by interfering with your bank feeds and transaction updates. However, by understanding the causes and following the outlined steps, you can effectively resolve this error in both QuickBooks Online and Desktop versions. Staying proactive with regular updates and troubleshooting practices can help you avoid similar issues in the future, ensuring that QuickBooks continues to support your business’s accounting needs smoothly.
If the error persists, don’t hesitate to reach out to a QuickBooks support expert for tailored assistance to get back on track quickly and efficiently.
Frequently Asked Questions
It typically indicates a problem with connecting to your bank or credit card account for online banking transactions.
1. First, verify that your bank’s website is accessible without any issues.
2. Update QuickBooks to the latest version.
3. Disable and re-enable online banking for affected accounts.
4. Verify the account information, including login credentials.
5. If the issue persists, contact your bank for assistance or wait for their servers to become operational.
QuickBooks Error Code 350 is not as common as some other errors, but it can occur due to various reasons, including server issues on the bank’s side or QuickBooks software problems.
While you can’t always prevent this error, keeping your QuickBooks software updated and regularly reconciling your accounts can help minimize such issues.
If you’ve tried the basic troubleshooting steps and continue to encounter Error Code 350, it’s advisable to contact QuickBooks support or your bank’s customer service for further assistance.
Remember that error codes in QuickBooks can sometimes be caused by factors beyond your control, such as bank server issues, so patience may be required when resolving them.


