Table of Contents
Toggle- Steps to Move QuickBooks Desktop File to QuickBooks Online
- Different Words in QuickBooks Desktop and QuickBooks Online
- Features That Transfer and Those That Don’t Transition to QuickBooks Online
- Migrate Files to QuickBooks Online with the Accountant Batch Migration Tool
- Benefits of Converting QuickBooks Desktop to QuickBooks Online
- Conclusion
- Frequently Asked Questions
If you’re thinking about moving your company file from QuickBooks Desktop to QuickBooks Online, we’re here to help! Migrating your files to QuickBooks Online needs careful attention to maintain accuracy. Making the move can seem daunting at first but it’s an important step that can streamline your accounting processes and offer insights into your business’s finances. Making this shift comes with a multitude of advantages, including improved accessibility, real-time collaboration, automatic backups, software updates, and seamless integration with third-party apps and services.
This article will thoroughly explore the step-by-step transition from QuickBooks Desktop to Online, elucidating the benefits of doing so, and discussing the features that move and don’t move over to QuickBooks Online. Additionally, you will learn how to migrate files to QuickBooks Online with the Accountant Batch Migration Tool.
Steps to Move QuickBooks Desktop File to QuickBooks Online
Below are the steps to migrate your QuickBooks Desktop File to QuickBooks Online:
Step 1: Get your Desktop File ready
Note: You have 60 days from when you set up your QuickBooks Online account to move your data. If you’re unsure about your company’s age, sign in to QuickBooks Online and refresh the page for personalized information.
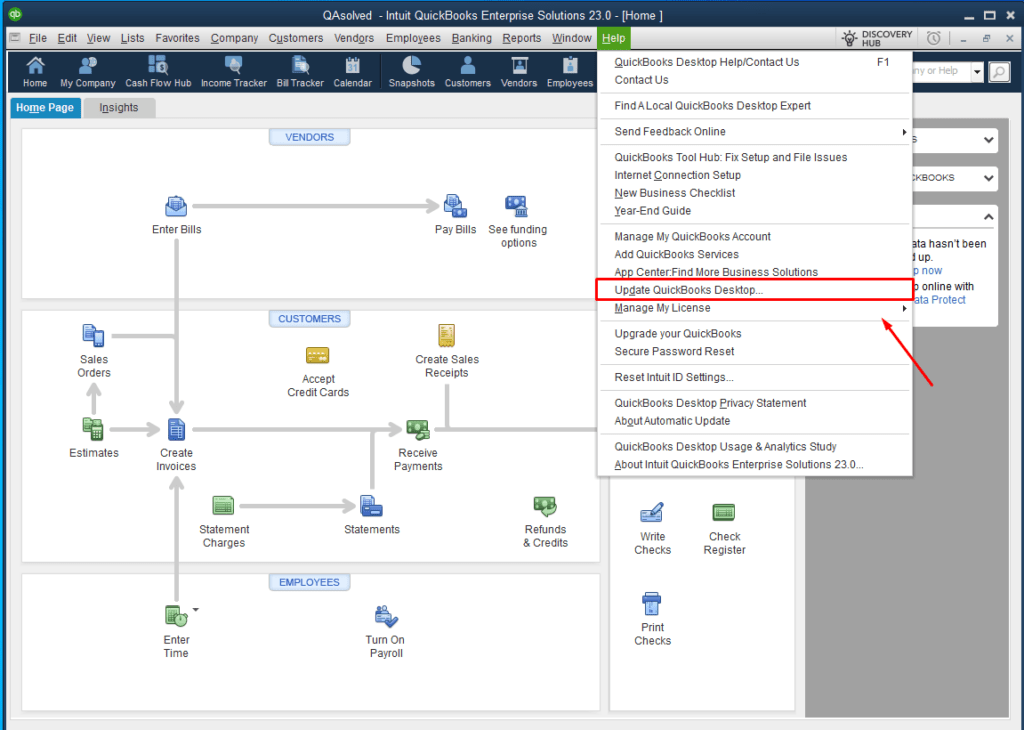
| Important: Ensure QuickBooks is updated. Press F2( or Ctrl+1) in QuickBooks to access the Product Information window in QuickBooks.Next, verify your existing version and release. For optimal results, ensure you use QuickBooks versions and releases that meet the following criteria or are newer: 2019 R17, 2020 R15, 2021 R10, and 2022 R5. |
1. Update QuickBooks Desktop to the latest version.
2. Next, verify your company file isn’t too large to export.
- To convert to QuickBooks Online, your total targets must be under 750,000. Press Ctrl+1 to check. If the total exceeds this number, you can either import lists and balances into QBO or begin with a fresh start.
3. Before proceeding with your move, print a copy of your Sales Tax Liability report. This report will be necessary for entering adjustment entries following the transition.
- Access the Reports section.
- Pick “Vendors & Payables”, and then choose “ Sales Tax Liability.”
- In the Dates dropdown menu ▼, choose “ All”.
- From the Print dropdown menu, choose “Save as PDF.“
- Pick the folder where you want to save the file, give it a name, and click “Save.”
4. If you utilize QuickBooks Desktop Payroll, follow these steps:
- Terminate or deactivate any employees who are no longer employed and haven’t received payments in the current year.
- Wait for 2-3 days after running payroll before moving your data. This ensures that all paycheck information transfers to QuickBooks Online. Also, don’t forget to move your data before your next scheduled payroll.
Also Read:- QuickBooks Online vs QuickBooks Desktop
Step 2: Move your QuickBooks Desktop File to QuickBooks Online
For QuickBooks versions 2020 or older, an online tool is available to facilitate the transfer of your data to QuickBooks Online.
| You can Utilize the Online Tool if: |
|---|
| 1. If you have QuickBooks Pro, Premier, Enterprise, or QuickBooks Desktop for Mac files. This tool can transfer data from various QuickBooks file formats, such as QuickBooks company files (.QBW), portable files (.QBM), backup files (.QBB), and QuickBooks Desktop for Mac files, provided you have saved a backup for Windows in the .qbb format. 2. If you’re an accountant without QuickBooks Desktop and you want to help your client transition to QuickBooks Online, you can use our tool even if you don’t have QuickBooks Desktop. You just need a QuickBooks Desktop file that you want to move to QuickBooks Online. 3. Your QuickBooks Desktop file should be from 2011 or later. If it’s from 2010 or earlier, follow specific steps to fix your company file before using our tool. |
To utilize the Online tool follow these steps:
Open the Online Tool
1. Choose the appropriate link for your QuickBooks version:
- QuickBooks Pro/Premier
- QuickBooks Enterprise
- QuickBooks for Mac:
If you’re using QuickBooks for Mac, ensure you convert your file to QuickBooks for Windows before proceeding with the tool.
2. Then, select “Get Started” and sign in with your Intuit Account.
Upload your Company File
1. Choose “Select File” and locate your QuickBooks Desktop file.
Note: You can only upload one file at a time.
2. Once found, click “Open” to upload.
- Alternatively, drag and drop your QuickBooks Desktop file to upload it.
3. After you upload your file, we will automatically update it to the latest version of QuickBooks Desktop. Then, we will present you with the option to transition to QuickBooks Online.
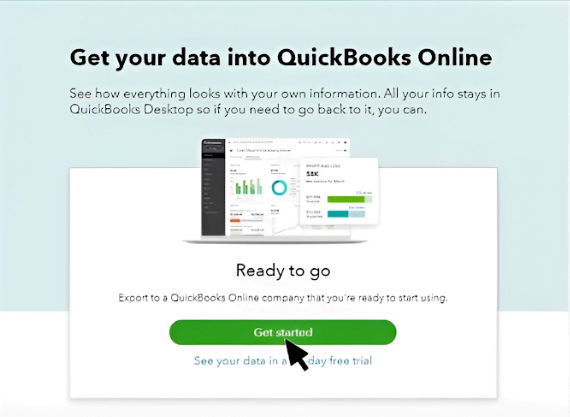
4. Next, you’ll encounter an option to transition to QuickBooks Online.
5. If you wish to move to QuickBooks Online, simply follow the on-screen instructions.
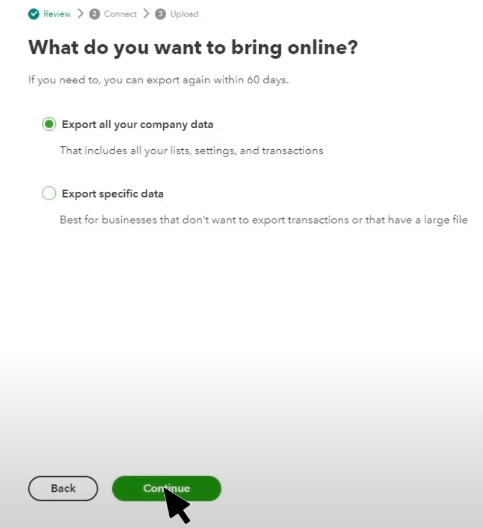
6. Next, you
will get the QuickBooks Online login option.
QuickBooks Desktop Pro and Premier:
1. Log in as an admin.
2. Opt for the Company and choose Export Your Company File to QuickBooks Online.
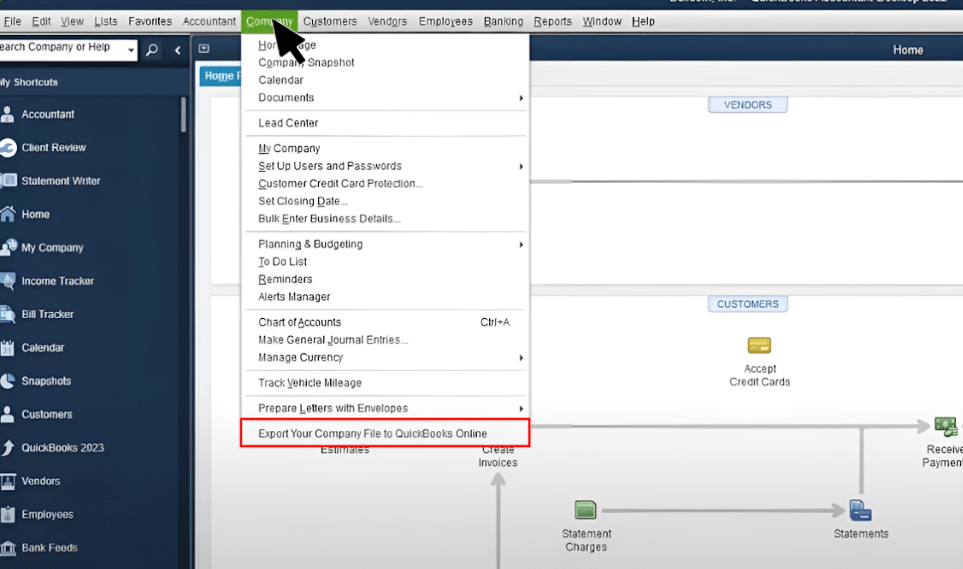
3. Click on Get Started.
4. Log in as an admin to your QuickBooks Online account.
5. Choose “Select Online Company” and determine the company you wish to replace with your company file.
6. Next, select Continue.
7. Track inventory in QuickBooks Desktop:
- Choose “Yes” to migrate them over, then specify the as-of-date.
Note: Start your inventory from the first day after your last tax filing period.
- Select “No” if you prefer to set up new items later in QuickBooks Online.
8. In the text field, type Agree and next choose Replace.
9. Click Yes to proceed with replacing the data, then opt for Replace.
to resolve your query in no-time.
QuickBooks Desktop Enterprise:
Note: It’s advisable to begin from the start, especially if you utilize advanced features such as advanced reporting and inventory.
1. Sign in as an admin to your desktop company file.
2. Press Ctrl + 1 to open the Product Information window.
3. Press Ctrl + B + Q, then click OK to open the export window, and then select Get Started.
4. Sign in as an admin to your QuickBooks Online company.
5. Choose your online company and continue.
6. If you track inventory:
- Select Yes and specify the as-of-date.
Note: Use the first day after your last tax filing period as your inventory start date.
- Select No if you want to set up new items later in QuickBooks Online.
7. Type “Agree” in the text field, then choose Replace.
8. Finally, confirm Yes, go ahead and replace the data, and choose Replace.
QuickBooks Desktop for Mac:
Note: You can only transfer QuickBooks Desktop for Mac files only to the US version of QuickBooks Online. Furthermore, if your file contains more than 35,000 targets, you’ll need to condense it before transferring.
If you use QuickBooks Desktop Version 2020 and Later:
- Login to your QuickBooks Desktop file as the admin.
- Choose File, Export, and then To QuickBooks Online. ( Utilize the keyboard shortcut: Shift+ Command+ D)
- Opt for “Get started”.
- Choose Export all your company file data or Export specific data.
- If you utilize inventory you have the option to whether you wish to move inventory or not.
- If you’re an existing QuickBooks Online user, pick “Yes, sign me in,” and provide your login details. For new users, select “No, I need to create a new one,” and proceed to set up a new account.
- Next, choose the QuickBooks Online company where you intend to transfer your data and click “Continue.”
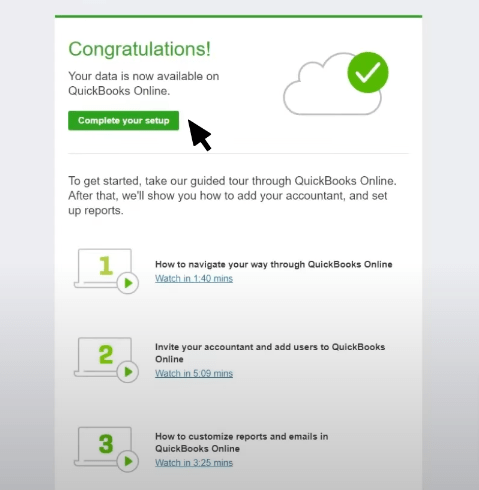
Your data migration process has been initiated. Note that your QuickBooks Desktop data will replace any existing information in QuickBooks Online.
After you Transfer your Data to QuickBooks Online:
| You will receive an email confirmation once the transfer is complete. Please note that confirmation may take up to 12 hours. |
If you use QuickBooks Desktop Version 2019 or Older:
- Transfer your QuickBooks Mac file to QuickBooks Desktop for Windows.
- Utilize the Online migration tool to transfer your file to QuickBooks Online.
Note: If your company data exceeds 350,000 targets, you must condense your file.
After you Transfer your Data to QuickBooks Online:
- Expect an email confirmation once the process is completed.
- Confirmation may take up to 24 hours.
Step 3: Get Ready to Use QuickBooks Online
Note: If you track sales tax, ensure to set up location-based sales tax in QuickBooks.
- Keep track of your bills.
- If you use payroll, set up and run payroll in QuickBooks Online.
Note: You’ll need to sign in to QuickBooks Online to access this information.
- Finally, you can begin using QuickBooks Online.
Different Words in QuickBooks Desktop and QuickBooks Online
QuickBooks Desktop and QuickBooks Online use the following different terms:
Note: QuickBooks Desktop has some features that are unavailable in QuickBooks Online.
| QuickBooks Desktop | QuickBooks Online |
|---|---|
| Bank Feeds | Online Banking / Bank Transactions |
| Documents /Doc Center | Attachments |
| Scheduled Payroll | Run Payroll |
| Unscheduled Payroll | Run Payroll Bonus Only |
| Payment Reminders | Reminders / Automatic invoice reminders |
| Income Tracker | All Sales |
| Bill Tracker | Vendors window |
| Upload & Review Bills | Receipts |
| Schedule Online Payment | Online Bill Pay |
| Forecast | Budgets |
| Budgets | Budgets |
| Reconcile | Reconcile |
| Inventory Parts | Inventory |
| Non-inventory Parts | Non-inventory |
| Assemblies | Bundles (Products & Services) |
| Groups | Bundles (Products & Services) |
| Other Charges | Unavailable in QuickBooks Online |
| Subtotals | Subtotal |
| Discounts | Unavailable in QuickBooks Online |
| Payments | Payments |
| Services | Services |
| Jobs | Sub-customersProjects |
| Items | Products and services |
| Memorized transactions | Recurring transactions |
| Leads | Unavailable in QuickBooks Online |
| Price Levels | Unavailable in QuickBooks Online |
| Billing Rate Levels | Unavailable in QuickBooks Online |
| Other Names | Unavailable in QuickBooks Online |
| Vendors | Vendors (for all Vendors)Contractors (for Vendors tracked for 1099) |
| Fixed Asset Items | Available in QuickBooks Online Advanced |
| Sales Reps(Customer & Vendor Profile Lists) | Unavailable in QuickBooks Online |
| Vendor Types(Customer & Vendor Profile Lists) | Unavailable in QuickBooks Online |
| Job Types(Customer & Vendor Profile Lists) | Unavailable in QuickBooks Online |
| Customer Messages(Customer & Vendor Profile Lists) | Unavailable in QuickBooks Online |
| Ship Via(Customer & Vendor Profile Lists) | Unavailable in QuickBooks Online |
| Vehicles(Customer & Vendor Profile Lists) | Manage vehicles |
| Templates | Custom Form Styles |
| Add/Edit Multiple List Entries | Unavailable in QuickBooks Online |
| Customers | Customers |
| Employees | Employees |
| Classes | Classes (and Locations) |
| Chart of Accounts | Chart of Accounts |
| Customer Types(Customer & Vendor Profile Lists) | Customer Types |
| Terms(Customer & Vendor Profile Lists) | Terms |
| Payment Methods(Customer & Vendor Profile Lists) | Payment Methods |
| Memorized reports | Custom reports |
| Scheduled reports | Custom reports |
| Commented reports | Unavailable in QuickBooks Online |
| Custom reports | Custom reports (QuickBooks Online Advanced) |
| Company Snapshot | Business Snapshot |
| Job & Item Estimates vs Actuals | Unavailable in QuickBooks Online |
| Bills | ExpensesBillsVendor Credits |
| Credit Card Charges | ExpensesCredit Card Credits |
| Item Receipts | ExpensesBills |
| Sales Orders | Unavailable in QuickBooks Online |
| Credit Memos | Credit MemosRefund ReceiptsDelayed Credits |
| Batch Invoices | Batch transactions (QuickBooks Online Advanced) |
| Receipt Management | Receipts |
| Adjust Quantity/Value on Hand | Inventory Quantity Adjustment |
| Make General Journal Entries | Journal Entries |
| Make Deposits | Bank Deposits |
| Transfer Funds | Transfer |
| Enter Statement Charges | Unavailable in QuickBooks Online |
| Statements | Statements |
| Estimates | Estimates |
| Invoices | Invoices |
| Receive Payments | Receive Payments |
| Sales Receipts | Sales Receipts |
| Checks | Checks |
| Purchase Orders | Purchase Orders |
| Pay Bills | Pay Bills |
| Undeposited Funds | Undeposited FundsPayments to deposit |
| Use Register(For Banks/Accounts) | View Register |
| Edit, then Preferences | Settings ⚙, then Account and Settings. Settings ⚙, then Payroll settings |
| My Company | Settings ⚙, then Account and settings |
| Weekly Timesheet | Time Entries (if the Time tab is available)Weekly Timesheet (if the Time tab isn’t available) |
| Time / Enter Single Activity | Time Entries (if Time tab is available)Single Time Activity (if Time tab isn’t available) |
| Calendar | Unavailable in QuickBooks Online |
| Set Up Users | Manage Users |
| To Do List | Tasks (QuickBooks Online Advanced) |
| Reminders | Unavailable in QuickBooks Online |
| Letters | Unavailable in QuickBooks Online |
| Customer Groups | Unavailable in QuickBooks Online |
| Payroll Item List | Edit Pay Items |
| Desktop Payroll Reports: • Payroll Details report • Tax Liability report • Direct Deposit report • Workers Comp report • Sick and Vacation report | Online Payroll Reports: • Payroll Summary report • Liability Balance report • Employee Direct Deposit Listing • Workers Comp report • Sick and Vacation History report |
Features That Transfer and Those That Don’t Transition to QuickBooks Online
| Moves to QuickBooks Online | Doesn’t Move to QuickBooks Online |
|---|---|
| X | Attachments/Document Center docs Attachments aren’t included in a QuickBooks company file or backed up with it. You’ll have to manually attach your documents in QuickBooks Online after transferring your data. |
| Budgets Only Profit and Loss budget types are supported in QuickBooks Online Plus or Advanced. | Budgets Data migrates, but budget information isn’t replicated in QuickBooks Online due to mapping disparities. |
| Inventory 1. Inventory is available only in QuickBooks Online Plus and Advanced. 2. It’s imported using the First-In, First-Out (FIFO) method. 3. You’ll need to set a FIFO start date. 4. QuickBooks Online recalculates inventory based on the FIFO start date. 5. The recalculated inventory and adjustments are then imported into QuickBooks Online. Note: If using QuickBooks Desktop Mac, inventory items are migrated as non-inventory items in QuickBooks Online. To migrate them as inventory items, convert your QuickBooks for Mac file to QuickBooks for Windows before using the migration tool. | Inventory QuickBooks Online lacks support for units of measure for inventory items. |
| Multi-Currency 1. Multi-Currency is exclusive to QuickBooks Online Plus and Advanced. 2. Your Multi-Currency preferences will transfer to QuickBooks Online. | Multi-Currency Transactions with three different currency types will not transfer to QuickBooks Online. |
| Online Banking 1. Banking rules are transferred for both Express and Advanced modes. 2. Auto-recognized rules are also transferred for both Express and Advanced modes. | Online Banking Bank Feeds setup does not transfer to QuickBooks Online. |
| Payroll 1. Paychecks are moved as regular checks for accurate financial reporting. 2. QuickBooks Online copies current year paycheck data as lump sums. 3. Liability refunds, adjustments, and opening balance transactions become journal entries. 4. All employees (active and inactive) transfer to QuickBooks Online. 5. Some addresses may need fixing; non-supported state addresses (e.g., PR, AS, VI) stay blank. 6. Essential employee details like date of birth, gender, and SSN are included. 7. Company direct deposit details and employee bank information are migrated. | Payroll 1. Past years’ payroll history is not transferred. 2. After setting up payroll in QuickBooks Online, you can generate paychecks. 3. Transaction details like payroll item breakdown and previous year’s employee year-to-date numbers do not convert. 4. You must input physical addresses for all work locations. 5. Employee schedules, wages, and year-to-date balances and information need to be set up separately. |
| QuickBooks Payments 1. Payments account automatically transfers from QuickBooks Desktop (Payments only, no payroll). Note: To ensure a successful migration, ensure admin user status on both QuickBooks Desktop and QuickBooks Online Intuit accounts. | X |
| X | Price Levels |
| Sales Tax Sales tax won’t transfer for all transactions; some taxes will be copied as journal entries. | X |
| X | Write Letters |
| X | Mileage Tracking You must manually input previous mileage into QuickBooks Online. |
Migrate Files to QuickBooks Online with the Accountant Batch Migration Tool
| You can Use this Tool if: |
|---|
| 1. You have QuickBooks Desktop Accountant versions 2021-2024. 2. QuickBooks Desktop Pro, Premier, or QuickBooks Desktop for Mac files are compatible, but QuickBooks Enterprise files are not supported. 3. Your client’s payroll has up to 50 employees. 4. Files have up to 750,000 targets, 5 GB or smaller, and are locally stored. 5. Migrating with existing QuickBooks Payroll data requires a local QuickBooks Desktop Accountant. Migrations with hosted versions may not always succeed. Note: You might receive notifications suggesting otherwise. 6. QuickBooks Online companies you’ll move files into shouldn’t have existing payroll data; contact support if they do. |
Steps to Migrate Files to QuickBooks Online using Accountant Batch Migration Tool
Here are the steps to move files to QBO using the Accountant Batch Migration Tool:
Step 1: Verify that your client’s files are ready to move to QuickBooks Online
- Update QuickBooks to the latest version.
- Sign in as the Primary admin (All access) to your client’s file.
- Review the pre-migration checklist to confirm the company file is ready for transfer to QuickBooks Online.
- If the company file has attached services like payments, confirm your QuickBooks Online account admin has admin access on the QuickBooks Desktop Intuit Account.
Step 2: Transform your Desktop Company File to a QuickBooks Migration (.QM) file
Note: You have 60 days, starting from the creation of your QuickBooks Online account, to complete the transfer of your data.
To proceed follow these steps:
- Log in to your client’s file as the company file admin (all access).
- Access the Company menu.
- Choose “Migrate multiple company files to QuickBooks Online.”
- If the company file lacks an owner email address, you’ll need to input it when prompted.
- Follow the instructions outlined in “Migrate multiple company files.”
- Opt for “Save as QM file” and select the desktop location to save the file.
- Click on “Save.”
- Once saved, you can repeat the process for each company file, signing in as the company file admin each time.
- After saving all .QM files, access the “Open Batch Migration Tool.” This tool will launch in an external browser to initiate the migration process.
Step 3: Move your QuickBooks Desktop File to QuickBooks Online
Note: To proceed, every Desktop file must match an online company file. If your QM file can’t find a match, you can manually link it. If your QuickBooks Online company already has account data, you’ll need to authorize its replacement.
- Open the Accountant Batch Migration Tool and make sure you meet all requirements.
- Sign in as an admin to your QuickBooks Online Accountant account.
Note: You need to sign in as the Admin to your QuickBooks Online Accountant account to move your QuickBooks desktop files. If you don’t have Admin access, you’ll be asked to sign in as the admin or create a new QuickBooks Online Accountant account.
- Upload your saved .QM file to the tool. You can upload one or multiple files simultaneously. Files that aren’t .QM files (.QBW, .QBB) won’t upload.
- Once you successfully upload all .QM files, you can move them to QuickBooks Online.
- In the mapping screen, all uploaded QM files will automatically match with QuickBooks Online companies based on the company name. The mapped company file will display the name and last 4 digits of the company ID.
- Select “Migrate” to begin the migration process for all mapped company files. A migration status email will be sent to you and the primary admin of each company file.
Step 4: Get Ready to Use QuickBooks Online
- Check your email for migration status updates for each migrated company file.
- Review and confirm that all relevant data has been successfully migrated.
Benefits of Converting QuickBooks Desktop to QuickBooks Online
Converting QuickBooks Desktop to QuickBooks Online (QBO) offers several benefits:
1. Accessibility: QuickBooks Online allows you to access your financial data from anywhere with an internet connection.
2. Collaboration: QBO enables multiple users to work on the same file simultaneously, facilitating seamless collaboration among team members and accountants.
3. Automatic Updates: With QBO, it automatically applies updates and new features, ensuring that you always have access to the latest version without manual installation.
4. Integration: QuickBooks Online seamlessly integrates with various third-party applications, expanding its functionality.
5. Security: QBO provides robust security measures to protect your financial data, including encryption, multi-factor authentication, and regular data backups.
6. Scalability: As your business grows, QuickBooks Online offers scalable solutions to accommodate your evolving needs without the hassle of migrating to a new platform.
7. Mobile Access: QBO’s mobile app allows you to manage your finances on the go, providing real-time insights and the ability to perform essential tasks from your smartphone or tablet.
Conclusion
In conclusion, migrating files from QuickBooks Desktop to QuickBooks Online is a strategic move that brings numerous advantages to businesses seeking enhanced accessibility, collaboration, and better management of finances. With the convenience of cloud-based access, real-time updates, and the flexibility to work from anywhere, QuickBooks Online offers a modern solution for businesses of all sizes. Making this switch improves the efficiency and adaptability of managing your finances. To make the switch today, contact our QBO Support at our toll-free number: +1-855-875-1223, for immediate assistance.
Frequently Asked Questions
Yes, you can switch from QuickBooks Desktop to QuickBooks Online. The transfer from QuickBooks Desktop to QuickBooks Online will move your data, but not all of it will copy seamlessly.
The duration required to transfer your data to QuickBooks Online varies depending on the size of your company file. The migration process can take up to 72 hours depending on the amount of data to transfer.
Remote access: QuickBooks Online allows for remote access, unlike Desktop, which may need remote desktop software. Additionally, QuickBooks Online is cloud-based, unlike Desktop. Integration: QuickBooks Online provides better integration options than Desktop, offering broad compatibility with third-party apps.
Here’s how to import your file:
1. Sign in to QuickBooks Online.
2. Select Settings ⚙, then select Import Data.
3. Select Products and Services.
4. Select Create products with variants or Create single products, depending on what kind of products you offer.
5. Here, you can manually enter your product data, or copy and paste from your spreadsheet. To import, select Import CSV.
6. Select Next.
7. Map your information. CSV column headers represent the headers on your spreadsheet. From each dropdown ▼ menu, select the one that matches a field in QuickBooks Online.
Note: Make sure you select the correct date format.
1. Select Next.
2. If you see the correct red, this means the cell is invalid. Read the error message and correct it. Or, you can edit your CSV file and upload it again.
3. (Optional) Select Check this box to overwrite details of existing items in your account to replace details of existing items in your account. Make sure everything looks correct because this can’t be undone.
4. Select Save.
Step 1: On the Old Computer
1. From QuickBooks, go to the File menu, select Utilities, and then select Move QuickBooks to another computer.
2. Select I’m Ready, then create a one-time password.
3. Follow the instructions to choose the USB flash drive you’ll use. Then wait for the files to be copied.
Step 2: On the New Computer
1. Insert the USB flash drive. Due to Windows security restrictions, the Migrator Tool won’t automatically open.
2. Open the flash drive to view its files and double-click the file Move_QuickBooks.bat to start the migrator.
3. Enter the password you created, then select Let’s Go.
4. Wait for the Migrator Tool to finish. Note: This will depend on the speed of your computer and internet, and the size of your company file(s).
Note: If the migrator doesn’t open after selecting and running the file, you may need to update your version of Windows 10.
Generate a Profit and Loss report or a Balance Sheet report in both QuickBooks Online and QuickBooks Desktop, then proceed to compare the two.
No, QuickBooks Online operates independently from QuickBooks Desktop.
To begin the process in QuickBooks Desktop, log in as an administrator to the company file you wish to import. Navigate to the Company menu, then choose Export Company File to QuickBooks Online. Select Get Started, then click Select Destination. Sign in to your QuickBooks Online account to proceed.

