
Converting data between different QuickBooks formats can sometimes be tricky, especially when you need to convert a QBXML file to a QBW file for direct use in QuickBooks Desktop. While both file types are associated with QuickBooks, they have very different purposes. QBXML (QuickBooks Extensible Markup Language) is a structured data format used for exchanging information between QuickBooks and external applications. It’s often generated during data export processes or when integrating with third-party tools. In contrast, QBW (QuickBooks Company File) is the main working file format that stores all of your company’s financial data, preferences, and settings.
If you’ve received a QBXML file and need to access or use the information directly within QuickBooks, you’ll need to convert it into a QBW file. This process isn’t as straightforward as renaming the file extension because it involves properly importing the QBXML data into QuickBooks to create or update a functional company file. Done incorrectly, the conversion could lead to missing data, formatting issues, or even file corruption.
In this blog, we’ll walk you through the step-by-step process of converting QBXML to QBW and share best practices to ensure a smooth transition. Whether you’re restoring old records, switching systems, or syncing information from another platform, understanding this process will help you avoid errors and keep your financial data accurate and intact. So, let’s begin with it.
What is the Meaning of QBXML File?
QBXML stands for QuickBooks Extensible Markup Language. It is a specialized XML-based format developed by Intuit to facilitate communication between QuickBooks and external applications. QBXML files store structured data, such as customer information, invoices, transactions, and reports, in a way that can be easily read and processed by both QuickBooks and compatible third-party software.
Unlike a QuickBooks working file (QBW), which contains all the company’s financial data in a proprietary format, a QBXML file is primarily used for data exchange. It acts as an intermediary when:
- Importing or exporting data between QuickBooks and another program.
- Transferring specific records (like customer lists or sales transactions) without sharing the entire company file.
- Integrating QuickBooks with e-commerce platforms, CRM systems, or other business tools.
Because it’s text-based and follows a standardized structure, QBXML is easy for software systems to parse, making it ideal for automation and integration tasks. However, it isn’t directly usable as a working QuickBooks file, you need to import it into QuickBooks to convert the data into a functional QBW company file.
What is the Meaning of QBW File?
A QBW file is the primary company file format used by QuickBooks Desktop to store all of a business’s financial data. When you create a new company in QuickBooks, the software generates a QBW file to hold essential information such as:
- Chart of accounts
- Customer, vendor, and employee details
- Invoices, bills, and payments
- Payroll records
- Company preferences and settings
Essentially, the QBW file is your working QuickBooks file, containing both your accounting transactions and the structural data needed to operate your company’s books. It’s a proprietary file format, meaning it can only be opened and edited using QuickBooks Desktop or compatible Intuit tools.
Unlike QBXML; which is used for data exchange between QuickBooks and other applications, a QBW file is fully interactive. You can run reports, process transactions, and manage all aspects of your accounting directly within it. Now, let’s understand why users convert their QBXML to QBW.
Why Do QuickBooks Users Convert QBXML Files to QBW Format?
There are several scenarios where QuickBooks users find it necessary to convert their QBXML to QBW. A QBXML file, while great for data exchange, cannot be used as a fully functional company file within QuickBooks Desktop. To perform day-to-day accounting tasks, like creating invoices, running payroll, or generating reports, you need a QBW file.
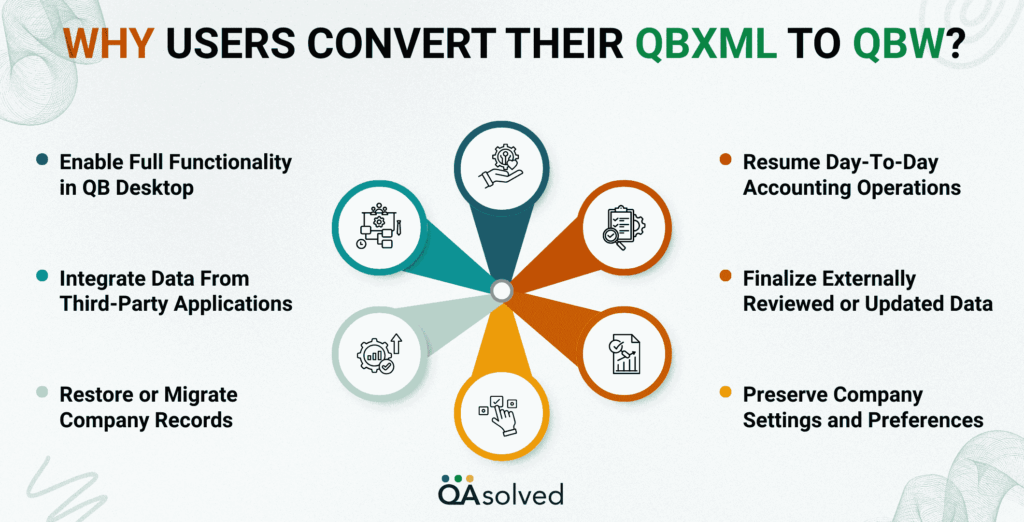
Here are the reasons that lead users to convert their QBXML File to QBW File.
1. Enable Full Functionality in QB Desktop
QBXML files are only designed for data transfer and cannot be used for transactions, reporting, or company management until they are converted into a QBW file.
2. Integrate Data From Third-Party Applications
Many external tools export data in QBXML format. Converting it to QBW ensures the information becomes part of an active QuickBooks company file.
3. Restore or Migrate Company Records
When transferring data between systems or restoring old backups, users often receive files in QBXML format that must be converted to QBW for ongoing use.
4. Resume Day-To-Day Accounting Operations
Tasks like generating invoices, running payroll, and managing expenses require a QBW file format.
5. Finalize Externally Reviewed or Updated Data
Accountants and bookkeepers may request QBXML files for compatibility, edit them externally, and then convert them back to QBW for continued use by the business.
6. Preserve Company Settings and Preferences
The conversion process ensures that important configurations, customizations, and financial data remain intact in the QuickBooks environment.
These are the common reasons that lead users to convert their QBXML to QBW.
What are the Steps to Convert QBXML to QBW?
Converting a QBXML file to a QBW file generally involves importing the data into QuickBooks Desktop and saving it as a new company file. The process may vary slightly depending on your QuickBooks version but follows the same basic steps. Let’s discuss this in detail.
Steps to Prepare QuickBooks Online Data for Export
Here are the steps to prepare the QuickBooks Online Data for export:
- Access your QuickBooks Online company by logging into your account.
- Click the Gear icon and select Export Data. A pop-up will appear asking for the reason for your data conversion. You can either provide an answer or skip this step.
- Review the Export Overview carefully to understand the process, then click Get Started.
- In the Prepare to Export window, follow the prompt to install ActiveX Control.
- Once the installation is confirmed on-screen, proceed with the export process by clicking through the prompts.
- Navigate to the specific data you wish to export and select it.
- On the Data Page, review your data and check how it will appear after conversion. When ready, click to proceed.
- Enter your contact information when prompted, then click Continue.
- Within approximately 2 to 120 minutes, you will receive a confirmation email indicating that your data has been compiled and is ready for export.
So, these are the nine steps that can help you to successfully prepare QuickBooks Online data for export. Now, let’s see how we can export or convert the same data.
Steps to Export Data from QuickBooks Online
Follow the eleven crucial steps to export your data from QuickBooks Online:
- From the Home page of your QuickBooks Online company, click the Gear icon and choose Export Data from the menu.
- Click Get Started to begin.
- If you’ve already completed the earlier steps on this computer, ActiveX Controls should already be installed. If you’re using a different computer, install ActiveX Controls before continuing. If the same computer is being used, you can skip this installation step.
- Locate the data you wish to export, select it, and proceed.
- On the Exporting from QuickBooks Online page, click Continue to Download.
- Ensure that the QuickBooks Desktop version you are exporting to is open at the No Company Open screen. If a company file is open, close it before moving forward.
- Continue with the prompts to proceed.
- In the save dialog window, choose a location for the export_company file and confirm.
- Once the file has been downloaded, click Convert Now.
- In the pop-up window, enter the desired name for your new file and choose a local directory to save it.
- After the export process is complete, click to finish.
So, these are the crucial steps that can help a user to prepare, convert, and export data easily. Now, let’s take a look at how you can import the QBXML File into QuickBooks Desktop.
Also Read: How to Fix QuickBooks Unable To Export To Excel Error?
How to Import the QBXML File into QuickBooks Desktop?
Working with a QBXML file becomes straightforward once you understand how its import process works. Below are a few important points to remember when importing a QBXML file into QuickBooks Desktop:
- A QBXML file can be used to transfer account details, custom settings, and forms from QuickBooks Online to QuickBooks Desktop. This makes it an ideal choice for moving various types of data that are not transactions or list items.
- Importing new data through a QBXML file will overwrite existing information—particularly user preferences and company settings—in QuickBooks Desktop.
- Always create a backup of your company file before importing preferences or custom forms via QBXML to avoid accidental data loss.
Hence, creating a backup of your QuickBooks Desktop file lets you restore a previous version of your company file, including all accounting data and user preferences. To back up your QuickBooks Desktop company file, follow these steps:
- From the File menu, select Switch to Single User Mode.
- Open the File menu again and choose Back Up Company.
- Select Create Local Backup.
- Choose Local Backup, then click Next.
- Click Browse and select the location where you want to save the backup file.
- If setting up automatic backups, specify the number of backups to keep. For the Online Backup option, sign in to your Intuit account.
- Select Complete Verification so QuickBooks can analyze and confirm the backup file is saved correctly.
- Click OK when you’re ready to create the backup.
- Choose Save it Now and Schedule Future Backups to create a backup immediately and set up automatic backups, or Only Schedule Future Backups if you want to schedule backups without creating one right now.
Creating regular backups of your QuickBooks Desktop company file is essential for protecting your financial data and preferences.
Steps to Import Data into QuickBooks Desktop
Here are the three easy steps that can help you import data into QuickBooks Desktop easily:
- Install the CData Cmdlets for QuickBooks on the computer where your QBXML file is stored. This will allow you to import the QBXML data into QuickBooks Desktop.
- Install the Remote Connector on the system hosting QuickBooks Desktop. The Remote Connector is bundled with the Cmdlets installer, so you can set it up during the installation process.
- After completing the installations, follow the online instructions to successfully import your QBXML file into QuickBooks Desktop.
However, keep in mind that this process requires a certain level of expertise. If you encounter difficulties or are unable to complete it on your own, it’s best to seek assistance from a qualified professional.
Conclusion
Converting a QBXML file to a QBW file may seem technical at first, but with the right steps and precautions, the process can be smooth and risk-free. Understanding the difference between these two file formats is essential, QBXML is designed for data exchange, while QBW is your working QuickBooks Desktop company file. Whether you are migrating from QuickBooks Online, integrating data from third-party software, or restoring archived information, proper conversion ensures your financial records remain accurate and usable.
Always remember to back up your QuickBooks Desktop file before starting the conversion. This precaution safeguards your data, allowing you to restore a previous version if anything goes wrong. By following the outlined steps carefully, verifying your data, and maintaining a backup routine, you can confidently complete the conversion without disrupting your accounting operations.
Frequently Asked Questions
If you need to convert an accountant’s copy into a regular QuickBooks company file (QBW), follow these steps:
1. Open your accountant’s copy file (QBX or similar format) in QuickBooks.
2. Go to the File menu.
3. Select Convert Accountant’s Copy to Company File/QBW.
4. Click OK to confirm that you want to convert the file.
5. Choose the folder where you want to save the new QBW file.
6. Once the conversion is complete, click OK to finish.
This process creates a standard QuickBooks Desktop company file from your accountant’s copy, making it fully editable and ready for regular use.
Yes. Intuit, the developer of QuickBooks, provides a dedicated conversion tool that allows users to transfer their company files from other accounting software into QuickBooks. This tool supports conversions from a variety of programs, making it easier to migrate your financial data without starting from scratch. It ensures that essential company information, such as accounts, transactions, and lists, is carried over accurately into QuickBooks.
A QBW file is the standard company file format used by QuickBooks Desktop, saved with the .qbw extension. It contains your complete company data, including account information, transactions, and settings. For example, if your company is named MyBusiness, QuickBooks will save the file as MyBusiness.qbw.
By default, QuickBooks Desktop stores QBW company files in the following location on your computer:
C:\Users\Public\Public Documents\Intuit\QuickBooks\Company Files
You can use File Explorer to navigate to this folder and view your files. Details such as file name, date, timestamp, and size can help you identify the most recent version of your company file.
