
The QuickBooks Install Diagnostic Tool (QBInstall) is a specialized utility developed by Intuit to diagnose and fix issues that occur during the installation of QuickBooks Desktop. If you experience installation errors while setting up QuickBooks, this tool can help identify and repair the underlying problems automatically.
In this guide, you will learn how to download, install, and use the QuickBooks Install Diagnostic Tool. QuickBooks Desktop relies on several Microsoft components to run properly. If any of these components are missing, damaged, or malfunctioning, it can cause installation failures or runtime errors.
What is the QuickBooks Install Diagnostic Tool?
The QuickBooks Install Diagnostic Tool is designed to identify and repair problems related to Microsoft components required by QuickBooks, such as:
- Microsoft .NET Framework
- Microsoft MSXML
- Microsoft Visual C++ Components
If these components become corrupted or unstable, QuickBooks may fail to install or may generate various system errors. Running the QB Install Diagnostic Tool automatically scans your system and repairs many of these issues.
Common QuickBooks Desktop Installation Errors
The following errors may occur if your operating system is damaged or if any core Microsoft components used by QuickBooks are unstable or malfunctioning. Use the QB Install Diagnostic Tool to fix a wide range of installation-related errors, including:
- QuickBooks Error 1603
- QuickBooks Error 1935
- QuickBooks Error 1904
- QuickBooks Error 1402
- QuickBooks Error 1903
- QuickBooks Error 1712
- ABS PDF Driver Errors
- QuickBooks Error 15106
- QuickBooks Error 1334
- QuickBooks Error 1722
- QuickBooks Error 12031
- QuickBooks Has Stopped Working
- QuickBooks Unrecoverable Errors
- Errors Related to Damaged Microsoft .NET Framework
- Errors Related to Damaged MSXML and C++
Benefits of Using the QuickBooks Install Diagnostic Tool
When you install this tool, it will automatically resolve installation issues with minimal human intervention. The benefits of using this tool include:
- Efficient issue resolution.
- Automatic error detection.
- Minimal need for manual intervention to fix various errors.
System Requirements for Tool Installation
The QuickBooks Install Diagnostic Tool works alongside the QuickBooks Tool Hub. Before installing it, ensure your system meets the following requirements:
- Stable internet connection for downloading updates
- A supported Windows operating system
- Microsoft .NET Framework installed
- Microsoft Visual C++ Redistributable packages installed
How to Download and Install the QuickBooks Install Diagnostic Tool?
Follow these steps to download and install the QB Install Diagnostic Tool:
Steps to Download the Tool
- Visit the official Intuit website and download the QuickBooks Desktop Install Diagnostic Tool.
- After a successful download, save the setup file in a location that is easy to find, preferably on your desktop.
Steps to Install the Tool
- Locate the saved setup file and open it.
- Select the QuickBooks Install Diagnostic Tool .exe file and click ‘Run.’
- A dialogue box with the license agreement will appear. Click ‘Yes’ to agree.
- The QuickBooks Desktop Install Diagnostic Tool is now installed.
- Restart your computer and open the recently installed diagnostic tool to verify the status of all major components.
Steps for Utilizing the QuickBooks Install Diagnostic Tool
The QB Install Diagnostic Tool can be employed effortlessly by following the steps outlined below. These steps are effective in addressing common issues such as network problems and data file errors. Let’s explore these steps:
Step 1: Assessing General Compatibility Using the Connection Tab
To evaluate your system’s compatibility with QuickBooks, you can utilize the Connection Tab. This tab helps you configure a new QuickBooks company data file as well.
Step 2: Verifying Firewall Status
The QBInstall Diagnostic Tool aids in identifying firewall-related issues by providing essential information about your system’s firewall. It can also assist in resolving any problems that may arise during the QuickBooks installation.
Step 3: Examining Network Connectivity
This tool is valuable for examining the status of your system’s network connectivity. If any connectivity issues are detected, they could potentially disrupt the installation process.”
Points to Remember When Using the QuickBooks Install Diagnostic Tool
Once you have successfully installed the tool, here are some important points to ensure a smooth process:
- Close all other running programs before running the scan.
- Some errors may require a system reboot after resolution.
- If the tool reports ‘No Errors Were Detected,’ it means the tool didn’t identify the error, not that it’s resolved.
- Always close other open programs when running the utility.
- The tool can automatically detect and resolve errors, but a system reboot may still be needed.
Understanding the QuickBooks Install Diagnostic Tool Interface
The QB Desktop Install Diagnostic Tool scans specific files for diagnosis and error resolution. To comprehend the process, you must understand the scenarios where this tool is applied.
Several factors can lead to installation errors in QuickBooks, with the primary ones being:
- QuickBooks Connection Diagnostic Tool
- Connection Tab
- Firewall Settings
- Network Connectivity
The QuickBooks Install Diagnostic Tool works through a scanning process to identify and eliminate errors within these areas.
- Connection Tab: This tab scans the entire system to detect errors and assists in setting up company file data in QuickBooks.
- Firewall Settings: Firewalls can hinder new file or application installations. The tool checks the firewall’s status and diagnoses any errors.
- Network Connectivity: Low network connectivity can also cause installation errors. The diagnostic tool detects such issues during the scan.
How to Utilize the QuickBooks Install Diagnostic Tool to Address Installation Errors?
When QuickBooks users encounter installation or update errors, the QuickBooks Diagnostic Tool is often their first recourse. Here’s a straightforward guide on using the QuickBooks Install Diagnostic Tool to eliminate installation errors:
- Locate the QuickBooks Diagnostic Tool on your system.
- If you can’t find the tool, access the Search field in the Menu Bar by clicking the Start button.
- Type ‘QuickBooks’ in the search field and press Enter.
- In the Menu bar, find QuickBooks Install Diagnostic Tool, then click to open it.
- Once the tool is open, it will automatically initiate the error scanning process.
- The scanning process may take some time to identify and resolve the errors.
- After the diagnosis is complete, restart your device to ensure all essential QuickBooks components are up to date.
What to Do if the QuickBooks Install Diagnostic Tool Fails to Resolve Installation Errors?
If the QuickBooks Install Diagnostic Tool doesn’t fix the installation error, consider the following alternative methods:
1. Solution: Uninstall and Reinstall QuickBooks Desktop
- Try this as your first solution; it often resolves errors.
- Uninstalling QuickBooks Desktop removes the error, and reinstalling ensures a fresh start.
2. Solution: Update the Windows Operating System
- If the first method fails, update your Windows operating system to the latest version.
- Download updates from the official website or use the control panel to locate and install available updates.
3. Solution: Manual Troubleshooting (Fix-It Manually)
- If the error persists, manually troubleshoot the file.
- Right-click the problematic file, choose the troubleshooting option, and allow the process to scan and repair the error.
4. Solution: Selective Startup Mode
If the error remains unresolved, try starting your system in Selective Startup mode.
Begin by launching the device in Selective Startup mode.
- Open the Run command by pressing Windows+R.
- Enter ‘msconfig’ and click OK.
- In the System Configuration window, go to the General tab and select ‘Hide all Microsoft services.’
- Click ‘Disable all.’
- Uncheck ‘Hide Microsoft services’ and check ‘Windows Installer.’
- Click OK.
- Restart your device to apply the changes and return to normal configuration.
5. Solution: Manual Repair of Windows Components
- If the issue persists, you may need to manually repair Windows components, including Microsoft .Net Framework and Microsoft MSXML.
- Seek professional assistance for this method.
By following these steps and alternative solutions, you can effectively address QuickBooks installation errors and ensure smooth operation.
How to Resolve Installation Errors Using the QBInstall Diagnostic Tool?
1. Diagnose Connection Tab: This tab helps test your computer’s connectivity to set up company data files, whether configured for single-user or multi-user mode.
2. Firewall Status: This section provides instructions related to the firewall.
3. Test Your Connectivity: This area allows you to check your workstation’s connectivity. Here’s how to test your connectivity:
- Click the button next to the “Company File” field where you want to locate your company file.
- Use the Linux system only if your network setup is correct, as an alternative connection method. To use this, select the “Change the hosting server check” dialog box.
Using the QuickBooks Tool Hub to Access the QuickBooks Install Diagnostic Tool
Since the introduction of the QuickBooks Tool Hub, accessing various tools in QuickBooks has become more convenient. The same applies to the QuickBooks Install Diagnostic Tool. You can use the QuickBooks Install Diagnostic Tool via the QuickBooks Tool Hub. Here’s how:
Step 1: Download QuickBooks Tool Hub
- Close QuickBooks.
- Download the QuickBooks Tool Hub from the official Intuit website.
- Save the file on your system for easy access.
- After downloading, open the file named “QuickBooksToolHub.exe.“
- Follow the on-screen instructions to install it.
- Click “Next” to agree to the terms and conditions.
- Once the installation of QuickBooks Tool Hub is complete, open it by double-clicking on the icon.
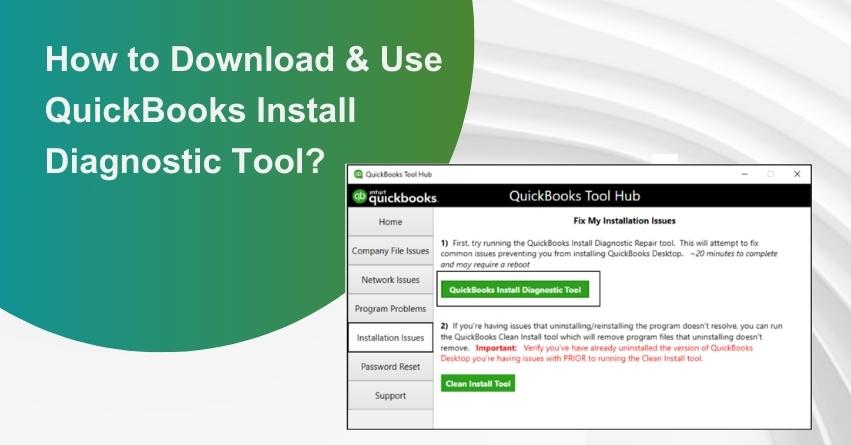
Step 2: Run QuickBooks Install Diagnostic Tool Using QB Tool Hub
- Open QuickBooks Tool Hub either from the desktop icon or by searching in the Windows search bar.
- Select “Installation Issues” from the list in QuickBooks Tool Hub.
- Choose “QuickBooks Install Diagnostic Tool.”
- Click on “QBInstall Tool.”
- Allow the tool to run; this process may take around 20 minutes or more.
After the process is complete, reboot your system.
Conclusion
If you encounter difficulties with downloading the QuickBooks Install Diagnostic Tool, face challenges when using the tool, or have any other questions, seek expert guidance from U.S.-based accounting professionals, CPAs, and industry-leading accountants. They are available through various support methods, including email, phone calls, or remote assistance.
We hope this article has provided you with valuable insights into the QB Install Diagnostic Tool and its functionalities. If installation-related problems persist or if you encounter any issues, don’t hesitate to contact the QuickBooks technical support team at +1-888-245-6075.
Frequently Asked Questions
QuickBooks Desktop users may encounter various challenges while using the software. These challenges include H-series errors, data-related issues, 6000-series errors, and more. Each problem requires a unique set of solutions. Installation problems can also occur during the software setup.
Repairing QuickBooks Desktop is made easy with the assistance of the QuickBooks Install Diagnostic Tool. This tool automatically diagnoses and rectifies errors with minimal user involvement.
QuickBooks Desktop installation errors can include issues like:
1. QuickBooks Error 1402
2. QuickBooks Error 1603
3. QuickBooks Error 1903
4. QuickBooks Error 1935
5. Microsoft .Net Framework Errors
The Install Diagnostic Tool can simplify the resolution of installation issues. The following steps can be followed:
1. Launch the QuickBooks Tool Hub.
2. Navigate to the Tool Hub and select Installation Problems.
3. Choose QuickBooks Install Diagnostic Tool and let it run.
4. After the operation is completed, restart your system.
QuickBooks Install Diagnostic Tool is a program designed to address errors that may occur during the software installation process, such as error codes 1603, 1935, 1904, and 1402. This tool is available for free download from Intuit’s official website.
After downloading the tool, install it on your system and execute it to resolve installation issues.
QuickBooks errors 1603, 1601, and 1642 may appear when attempting to update or install QuickBooks software. These errors could be caused by various factors, such as:
1. Corruption of Microsoft Windows Installer
2. Damage to QuickBooks Desktop installation
3. Corruption in Microsoft Windows installation
4. Malware or virus attacks
To address these issues related to QuickBooks installation, you can utilize the Install Diagnostic Tool. This tool is designed to resolve any problems that may arise during the installation process.
QuickBooks is a robust accounting software used for everyday accounting and bookkeeping tasks. To download and install this program, follow these steps:
1. Obtain the appropriate installation file for the product.
2. Visit the Downloads & Updates page and select your country, product, and version.
3. Click the download button to complete the process.
